Defining a Cognos Adapter Connection
Create one or more Cognos connections before TA can run your Cognos jobs. License these connections before TA can use them. A connection is created using the Connection Definition dialog.
To add a connection:
-
Navigate to Administration > Connections to display the Connections pane.
-
Right-click Connections and select Add Connection > Cognos Adapter from the context menu.
-
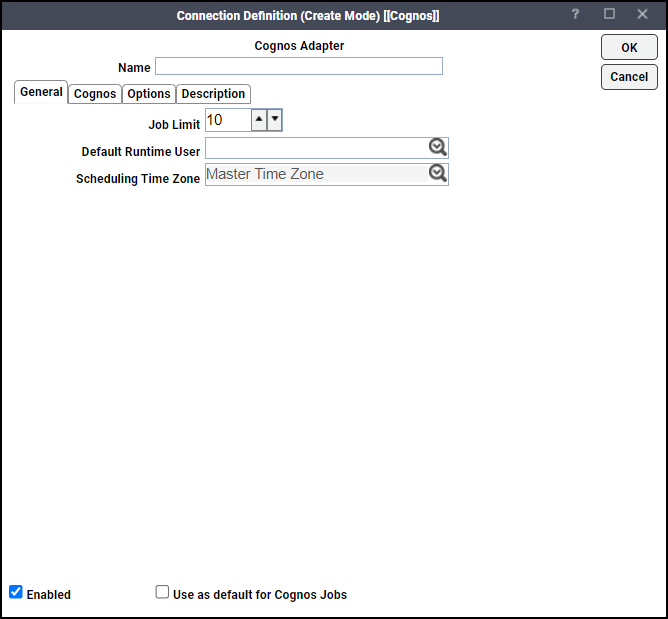
Enter a name for the new connection in the Name field.
-
Navigate to the Job Limit field and choose the maximum number of concurrent active processes that TA should submit to the Cognos server at one time.
-
Choose the name of the default user for Cognos jobs from the Default Runtime User drop-down list. The runtime user is used for authentication with Cognos to authorize scheduled operations.
Only authorized users that have been defined with Cognos passwords display in this list. The selected user is automatically supplied as the default runtime user in a new TA Cognos job definition.
-
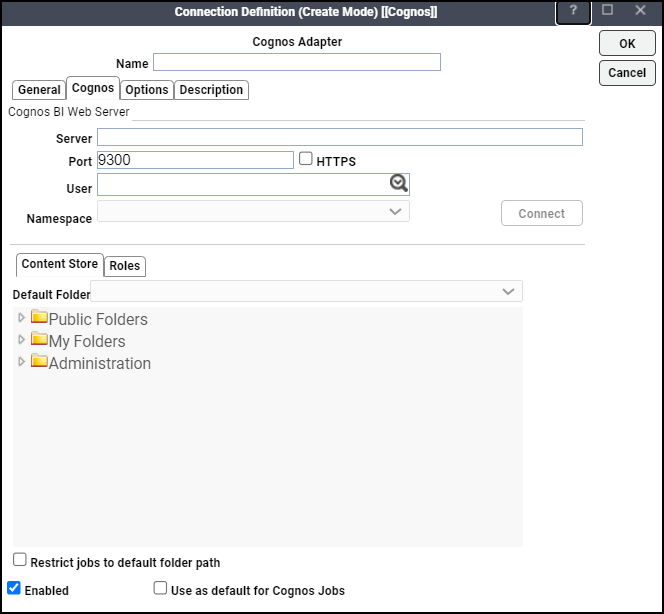
Click Cognos.
-
Enter the name of your Cognos server in the Server field.
-
Enter the appropriate port number in the Port field.
Note: The default port is 9300. If Cognos has been configured for SSL and the HTTPS checkbox is selected, the default port is 9343.
-
Choose the associated Runtime User for Cognos to be used for connecting to Cognos from the User list.
This is a persistent user connection to Cognos that is only used for administration and monitoring and for jobs with a matching runtime user. Jobs with a different runtime user specified will create additional temporary connections.
Note: Connect activates when all required fields are populated.
-
Choose the appropriate namespace for the user supplied in the Namespace field.
Note: It will default to the domain associated with the User field.
-
Click Connect to test the connection. When a successful connection has been made, the button will switch to Connected and will be grayed out.
-
Navigate to the Content Store tab. You can select a folder from the content tree or from the Default Folder drop-down list to be the default folder when scheduling reports, queries, cubes, report views and other jobs.
If you want to restrict scheduling to objects in the default folder or any of its subfolders, choose the Restrict jobs to default folder path option.
You can also create a Report View, which is an instance of a report with a pre-defined set of parameter values and options. This simplifies the scheduling of reports for which there may be specific pre-defined variants.
Note: If a view name has not been specified in the option, the existing view name is used.
-
Click the Roles tab to select one or more security roles if you want to limit what users can do within TA based on Cognos roles.
-
Choose the appropriate roles. It is recommended that you select the No Role Restrictions option or leave all available roles unchecked to ensure that all scheduling features will be available. Selecting all roles is not the same as "no role restrictions", because if roles are added in the future, they are not automatically included; use the No Role Restrictions option instead.
-
Click the Options tab to configure parameters for this connection.
Note: The Connection Poll option is used to monitor connections in the Cognos system.
These parameters are available:
-
CGDEBUG – Turns the debugging function on/off. When set to ON, diagnostic data is added to the adapter log and job output. You may be asked to turn this option on when working with technical support to investigate an issue.
-
CGMAILERRORSOK – Set to Y if you want a Cognos job to complete normally, even if errors occur when sending email after a report is run. The default is N.
-
CGLOGTAIL – Along with CGLOG, this parameter specifies how many bytes from the end of cogserver.log should be included in the output of a job that has failed. The default is 5000 bytes.
-
CGTRANSFERSIZE – The maximum number of bytes of data the adapter transfers from the Cognos Server to the master machine for emailing attachments and saving reports locally. The default value is 100K.
-
CGHTMLSRCPATH – Refers to a web content path that contains common images shared by all reports. This can be a network share to the Cognos webcontent folder.
The default is ".."
For HTML output only, this option replaces all occurrences of <img src="..\ with <img src="CGHTMLSRCPATH\.
-
CGMAIL – Name of your SMTP server. This is only used when the adapter sends mail, not when Cognos sends mail. The adapter will send mail if you are using the History Collection option as described later under Defining Cognos Jobs.
-
CGMAILFROM – The address the adapter sends mail from. This is only used when the adapter sends mail, not when Cognos sends mail. The adapter will send mail if you are using the History Collection option as described later under Defining Cognos Jobs.
-
CGLOG – Optionally refers to a network share of the Cognos log location. If specified, the adapter will read the log to provide additional diagnostic information from the cogserver.log file in the output of failed jobs.
-
-
Click OK to save the new Cognos connection. The configured connection displays in the Connections pane.
The status light next to the connection indicates whether the TA Master is connected to the Cognos server. If the light is green, the Cognos server is connected.
A red light indicates that the master cannot connect to the Cognos server. Cognos jobs will not be submitted without a connection to the Cognos server. You can only define jobs from the Web client if the connection light is green.
If the light is red, you can test the connection to determine the problem. Right-click the connection and select Test from the shortcut menu. A message displays on the Test Cognos Connection dialog describing the problem. Or go to Operator|Logs to look for error messages associated with this connection.