Using the Adapter and Defining Cognos Jobs
This section provides instructions for defining a Cognos job in TA and descriptions of the various types of tasks and options that can be included in the jobs.
Cognos Job Definition
You define jobs to run Cognos pre-existing jobs, reports, and queries. This section describes the basic steps for defining a Cognos job.
To define a Cognos job:
-
Click Definitions > Jobs on the Navigation pane to display the Jobs pane.
-
Right-click Jobs and choose Add Job > Cognos Job from the context menus.
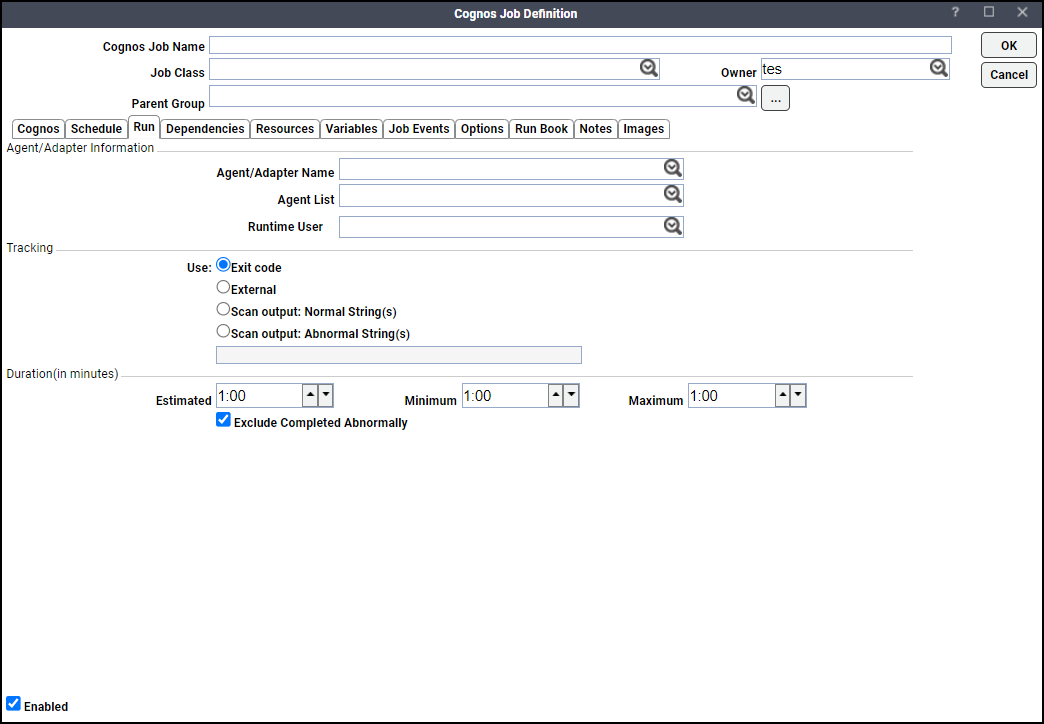
The Run tab is selected by default. You must first specify a name for the job, a valid runtime user who has the appropriate Cognos authority for the report being scheduled, and the Cognos adapter connection that will be used for the job.
-
Specify the information to describe the job:
-
Job Name – Enter a name that describes the job.
-
Job Class – If you want to assign a defined job class to this job, choose it from the drop-down list. This field is optional.
-
Owner – Choose the user name from the drop-down list for the person who owns this job. The user must have the appropriate Cognos authority for the operation.
-
Parent Group – If this job exists under a parent group, choose the name of the parent group from the drop-down list. All properties in the Agent Information section are inherited from its parent job group.
-
-
Specify the connection information in the Agent/Adapter Information section:
-
Agent/Adapter Name – Choose the Cognos adapter connection to be used for this job from the drop-down list.
-
Runtime User – Choose a valid runtime user with the appropriate Cognos authority for the job from the drop-down list.
-
-
Specify the appropriate Tracking and Duration information for the job. Refer to the Tidal Automation User Guide for information on these options.
-
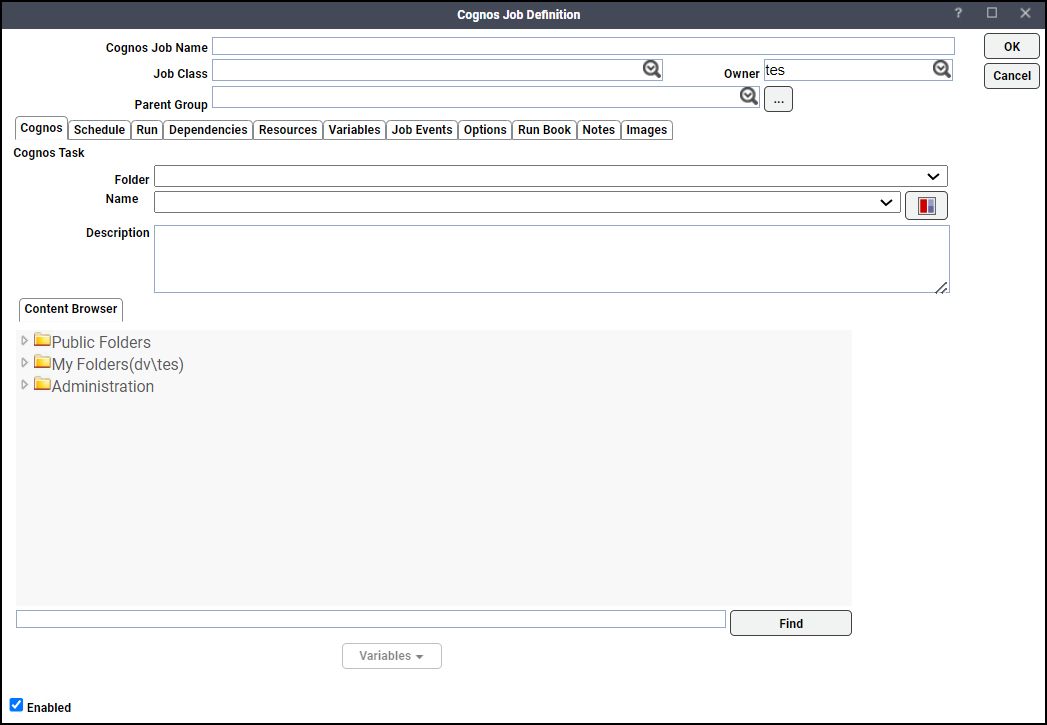
Click the Cognos tab.
-
Choose the report, query, report view, import/export deployment task or existing job you want to schedule in the Name field or on the Content Browser tab.
The task type, such as "Report", "Query" or "Job", will replace the "Name" label, and a description of the selected task displays in the Description field
You can search for a task by entering part of the folder, report, or job name in the Find field (located below the Content Browser), then click Find. Click Find again to find the next occurrence. After the last occurrence, Find will begin its search from the beginning again.
Note: When using Find, all content will be expanded, so you may see an hourglass while the entire Content Store is loaded. If you choose a report or query, the Cognos tab contains an Options tab, as shown above.
If you choose a pre-existing job, the Cognos tab contains a Job Steps tab.
-
Click the Options tab if you are scheduling a report or query.
The Print Option, Email Option, and Save Option options are described below.
This subtab contains these elements:
- Enabled Checkbox – Choose this option if you want the output printed.
-
Printer Name – Choose the name of the printer as defined in the Cognos configuration.
-
Printer Address – Enter the address of the printer.
Note: If a Printer Name is selected, the address is displayed from the Cognos configuration, and the field is disabled. To override the printer address, clear out the Printer Name by selecting the blank item in the list (the first item) and the field is enabled again.
This subtab contains these elements:
- Enabled – Choose this checkbox if you want the output emailed.
-
To – Use any valid email addresses separated by commas. You can also include Cognos user names or distribution list names and the Adapter will look up the corresponding email addresses from the configuration. You can use variables from Variable to populate this field.
- Subject – Enter the subject for the email. You can use variables from Variable to populate this field.
-
Body – Contains the body of the email message instead of attaching the report.
Note: You can use variables from Variable to populate this field.
Note: If you leave the Body field empty and the output format selected is HTML, the report will be embedded in the e-mail.
-
Attach Report – Choose this option if you want the report attached to the body of the email.
-
Provide Link To Report – Choose this option if you want a link displayed in the body of the email instead of the attached report. This option requires that the output be saved on the server. See Save Option. This is more secure as Cognos will require users to log on prior to displaying the report.
Note: If using history to track jobs (Run in Background option selected), the Adapter will send the email; if the job is tracked in real-time, the email is sent by Cognos. For information on configuring email parameters (CGMAILFROM and CGMAIL) used by the adapter to send mail, see Defining a Cognos Adapter Connection.
Note: If saving the file locally, you can use TA to attach the report to its own email, rather than using the Cognos email facility. See Save Option.
This subtab contains these elements:
-
Output Format – Choose the desired format from the list (e.g. PDF, HTML, CSV).
Note: For PDF and HTML, there are additional options you can set for the selected output.
These items have additional options:
Orientation – Choose the paper orientation, Landscape or Portrait.
Paper – Choose the paper size (Letter or Legal).
HTML
Rows – Maximum number of vertical rows of data per HTML page.
HTML Fragment
Rows – Maximum number of vertical rows of data per HTML page.
HTML WebArchive
Rows – Maximum number of vertical rows of data per HTML page.
Save to Content Store as Version – Saves the report output as the latest version of the report in the content store.
Save View As – Creates a saved view of the generated report in the Content Store for subsequent viewing. You can use variables.
Folder – Choose the folder you want the report view saved to.
Save to File – Enter a name for the file you want to save. The filename is relative to the Scheduling master machine, so use UNC naming or a shared network location to save the file remotely. You can use variables.
-
Click Parameters.
Parameter Guidelines:
-
Use commas to separate multiple values.
-
Do not use quotes.
-
Set the display name for a parameter using the {display-value} prefix.
Example: {Q1}[all].[2008].[20081],{Q2}[all].[2008].[20082]
{Q3}~[all].[2008].[20083] -
Start with / and /<level>/ before each tree subnode for hierarchical parameters.
Example: /Root/1/Europe/2/Italy/3/Florence/3/Rome/3/Milan/2/UK/3/London/1/Americas/2/United States/3/New York/3/San Francisco
Note: By default, all values are inclusive. For exclusive values, precede the value with a tilde ~.
-
Include spaces in the values.
For ranges of values:
-
Use > [inclusive] or < [exclusive] between beginning and ending values of range.
-
Use > [inclusive] or < [exclusive] before an end value with an unbounded begin value. Use > [inclusive] or < [exclusive] after a begin value with an unbounded end value.
Example: 1000>2000,1100<~1200 (excludes 1100 to 1199)
-
-
-
Right-click parameter and choose Parameter Editor to display the Parameter Editor dialog.
OR
Choose Copy Default to clear the Override Value field and to use the default value.
Note: If you do not fill in the override value, the default value will be used, if any.
-
Enter the new parameter value in the field provided corresponding to the parameter shown at the top of the screen.
Note: You can also use Variable to insert a variable anywhere into this field.
You can click the Defaults to populate the field with the default value, if one is available.
At the top of the Parameter Value Override dialog, you will see the parameter name, type, and associated model that determines the required format for the parameter's value(s). Values that you enter for parameter overrides must be in the format expected by Cognos.
Example: [all].[2008]
When you use a TA variable such as Production Date, you must set the format to match that expected by Cognos.
Example: [all].[<ProdDate.YYYY>]
Captions
If the report shows the value in the title or header of a report, you may want to assign a display name or caption for the value, so that instead of displaying "[all].[2008]", it displays "2008". To do this, put the display name in curly braces as a prefix to the value.
Example: {2008}[all].[2008]
OR
Example: {<ProdDate.YYYY>}[all].[<ProdDate.YYYY>]
Exclusive Values
For any value that is meant to exclude data, use the tilde (~) prefix before the value.
Example: {Q2}~[all].[2008].[20082]
Multiple Values
For parameters that accept multiple values, list the values separated by commas, or put one value on each line. There is no need to put any values in quotes.
Example: {Paris}[Europe].[France].[Paris], {London}[Europe].[United Kingdom].[London],
{Rome}[Europe].[Italy].[Rome]
OR
Example: {Paris}[Europe].[France].[Paris]
{London}[Europe].[United Kingdom].[London]
{Rome}[Europe].[Italy].[Rome]
Ranges
You can specify ranges of values using > or < between low and high values. For ranges to include, use >. For ranges to exclude, use <. Separate multiple ranges with commas or one range per line in the Parameter Override dialog.
Example: 1>100, 20<30 includes the range between 1 and 100, excluding 20 to 30.
Ranges can have an unbounded high or low value by omitting the value at the high or low end.
Example: >1000 includes any value up to and including 1000
1000< excludes any value greater than or equal to 1000
You can exclude the high or low value itself from the range with the ~ prefix.
Example: ~1000< excludes any value greater than 1000
Hierarchical Parameters
Hierarchical parameters can have multiple nested values. To represent a tree of values, start with / followed by the first level, and for each nested value, prefix it with /<level>/.
Example: /World/1/Europe/2/Italy/3/Florence/3/Rome/3/Milan/2/UK/3/London
/1/Americas/2/United States/3/New York/3/San Francisco
In this example, the root of the tree has the value "World" with the first level including "Europe" and "Americas" with nested countries and cities.
The tree is interpreted as follows:
|
World |
|||
|
Europe |
|||
|
Italy |
|||
|
Florence |
|||
|
Rome |
|||
|
Milan |
|||
|
UK |
|||
|
London |
|||
|
Americas |
|||
|
United States |
|||
|
New York |
|||
|
San Francisco |
Note: Any value can be excluded, by prefixing the value with ~.
-
Click OK to save the override parameters.
-
Optionally, use the checkboxes at the bottom of the Connection Definition panel as follows:
Run in Background (Save History) Option
Choose the Run in Background (Save History) option to create history in the content store for this job. If you disconnect from Cognos, your job can be recovered when you reconnect and resume.
Note: To reduce overhead and improve performance, Cognos suggests that you choose this option only for critical jobs and long-running jobs. Do not choose this option for jobs that are easily recovered through a rerun.
Burst Report Option
Choose the Burst Report option if you want to run a report once and then divide the results for distribution to recipients who each receive only a subset of the data. This option is only available for reports that have been designed for bursting.
-
Click OK to save the job.