Defining Informatica PowerCenter Jobs
To define an Informatica PowerCenter job:
-
Go to Definitions > Jobs in the Navigator pane. The Jobs window displays.
-
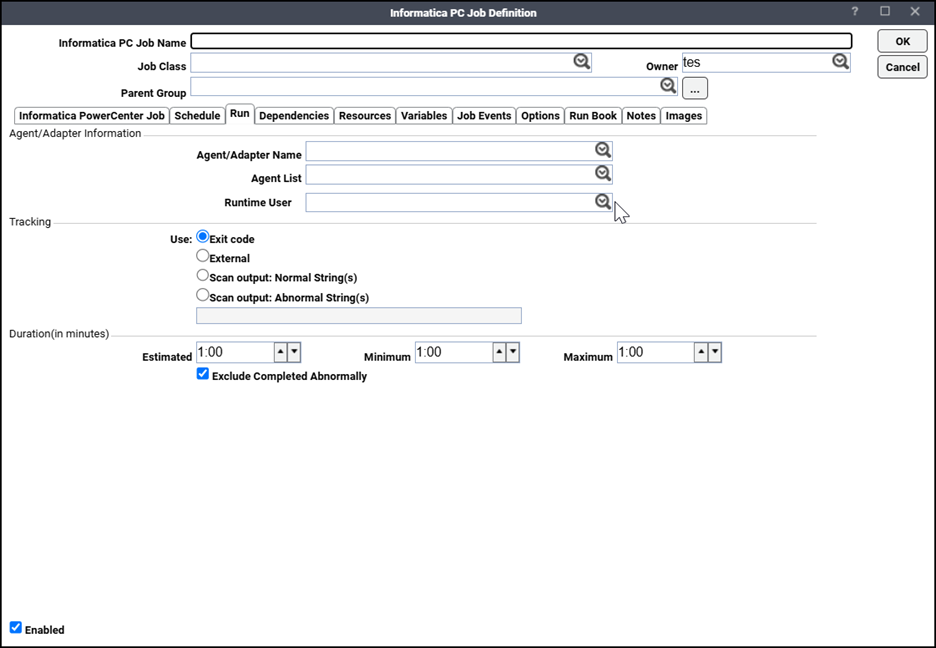
Right-click Jobs and click Add > Informatica PC Job. The Informatica PC Job Definition dialog appears. The Run tab is selected by default.
-
Specify the information to describe the job:
-
Job Name – Enter a name that describes the job.
-
Job Class (Optional) – If you want to assign a defined job class to this job, choose it from the dropdown list.
-
Owner – Choose the user or group name from the dropdown list for the person who owns this job.
-
Parent Group – If this job should be inside a job group, choose the job group from this dropdown list. All properties in the adapter information section are inherited from its parent job group.
-
-
Specify the connection information in the Agent/Adapter Information section:
-
Agent/Adapter Name – Choose the adapter connection to be used for this job from the dropdown list.
-
Agent List Name (Optional) – Choose an agent list for the platform on which your program or script can run. Note that if you choose an agent list, the Agent Name field is reset.
-
Runtime User (Optional) – Choose a valid runtime user with the appropriate Informatica PowerCenter authority for the job from the dropdown list. The user should have the appropriate Informatica PowerCenter authority for the operation.
-
-
Specify the appropriate Tracking and Duration information for the job.
-
Exit Code – Choosing this option means that the job completion status is determined by the job’s exit code. An exit code of 0 sets the job status to Completed Normally. Any other exit code sets the job status to Completed Abnormally.
The exit code of a job is set depending on the type of agent and script you are using. The exit code is determined by using the ocsexit command at the end of the batch or command file run by a job. The exit code value can range from 0 to 30,000.
-
External – Choosing this option means that the status of a completed job is determined externally by a user or program. TA will set the job status to Externally Defined when the job completes. You can then have the active job completion status set through an action or use the Set command from the Job Activity pane context menu.
-
Scan Output: Normal String – Choose this option if you want a particular text string in the output from a job to determine that a job completed normally. In the associated field, type the text string that will signify "normal". To use the text string, enclose the text in quotation marks; otherwise, TA treats the text string as a list of random words and any single word of the text signals "normal".
-
Scan Output: Abnormal String – Choose this option if you want a particular text string in the output from a job to determine that a job completed abnormally. In the associated field, type the text string that will signify "abnormal". To use the text string as a whole, enclose the text in quotation marks; otherwise, TA treats the text string as a list of random words, and any single word of the text signals "abnormal".
Note: You can scan job output for multiple strings. Listing multiple text strings separated by commas means any one of the listed text strings can signal that the job completed normally or abnormally. Listing text strings separated by plus signs means all text strings should appear in the job output to determine if the job completed normally or not. If the text strings contain commas or pluses, enclose the text string in quotation marks. You cannot mix commas and pluses together as separators.
-
Estimated – The estimated duration for the job specified in minutes, or a fraction thereof. The estimated run time is used to create the forecast shown in the Job Activity pane. It is also referenced by the Job finished later than expected job event trigger. You can use the Estimated Duration field to monitor jobs that run for a shorter or longer time than expected.
Example: You could set up a job event triggered by Job finished later than expected, with an associated email action that will notify you when a certain job that normally runs for 5 minutes, runs for more than one hour.
-
Minimum – The minimum duration that you expect your job to run. You can create a job event to monitor and perform an action if the job completes in less than the minimum time.
Example: You could set up a job event and job action that will run a diagnostic tool if it completes in less than the Minimum time.
-
Maximum – The maximum duration that you expect your job to run. You can create a job event to monitor and perform an action if the job runs over the maximum time.
Example: You could setup a job event and job action to stop the job if it runs past the Maximum time.
-
Exclude Completed Abnormally when calculating Estimated Duration – The calculation of the Estimated Duration of time that a Job should run includes the previous execution time for Jobs that complete normally and abnormally. Selecting this option allows you to control which Jobs are included in that calculation.
-
-
Click the Informatica PowerCenter Job tab.
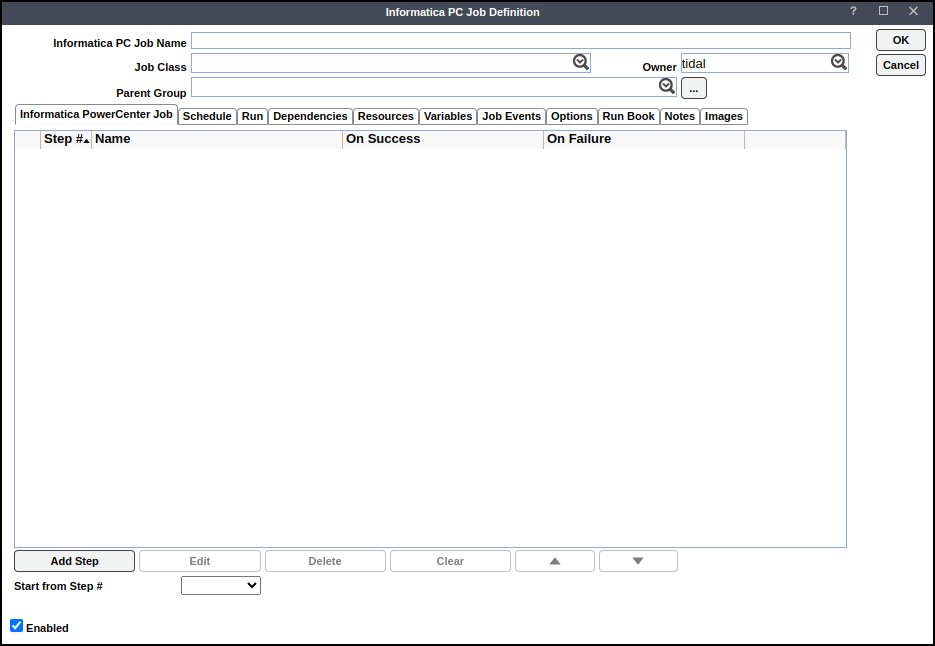
This tab contains these elements:
-
Step# – The step number.
-
Name – The name of the step.
-
On Success – The action occurs if the step completes successfully.
-
On Failure – The action occurs if the step completes fails.
These buttons and dropdown fields appear in the tab:
-
Add Step – Displays the Add Step dialog. Use this dialog to add a step to the operations that the job will perform.
-
Edit – Makes changes to an existing step.
-
Delete – Removes a step you select.
-
Clear – Removes all data in the grid.
-
Up Arrow – Moves a selected step higher in a list of steps.
-
Down Arrow – Moves a selected step lower in the list of steps.
-
Start from step # – Choose a step that initiates the execution of the job.
-
-
Click Add Step. The General sub tab appears.
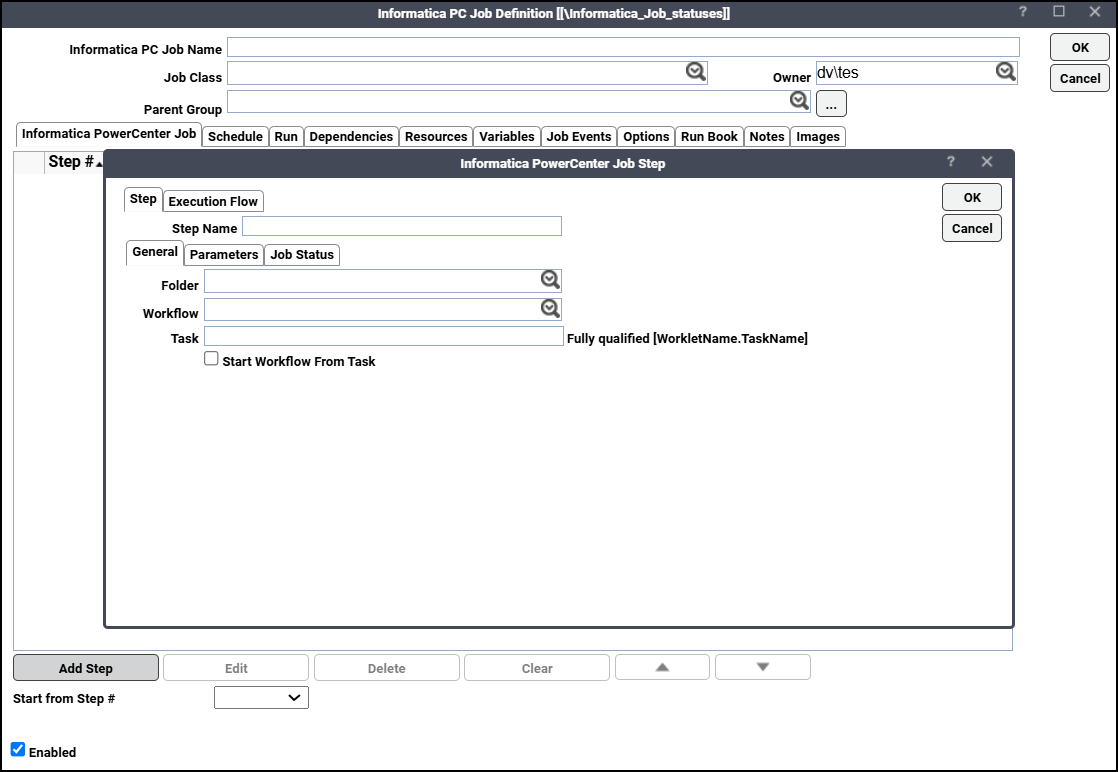
Note: The Informatica PowerCenter connection should be up and running.
-
Folder – Choose the folder containing the workflow from this list.
-
Workflow – Choose the workflow to schedule. Alternatively, you can enter your value.
-
Task – Specify the task to run separately.
Example: <WorkletName.TaskName>
Note: If you want to schedule this workflow to run a single task or to start from a task, the Task Name field is required.
To start a task within a worklet, use the format <WorkletName.TaskName>.
To start a task in a workflow without a worklet, use the task name directly.
-
Start Workflow From Task – Choose this option if you are running the workflow while starting from a specific task. If you are running a single workflow task, leave this unchecked.
Note: If you try to run two identical workflows, an error occurs. To avoid this issue, make sure to run the same workflow only after the previous one has completed.
Note: If you have already started a task in a workflow or from a step and want to run the same workflow while the first one is still in progress, the second workflow will wait until the first one is completed before starting.
-
-
Click OK to save the job.
Specifying Informatica Job Parameters
Use the Parameters tab of the Job Definition dialog to specify other job parameters.
You can override parameters by choosing one of these options:
-
File – Enter an absolute path name containing the workflow parameters. The file should be an absolute path name appropriate to the operating system where the Integration Service runs. This file should adhere to the parameter file format defined in the PowerCenter documentation.
-
No Parameters – Choose this option if you do not want to specify any parameters. This is the default option.
Note: To insert Scheduler variables, click Variables and choose the variable you need from the list.
Just as with a parameter file, when specifying parameter values, parameters are specified in a section or heading, with name or value pairs. Refer to the PowerCenter documentation for more information on Parameter File Structure.
Checking the Informatica Job Status
Use the Job Status tab to specify how job status is determined.
For this option, an exit code specifies the type of error encountered:
-
Workflow Status Only – (Default option) Job status is the workflow status.
Execution Flow
Use the Execution Flow tab to:
-
Define subsequent actions following either successful or failed completion of a step.
-
Define the maximum number of times a step is allowed to run.
Note: You can use this feature to break the execution sequence of a set of steps defined in the Informatica PowerCenter job.
The Execution Flow tab has these fields:
-
On Success Action: When a step is completed successfully, select:
Go to the next step
Quit the step flow, report success
Quit the step flow, report failure
Go to step #N
-
On Failure Action: When a step fails, select:
Go to the next step
Quit the step flow, report success
Quit the step flow, report failure
Go to step #N
Note: ‘N’ is a step number assigned to an already-defined step. If you choose Go to Next Step from either On Success Action or On Failure Action fields, the job completes normally even if there is no next step
-
Max. Allowed Runs
Enter a number in this field that represents the maximum number of times a step can run. When this number is reached, the step is not run, and the Informatica PowerCenter jobs fail with the status of Completed Abnormally.
This table explains the behavior of each type of action:
Action Description Go to the next step
This action ensures that the next step in the set of defined steps is executed. If no next step is defined, then the sequence of execution of steps is terminated and the Informatica PowerCenter job completes with the status "Completed normally" or "Completed abnormally" based on the completion status of the last step.
Quit the step flow, report success
This action ensures that after the step is executed, no other step is executed, and simultaneously, the Informatica PowerCenter job completes with the status "Completed normally".
Quit the step flow, report failure
This action ensures that after the step is executed, no other step is executed, and simultaneously, the Informatica PowerCenter job completes with the status "Completed abnormally".
Go to operation #N
This action ensures that the next specified step identified by step number, N, is executed.