Configuring the JD Edwards Adapter
After installation, there are configuration tasks that you might want to perform before using the JD Edwards adapter:
See Configuring service.props for details about configuring service.props to control such things as polling, output, and log gathering.
Configuring the JDE API Before Startup (Recommended)
Prior to using the JD Edwards adapter, TA requires that some specific files on the JDE Server are copied to the TA Master installation directory and configured in the CLASSPATH.
Without this configuration, there are two errors that might occur at Master or Adapter startup time:
-
Unable to find the configure file jdelog.properties
(printed in the JDEdwards.out file from the JDE API jar Base_JAR.jar)
-
Unable to find class loader, JMXMP connection may not work (logged from JDE API ManagementAgent_JAR.jar)
You can prevent getting these errors at startup time by configuring the JD Edwards adapter prior to startup as described below.
To configure the JD Edwards API prior to startup:
-
Login to the JDE server.
-
Navigate to C:\JDEdwards\E900\DDP\system\classes.
-
Copy the files jdelog.properties and jmxremote_optional.jar to your local directory where TA Master is installed.
Example: Local directory c:\temp\
-
Login to the system where the Master is installed.
-
Set the CLASSPATH for your machine type:
-
For Windows, change the CLASSPATH in environment variables to point jdelog.properties and jmxremote_optional.jar files.
Your class path should look like this:
%CLASSPATH%;C:\temp\;C:\temp\jmxremote_optional.jar;
where C:\temp is the location of the files you copied in step 3.
-
For Linux, use this command to set the CLASSPATH:
export CLASSPATH=$CLASSPATH:/opt/JDE:/opt/JDE/jmxremote_optional.jar
-
-
Restart the TA Master.
To validate that the configuration worked, check the Unable to find the configure file jdelog.properties error in the log file JDEdwardsService.out.
Note: Let the technical support know if you get errors at startup after performing this configuration.
Configuring Debug Options for the JD Edwards Adapter
When defining a connection or a job using the JD Edwards adapter, use the options below for debugging assistance:
Connection Definition Debug Options
Two JDE Connection definition tabs can be used to configure debugging:
-
Options
-
Overrides
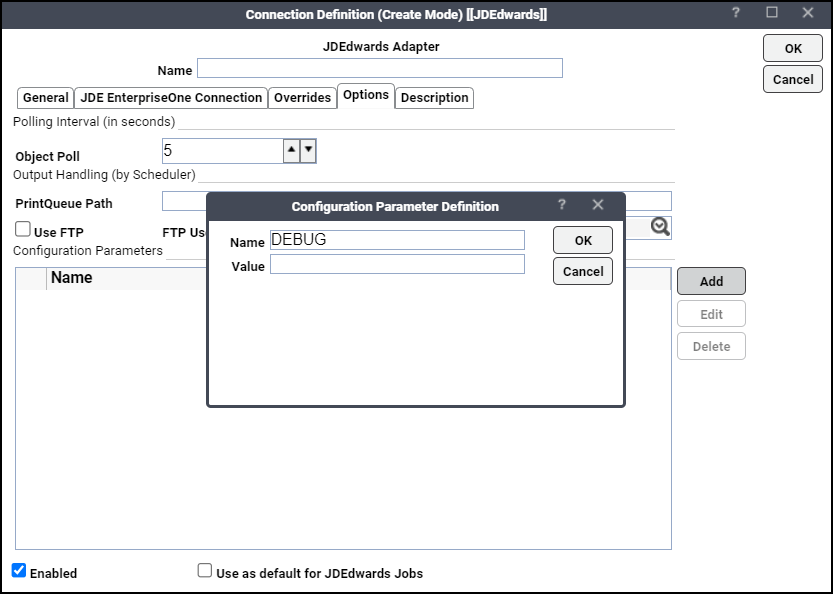
JDE Connection Definition – Options Tab
DEBUG – This parameter needs to be added to the connection definition Options tab. It turns the debugging function on or off. When set to ON, diagnostic data is added to the adapter log and job output. You may be asked to turn this option on when working with Technical Support to investigate an issue.
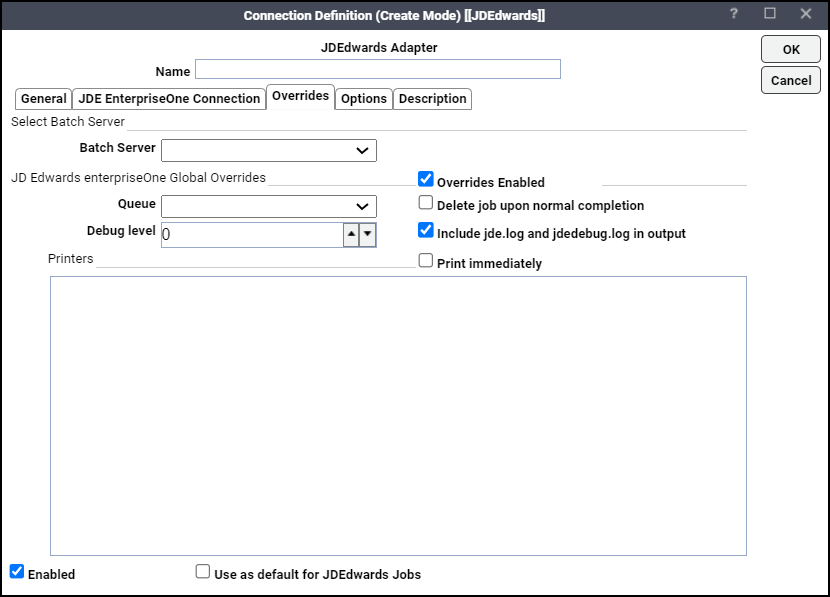
JDE Connection Definition – Overrides Tab
To choose and set these two values, select the Overrides Enabled checkbox.
-
Include jde.log and jdedebug.log in output – Optionally select this checkbox to include the text from the log and debug log for the UBE process.
-
Debug level – Click the up arrow or down arrow to set the debug level. Valid values are 0 to 6, 6 being the highest.
Job Definition Debug Options
Three JDE Job Definition tabs can be used to configure debugging:
-
Options
-
Output
-
Debug
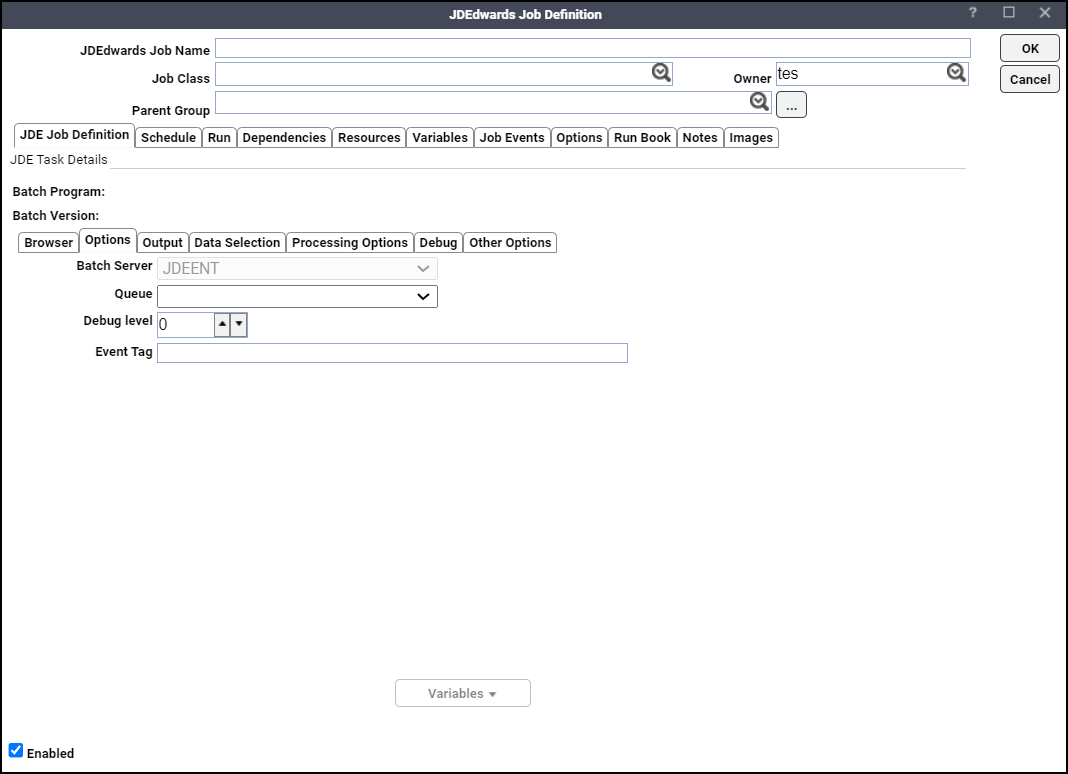
JDE Job Definition – Options Tab
Debug level – Click up or down arrow to set the UBE debug level. Valid values are 0 to 6, 6 is the highest.
JDE Job Definition – Output Tab
The jde.log and jdedebug.log can be enabled in job definition screen also. To include the logs, the connection must be setup with a UNC or FTP path so that adapter can access these files.
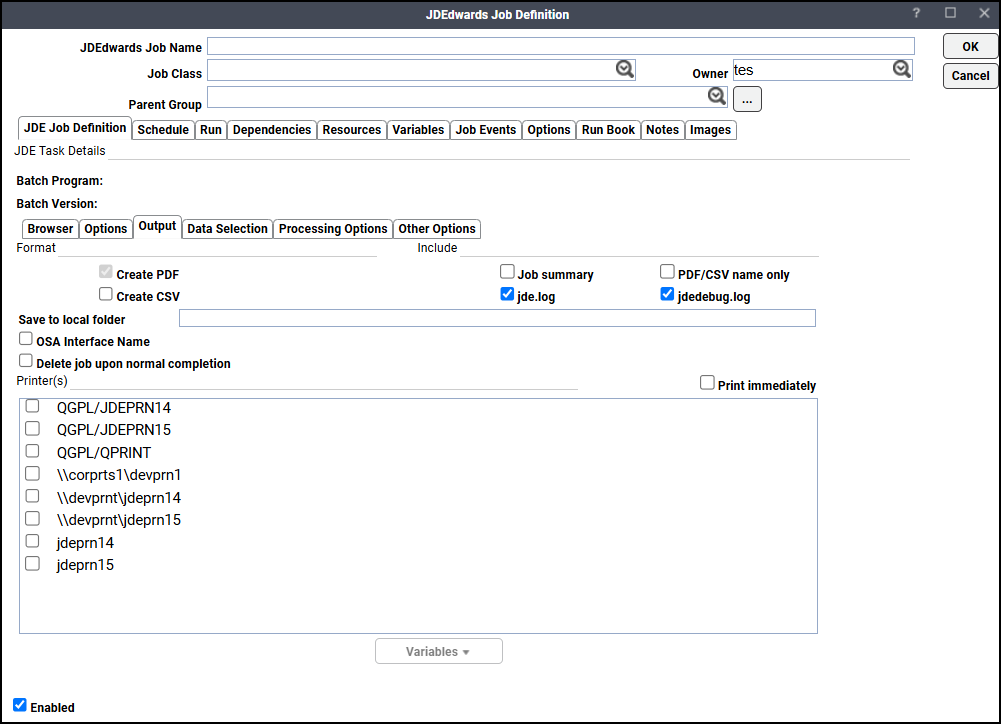
If the jde.log and jdedebug.log is enabled in connection or job definition then the logs would be included in the output summary along with the job output in JAC.
If the Overrides Enabled option is selected on the Connection Definition, the connection level value takes precedence.
JDE Job Definition – Debug Tab
If the DEBUG parameter is set to ON in the JDE Connection Definition, the job definition debug tab shows the data of UBE in XML format. This page is typically used by Technical Support to assist with problem resolution.
Configuring the HTTPS Protocol for the JD Edwards Adapter
It is recommended that JD Edwards Web servers be configured to use SSL via the HTTPS protocol for Data Services or Data Integrator. If your environment is configured to use HTTP, you can skip this section.
For complete instructions on configuring JD Edwards servers to use the HTTP or HTTPS protocol, refer to the JD Edwards documentation.
Obtain Security Certificates
From a Windows desktop, you can obtain a security certificates for each target JD Edwards server using the Microsoft Internet Explorer Certificate Cache.
Note: Although other procedures are available for obtaining the required certificates, the procedure below can be performed from your Windows desktop.
Note: You need to carry out these instructions only if your server certificate is generated in-house (that is, self-signed) or if your server certificate is signed by a Certification Authority that is not trusted by the version of Java you are using. Alternatively, if your adapter connection fails by reporting the error "unable to find valid certification path to requested target" you need to carry out these instructions.
To obtain target JD Edwards server security certificates:
-
Open the Internet Explorer browser and navigate to this dispatch URL (replacing the server name and port as it applies to your environment).
https://<adminHost:adminPort>/admin/servlet/webservices
where adminHost is where the Data Integrator Administrator is installed and adminPort is the port the Data Integrator Administrator is listening on.
A Security Alert message displays. If not, click the Lock icon that appears on the URL box.
-
Click View Certificate to open the Certificate dialog.
-
Click Install Certificate.
-
Click Next on the Certificate Import Wizard Welcome panel.
-
Click the Certificate Store panel, use the default option Automatically select the certificate store based on the type of certificate and click Next.
-
Click Finish on the Completing Certificate Import Wizard panel.
Note: If a Security Warning message displays informing you that you are about to install a certificate from a certification authority, click Yes to continue with the certificate installation.
A message stating The import was successful displays.
-
Click OK to close the message and return to the Certificate dialog.
-
Click OK on the Certificate dialog. You can close your browser now.
-
Repeat the process for each JD Edwards server that you want to connect to with the JD Edwards Adapter.
Export Security Certificates
After you have obtained the security certificates for the target servers, export them from the Internet Explorer cache to a local directory.
To export the cached certificates to a local directory:
-
On the local computer, create this directory for the certificates:
C:\JDE-Certs
-
Click Tools > Internet Options in Internet Explorer.
-
Click Content on the Internet Options dialog.
-
Click Certificates in the Certificates area.
-
Click Trusted Root Certification Authorities tab to display the list of trusted certificates. This list should contain the certificates for the target servers that were obtained in the previous procedure. See Obtain Security Certificates.
-
Scroll through the list of certificates to find the certificates.
-
Perform this procedure for each target server certificate:
-
Choose the certificate and click Export to launch the Certificate Export Wizard.
-
Click Next on the Welcome panel.
-
Click the Export File Format panel, use the default option DER encoded binary X.509 (.CER) and click Next.
-
Click the File To Export panel, enter the complete path to the JDE-Certs directory and a unique name for the certificate:
C:\JDE-Certs\servername.cer
-
Click Next.
-
Click Finish on the Completing the Certificate Export Wizard panel to complete the export.
-
Click OK to close the message box.
-
-
Click Close after all target server certificates have been exported to exit the Certificates dialog.
-
Click OK to close the Internet Options dialog.
Import Target Server Certificates Into a Java Keystore
Import the target server certificates into a local Java keystore.
Note: These instructions assume that a JRE or JDK is in your system PATH.
To import certificates into a Java keystore:
-
Open a Windows Command Prompt window.
-
Change to the directory where the certificates are stored by entering this commands:
c:
cd \JDE-Certs
-
Use the Java keytool utility to import a certificate. This syntax is used:
keytool -import -file <certificate-filename> -alias <servername>-keystore
<your_trusted_keystore.keystore-filename>
Example: C:\JDE-Certs>keytool -import -file sdkpubs01.crt -alias sdkpubs01 -keystore BOXI.keystore
Note: When prompted to create a password for the keystore, enter a password at the prompt. The keystore utility displays the certificate information.
-
Type yes at the Trust this certificate? [no] prompt and press Enter. The certificate is imported into the <your_trusted_keystore>.keystore and this message displays "Certificate was added to keystore".
-
Repeat this procedure for each target server.
-
Navigate to this folder where the TA JD Edwards adapter is installed and create a new directory named config:
<install dir>\master\services\{88EBA24D-7B9A-4EAC-855B-F29D99CE37E9}\config -
Create a text file named service.props in the \config directory located under the Adapter’s GUID directory if it doesn’t already exist.
-
Open the service.props text file and add this line:
Keystore=c:\\JDE-Certs\\<your_trusted_keystore>.keystore
Note: The use of escaped backslashes for Windows directories is essential.
See Configuring service.props for information about general and JD Edwards-specific properties that can be set to control logging and connections for the JD Edwards Adapter.