Adding a JMS Job
A TA job is a set of instructions about how, when and where to perform an automated task. For a JMS job, all scheduling criteria are available. The only difference between a JMS job and a standard operating system job is that you specify a JMS request instead of a command, program or script. In the job rule definition, as with other jobs, you can specify a short name for the job (job alias), where to run the job (agent), the days and the times to run the job, the dependencies needing to be satisfied before it can run and other runtime criteria.
A job or job group definition can be added to the production schedule either manually on demand or automatically through a calendar. Each entry of the job into the production schedule is called a job instance. A job instance is an occurrence of the job definition at a specific time. Job instance history can be reviewed for auditing purposes. Some properties of jobs are described below.
To add a JMS job:
-
Click Definitions > Jobs on the Navigation pane to display the Jobs pane.
-
Right-click and click Add > JMS Job to display the JMS Job Definition dialog.
-
Click the JMS Job Name field, and then enter a name up to 50 characters in length for your job.
The job name is an identifier for TA only. All of the other job definition information, such as Job Class, Owner and Parent Group, is also the same as a standard TA job and is used in the same way.
If you are putting your JMS job into a group, note that unless the parent group selected has an JMS host connection assigned, you must clear the Inherited option on the Run tab before you can specify an JMS connection.
-
Choose an agent/adapter name from the Agent/Adapter Name list on the Run tab.
-
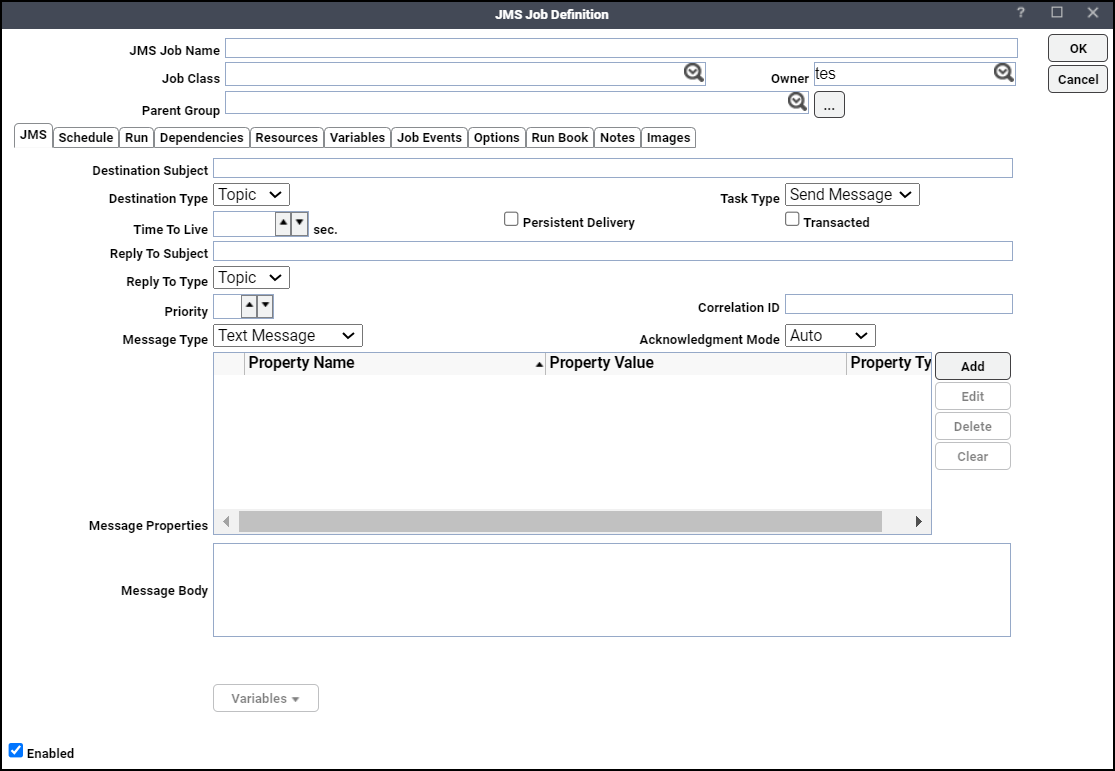
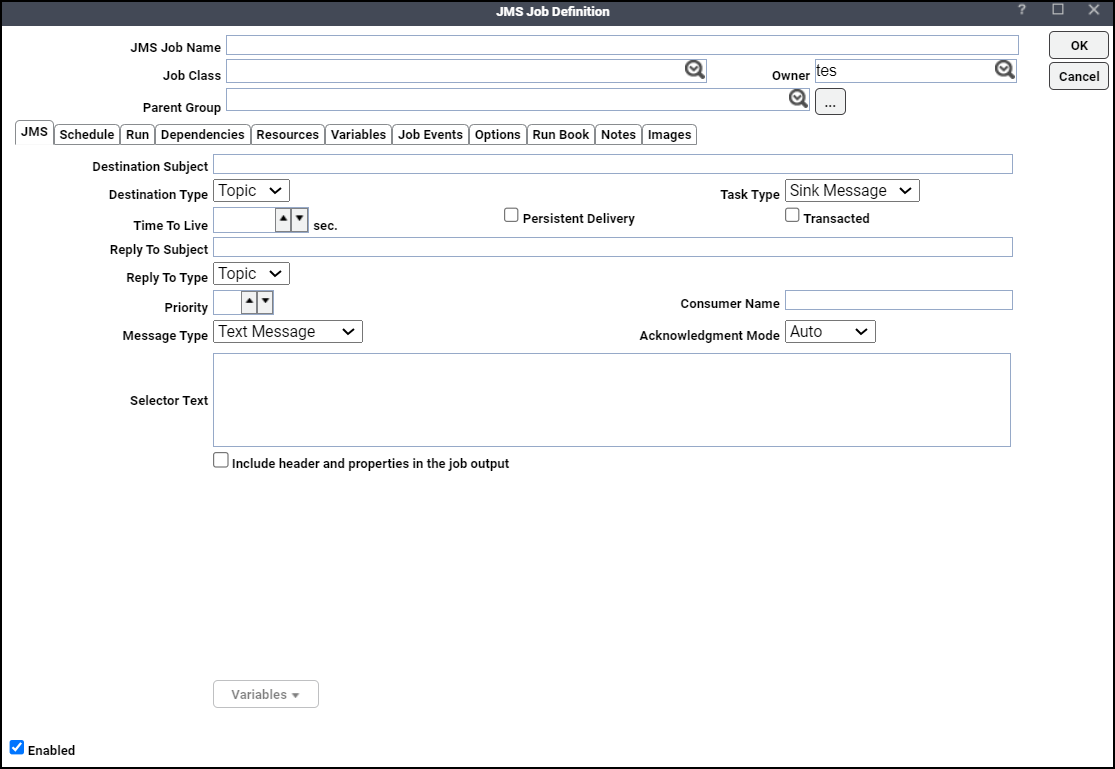
Click the JMS tab.
-
Enter the queue subject or topic subject in the Destination Subject field.
-
Specify from the Destination Type list whether the destination is a JMS Queue or Topic.
-
Choose Send Message to send a message from the Task Type list.
-
Click the Time To Live field, and then set the length of time in seconds from its dispatch time that a produced message should be retained by the message system.
-
(Optional) Click the Persistent Delivery option to set the producer's default delivery mode to PERSISTENT.
-
(Optional) Click the Transacted option if you want the session used to send the JMS message to perform a commit. If the job is canceled before it commits, the JMS adapter will attempt to do a rollback.
-
(Optional) Enter the subject of the reply destination in the Reply to Subject field.
-
(Optional) Specify the reply destination type, Queue or Topic from the Reply To Type list.
-
Enter the priority of the message in the Priority field.
-
Enter the consumer name in the Consumer Name field.
-
(Optional) Choose the message type from the dropdown list in the Message Type field. The message type includes Text Message, Byte Message, Stream Message, and Map Message. The default message type is Text Message.
Some messaging systems require that a message type definition for each application message be created and that each message specify its type. This ensures that the field is properly set for those providers that require it.
-
Specify from the Acknowledgement Mode list whether the consumer or the client will acknowledge any messages it receives.
Note: If the Transacted option is selected, this will be ignored.
The modes are available:
-
Auto – The session automatically acknowledges a client's receipt of a message either when the session has successfully returned from a call to receive or when the message listener the session has called to process the message successfully returns.
-
Client – The client acknowledges a consumed message by calling the message's acknowledge method.
-
Dups OK – This acknowledgment mode instructs the session to lazily acknowledge the delivery of messages.
-
-
Enter the Selector expression in the Selector Text box.
Example: JMSPriority=3
-
Click the Include header and properties in the job output checkbox for the Output tab to display the message headers, message properties and body in JSON format. This field appears only when you click the Task Type as Sink Message.
-
(Optional) If you want to link one message with another, enter one of these in the Correlation ID field.
-
a provider-specific message ID
-
an application-specific String
-
a provider-native byte [] value
Since each message sent by a JMS provider is assigned a message ID value, it is convenient to link messages via message ID. All message ID values must start with the 'ID:' prefix.
-
-
Click Add to add a property in the Message Properties field. The Add Property dialog bx opens.

In the Add property dialog, enter the Property Name, click the Property Type, enter the Property Value, and click OK. The other buttons in the Message Properties field were as followed:
-
Edit – Enables editing the property added.
-
Delete – Enables deleting the property added.
-
Clear – Enables clearing all the properties added.
-
-
Enter the body of the JMS message in the Message Body field.
Example: Text Message – “Test message for JMS”.
Example: Map Message – “TestKey1=JCValue1,TestKey2=JCValue2,TestKey3=JCValue3”
-
Click OK to add the job.