Defining a JMS Connection
Create a connection to a JMS brokerage system before TA runs your JMS jobs. These connections also must be licensed before TA can use them.
JMS Adapter supports connectivity to a variety of commercial JMS systems:
-
Apache ActiveMQ
-
Apache ServiceMix
-
IBM WebSphere
-
IBM WebSphere MQ (MQ-Series)
-
JBOSS
-
Oracle GlassFish
-
Oracle WebLogic
-
Amazon MQ (Added as custom type)
-
Custom
A connection is created through the Connection Definition dialog.
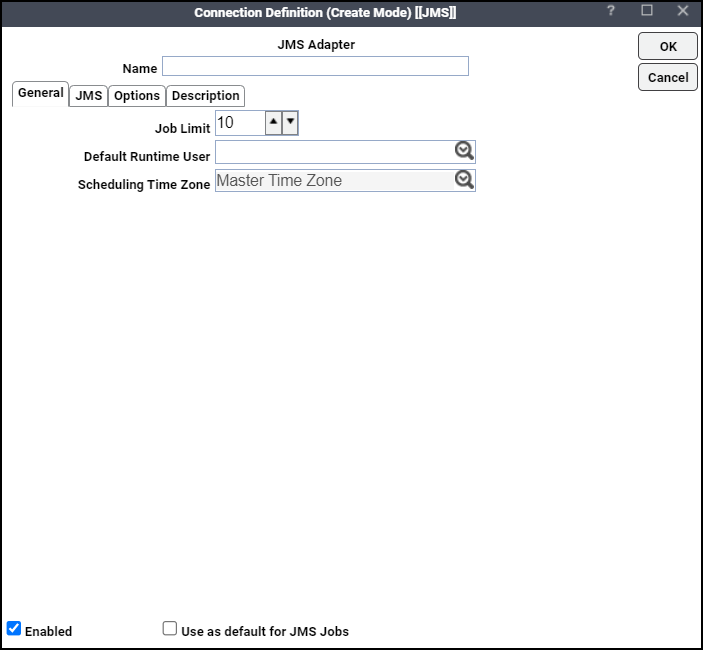
Adding a JMS Connection
To add a connection:
-
Click Administration > Connections on the Navigation pane to display the Connections pane.
-
Click Add or right-click and choose Add Connection > JMS Adapter from the context menu to display the JMS Connection Definition dialog.
-
Enter a name for the new connection in the Name field.
-
Click the General tab.
-
Click the maximum number of concurrent active processes that TA should submit to the JMS host on this server at one time on the Job Limit field.
-
Click the name of a default user for JMS jobs and events on the Default Runtime User list,
The runtime user will be used as default user identity for creating the connection.
Only users that have been defined with JMS passwords display in this list. The user selected is automatically supplied as the runtime user in TA JMS job definitions.
-
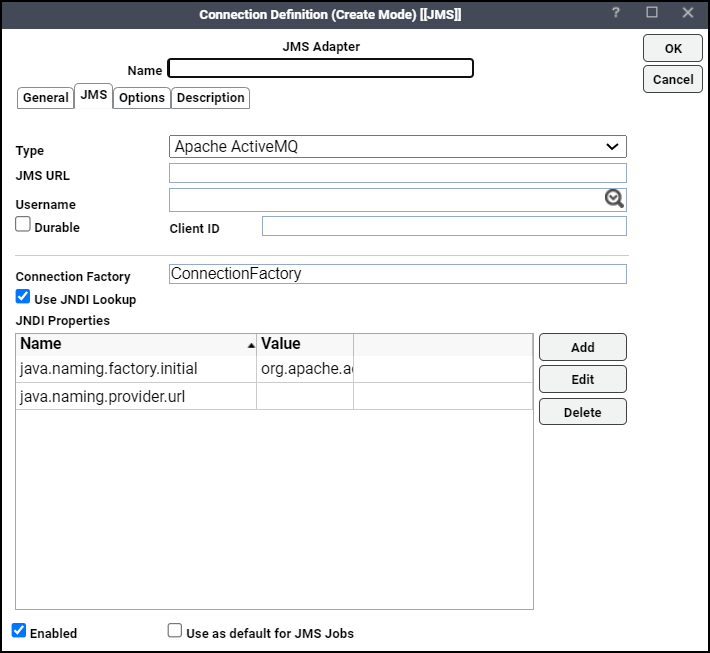
Click the JMS tab.
-
Choose the commercial JMS system from the Type list.
Note: You must create a separate connection for each JMS system.
-
Enter the URL of the JMS broker in the JMS URL field.
-
Click the Username list, and then click the user whose credentials will be used to connect to the JMS broker.
-
Choose the Durable option if you want a durable connection established to the broker, then enter the unique identifier for the connection to the JMS broker in the Client ID field.
Note: If you want to monitor JMS topics or queues as JMS events, this option must be selected.
In the Connection Factory field, if you have chosen to configure the connection with JNDI, you can modify the default JNDI properties and lookup name.
Connection to each of the supported JMS systems can be configured in two ways, JNDI (Java Naming and Directory Interface) or Java Reflection.
-
When JNDI is chosen, the adapter will present default JNDI properties and lookup name for connection factory based on JMS broker type, but allow the user to modify.
-
When JNDI is not chosen, you can specify a simple connection factory class that can be instantiated directly using Java reflection. It may suggest a default value based on the JMS broker type but allow an override. You must specify a connection factory class that implements a constructor that takes the JMS connection URL as a single parameter.
To enable connectivity, the adapter requires vendor's client API jar file(s) for each broker it interacts with. Except for "Apache ActiveMQ" jar which is packaged with the adapter, you must make the client jar(s) available to the TA Master before starting the process. This is done by adding the fully qualified name of the client jar(s) to the class path in master.props.
Example: Oracle WebLogic:
Classpath=${TIDAL_HOME}\lib\Scheduler.jar;${TIDAL_HOME}\lib\sqljdbc.jar;${TIDAL_HOME}\lib\ojdbc14.j ar;C:\bea\wlfullclient.jar;${CLASSPATH}Once the client API jar is in place, you can start the TA systems (i.e., Master, Client Manager, and Web UI) and start configuring connection to the desired JMS systems. The Custom type can be selected if the target JMS system is not covered in the supported list.
-
-
Click OK.
Connecting Amazon MQ with JMS adapter
To connect Amazon MQ with JMS Adapter:
Note: Ensure that you have an OpenWire Endpoint and appropriate credentials to access Amazon MQ.
-
Navigate to the JMS tab on Connection Definition dialog.
-
Choose Custom from the Type dropdown list.
-
Enter the OpenWire Endpoint of Amazon MQ (ssl://Amazon-End-Point-URL.amazonaws.com:61617) in the JMS URL field.
-
Choose the user of the Amazon MQ from the Username dropdown list.
-
Enter org.apache.activemq.ActiveMQConnectionFactory in the Connection Factory field.
-
Click OK to save the connection.
The JMS connection is now Active. Using this JMS connection, JMS adapter jobs can be created to access Amazon MQ.
Connecting IBM WebSphere MQ with JMS Adapter
To create a JMS Connection with IBM WebSphere MQ:
-
Create a bindings file on the server as shown in this link:
Example: Windows: https://www.ibm.com/docs/en/imdm/11.6?topic=file-creating-bindings-windows.
Example: Unix: https://www.ibm.com/docs/en/imdm/11.6?topic=file-creating-bindings-unix.
-
Copy the JNDI-Directory created on the IBM MQ server to the Tidal Master.
Example: C:/JNDI-Directory
-
Copy these libraries from <MQ_INSTALL_DIR> to any location on the Tidal Master:
-
com.ibm.mq.allclient.jar
-
fscontext.jar
-
providerutil.jar
Note: MQ_INSTALL_DIR is the directory where the IBM Websphere MQ was installed on the server.
-
-
Download the javax.jms.api-2.0.1.jar from the Maven Repository.
-
Add the above libraries path to the master CLASSPATH along with the existing libraries in the master.props.
For Windows:
;${TIDAL_HOME}\lib\com.ibm.mq.allclient.jar;${TIDAL_HOME}\lib\javax.jms-api-2.0.1.jar;${TIDAL_HOME}\lib\fscontext.jar;${TI DAL_HOME}\lib\providerutil.jar;${CLASSPATH}For UNIX:
:${TIDAL_HOME}\lib\com.ibm.mq.allclient.jar:${TIDAL_HOME}\lib\javax.jms-api-2.0.1.jar:${TIDAL_HOME}\lib\fscontext.jar:${TI DAL_HOME}\lib\providerutil.jar:${CLASSPATH} -
Stop the Master and start the Master after updating the Classpath.
-
Create the connection by entering these fields:
-
Type – Choose the type as IBM WebSphere MQ (MQ Series) from the Type dropdown list.
-
JMS URL – Enter the JMS URL as file:/C:/JNDI-Directory (the location where you copied the JNDI-Directory).
-
Username – From the Username dropdown list, choose the user who has access to the Queue Manager.
-
Connection Factory – Enter the name of the connection factory which was provided during the bindings creation. Refer to step 1 to create a bindings file
-
JNDI Properties – Click Add to add these properties:
java.naming.factory.initial - com.sun.jndi.fscontext.RefFSContextFactory
java.naming.provider.url - file:/C:/JNDI-Directory
-