Oracle Cloud ERP Job Definition
To define an Oracle Cloud ERP job:
-
Click Definitions in the Navigation pane > Jobs to display the Jobs pane.
-
Right-click Jobs and click Add Job > Oracle Cloud ERP Job.
-
Describe the job using these fields:
-
Job Name – Enter a name that describes the job.
-
Job Class – Choose class from the dropdown list to assign a defined job class to this optional field.
-
Owner – Choose the user or group that owns the job.
-
Parent Group – Choose the parent group name for a job that will reside inside a job group. All properties in the Agent Information section are inherited from the parent job group.
-
-
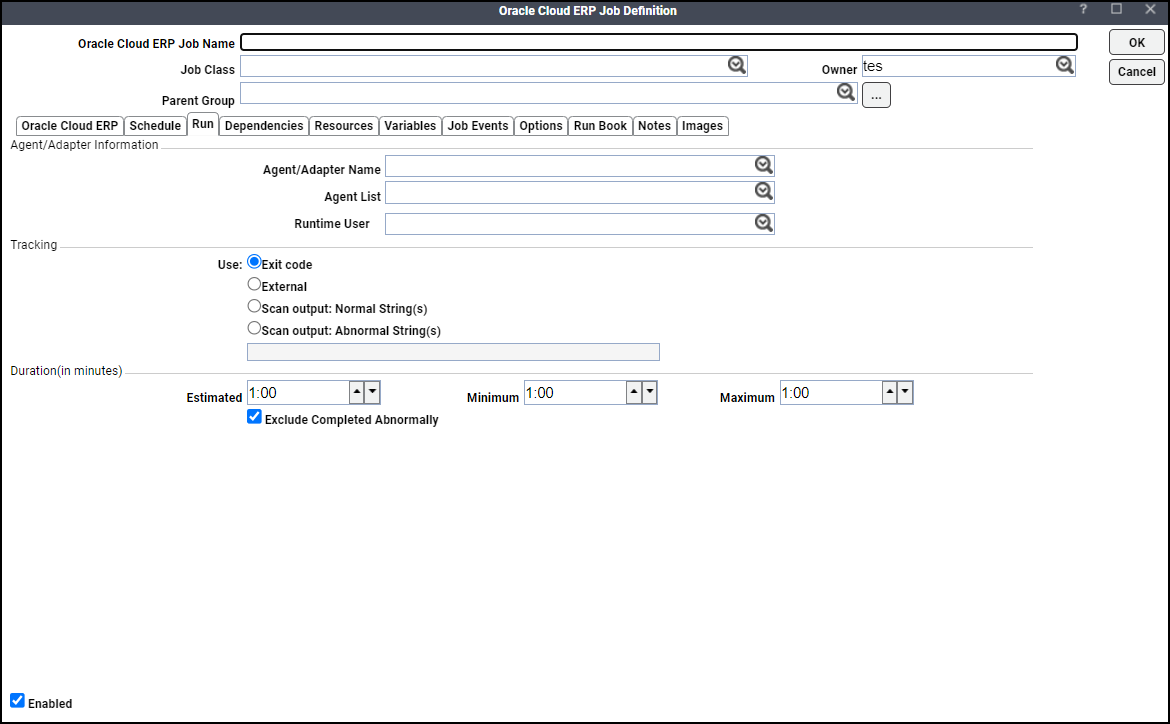
Specify the connection information in the Agent/Adapter Information section of the Run tab:
-
Agent/Adapter Name – Click the connection to be used for this job from this dropdown list.
-
Agent List – An agent list is a grouping of defined connections to Oracle Cloud ERP instances. Only Oracle Cloud ERP agent lists that were defined in the Agent List window are displayed. When the job runs, Tidal Automation attempts to connect with the first agent in the list. If the connection is unsuccessful, an attempt is made to connect to the next listed agent, and so on, until a successful connection is established.
Make sure that the job can run on any of the connections in the agent list. If the job is assigned to a connection on which it cannot run, an Error Occurred status message is displayed for the failed job.
Note: If you choose an agent list, the Agent Name value is reset.
-
Runtime User – Choose a valid runtime user for the job from this dropdown list.
Specify the appropriate Tracking and Duration information for the job. For information about these options, see Jobs and Job Groups.
-
-
(Optional) Specify the input value Defer until complete in the If job is currently running field. For information about the Defer until complete option, see Jobs and Job Groups.
-
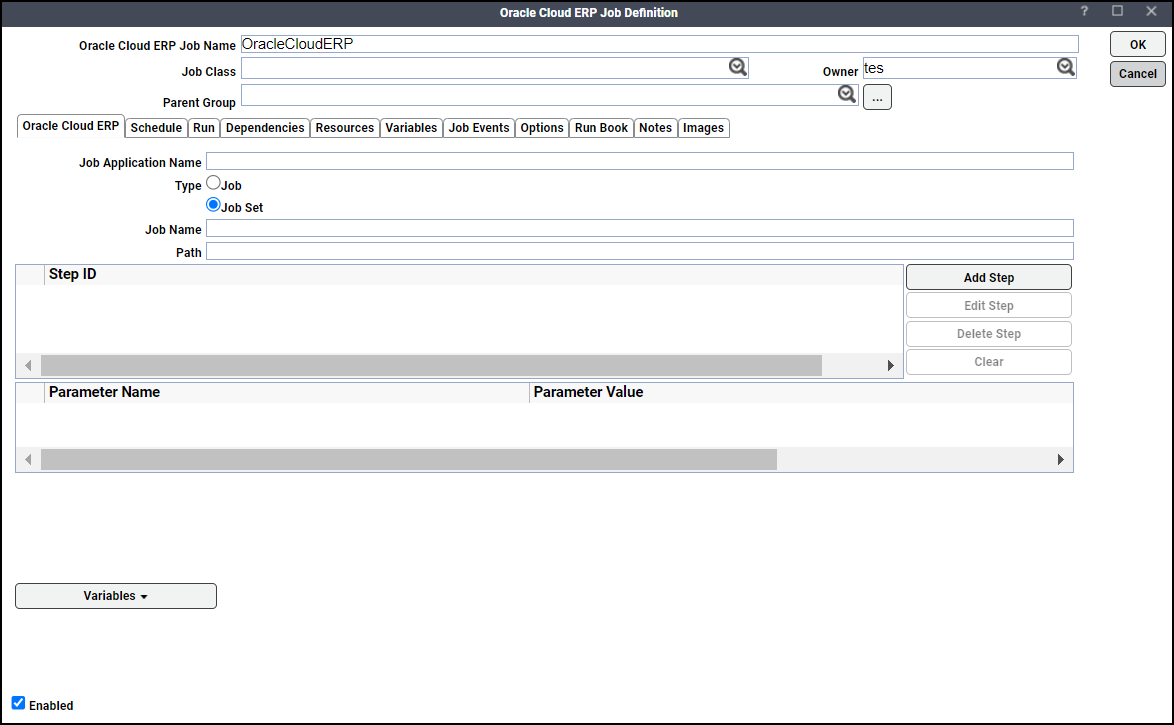
Click the Oracle Cloud ERP tab.
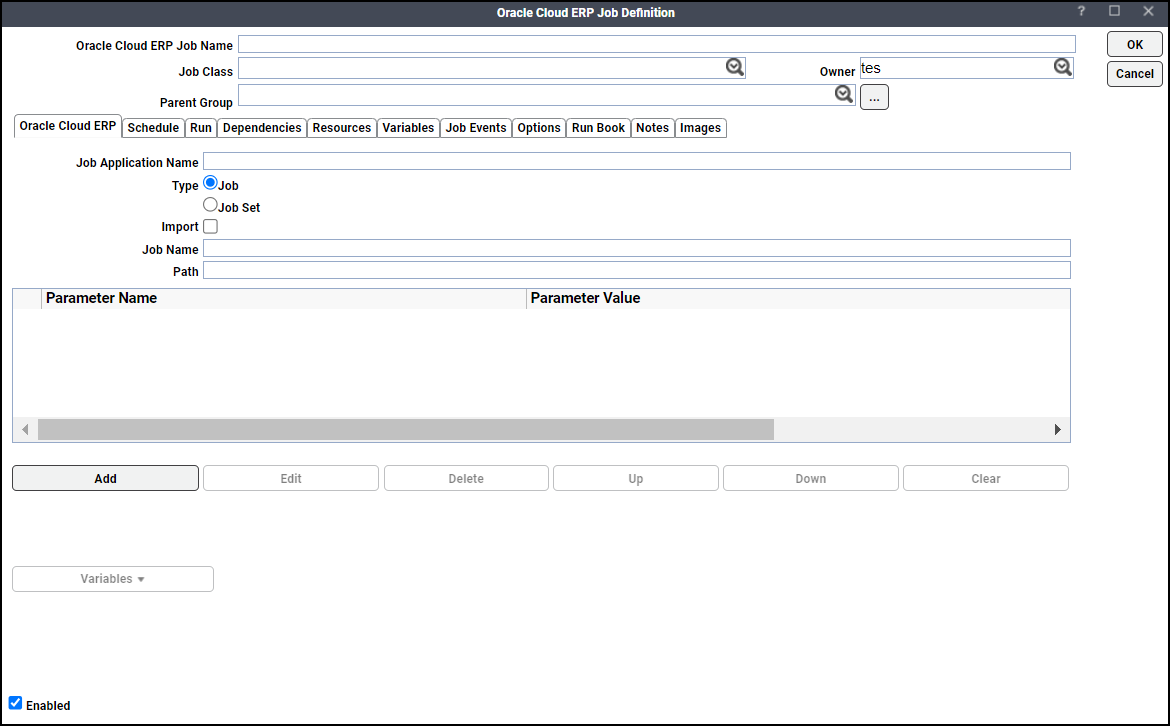
-
Click Job as the type to enable Enterprise Scheduler Job Definitions or choose Job Set as the type to enable Enterprise Scheduler Job Sets. For more information, see:
Defining an Oracle Cloud ERP Job
To define an Oracle Cloud ERP job:
Note: To enable an Enterprise Scheduler Job Definition in Tidal Automation, enter the details using the Job Definition metadata obtained from the Oracle Cloud ERP Server.
-
Enter the Job Application Name on the Oracle Cloud ERP tab.
-
Choose Job as the type.
-
Enter the Job Name.
-
Enter the Path.
-
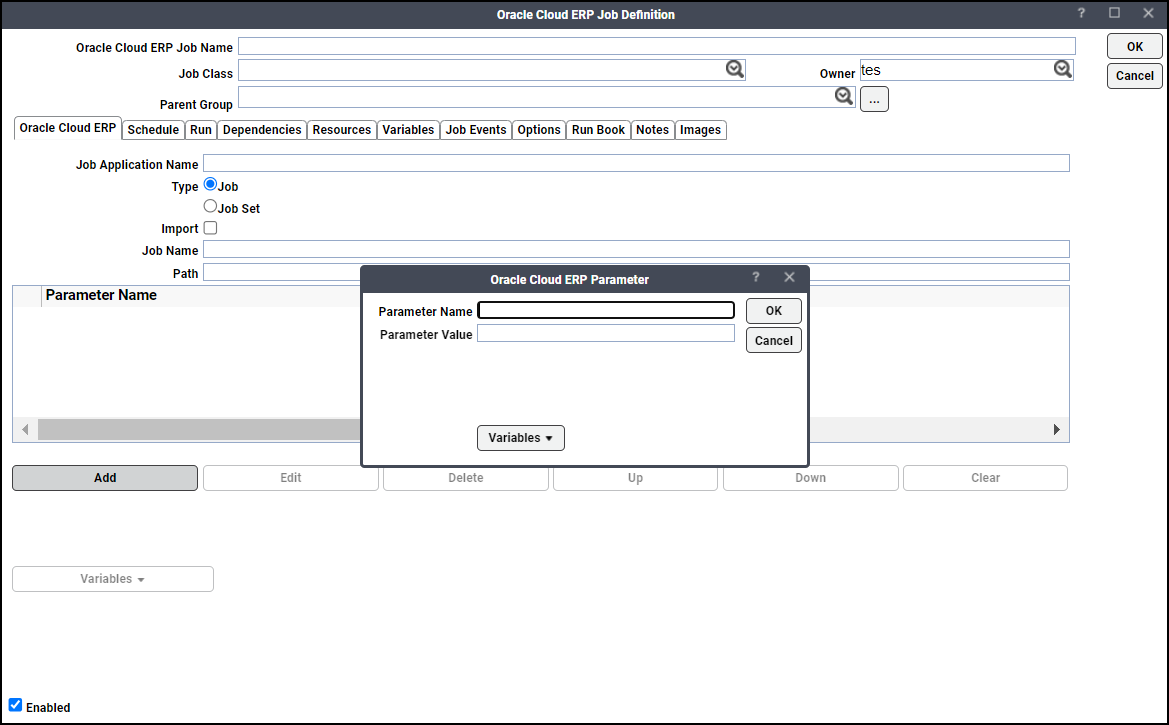
Click Add on the Parameters tab to include the parameters from job definition metadata.
If available, add variables from the Variables context menu. See Variables for more information.
You can perform these actions from the Parameters tab:
-
To modify an existing parameter, click the parameter, and click Edit.
-
To remove an existing parameter, click the parameter, and click Delete. The selected parameters are removed only from the grid. The job must be saved for the parameters to be removed from the database.
-
To change the parameter sequence, click the parameter, and click Up or Down.
-
To remove all parameters from the Parameters grid, click Clear. The parameters are removed only from the grid. The job must be saved for the parameters to be removed from the database.
Note: If available, add variables from the Variables context menu for the Job Application Name, Job Name, and Path. See Variables for more information.
-
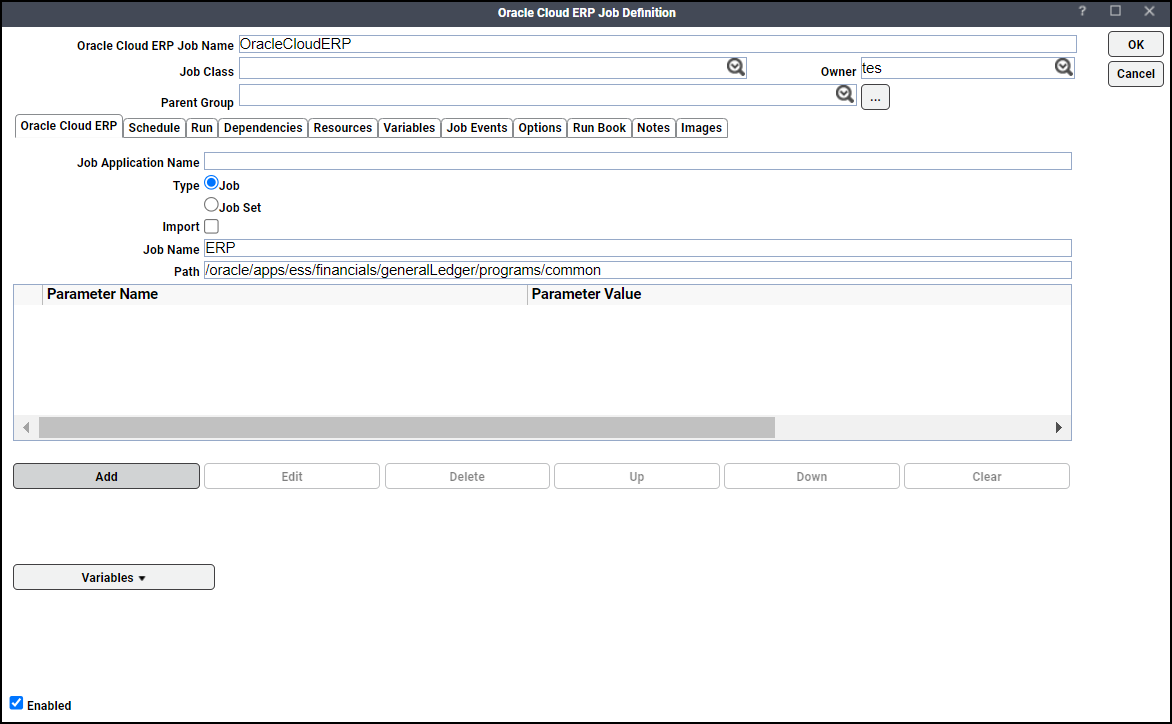
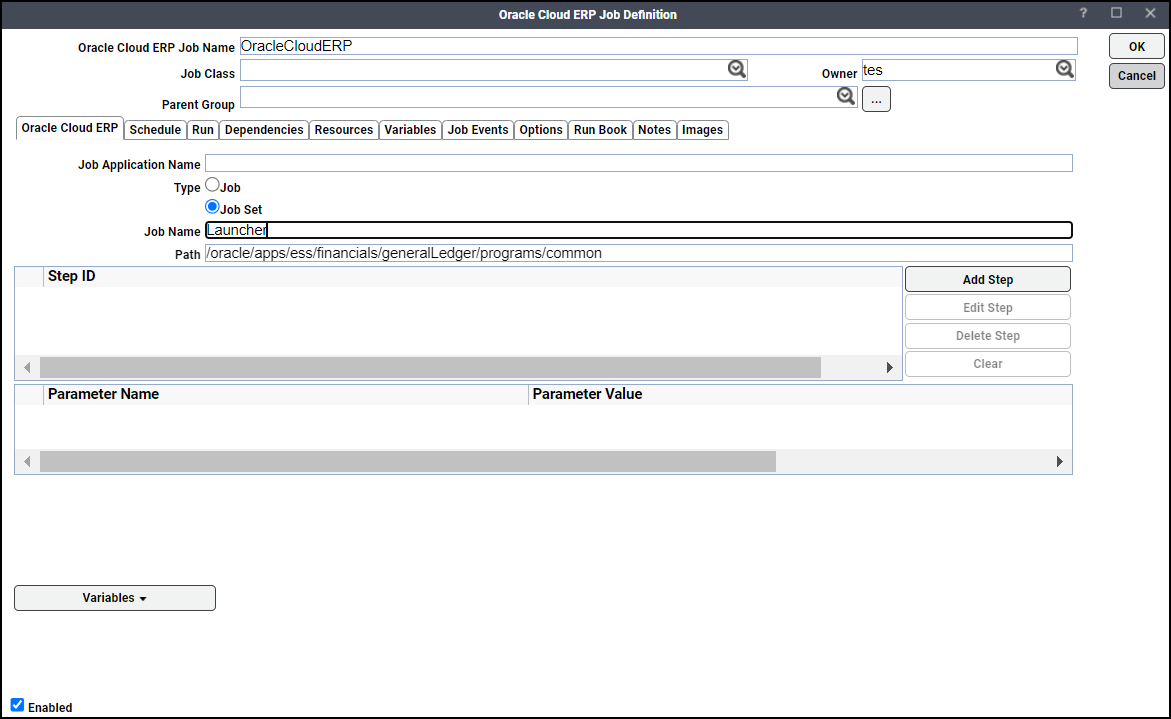
Example Job Definition with Job as type:
Defining an Oracle Cloud ERP Job Set
To define an Oracle Cloud ERP job set:
Note: To enable an Enterprise Scheduler Job Set in Tidal Automation, enter the details using the Job Set metadata obtained from the Oracle Cloud ERP Server as described in Defining an Oracle Cloud ERP Job.
-
Enter the Job Application Name on the Oracle Cloud ERP tab. This is the job set name obtained using the Job Set metadata from the Oracle Cloud ERP Server.
-
Choose Job Set as the type.
-
Enter the Job Name.
-
Enter the Path.
-
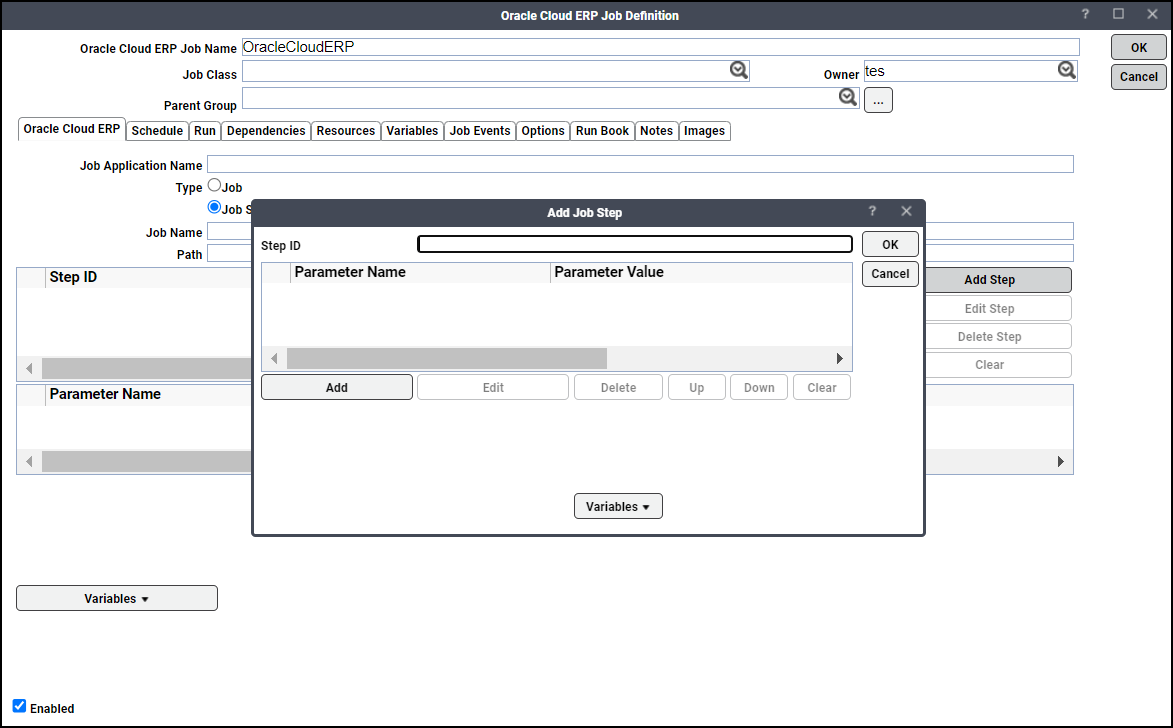
Click Add Step. Each job step is an individual job definition from the Oracle Cloud ERP Server; repeat this step to add all required steps.
-
Click Edit Step to edit an existing job set step.
-
Click Delete Step to delete an existing job set step.
-
Click Clear to clear the Step ID grid.
-
-
Enter the Job Set Step ID obtained from Job Set metadata in the Step ID field of the Add Job Step dialog.
Note: If available, add variables from the Variables context menu for the Step ID. See Variables for more information.
-
Click Add to add parameters from job definition metadata based on the value in the Step ID field.
Example: If “TaxContentUploadProcessDataProgram” is entered as the Step ID, then the parameters from the “TaxContUpProcessData” job definition metadata should be added.
If available, add variables from the Variables context menu. See Variables for more information.
Other actions that can be performed from the Add Job Step dialog:
-
To modify an existing parameter, click the parameter, and click Edit.
-
To remove an existing parameter, click the parameter, and click Delete. The selected parameters are removed only from the grid. The job must be saved for the parameters to be removed from the database.
-
To change the parameter sequence, click the parameter, and click Up or Down.
-
To remove all parameters from the Parameters grid, click Clear. The parameters are removed only from the grid. The job must be saved for the parameters to be removed from the database.
-
To view job step id parameters, choose the job step id from the JobSet Steps section.
Note: If available, add variables from the Variables context menu for the Job Application Name, Job Name, and Path. See Variables for more information.
-
Example Job Definition with "Job Set" as type:
Defining an Oracle Cloud ERP Job Using File-based Data Import
Tidal Automation supports file-based data import into the Oracle Cloud ERP service. Loading the data into an Oracle Cloud ERP service is traditionally a multi-step process.
Using the file-based data import, users can generate an input file for import using pre-delivered Excel sheets by Oracle.
The file-based data import is a two-step process:
-
Uploads the input file to the Oracle UCM (Unified Content Management) System and initiates the "Load Interface File for Import" process to load data into application tables.
-
Imports data from application tables into actual transaction tables.
Note: You can create either a single Oracle Cloud ERP job definition or multiple Oracle Cloud ERP job definitions in Tidal Automation using the file-based data import.
Overriding the Import Process Field Values
While performing the file-based data import with a single job definition, users can override the values in the Process dropdown list available in the Oracle Cloud ERP tab of the Oracle Cloud ERP Job Definition dialog.

To override the list of default values in the Process dropdown list, follow these steps:
-
Create a file named as “ImportProcess.xml” and add the required values in the file formatted as shown below: “ImportProcess.xml” file format:
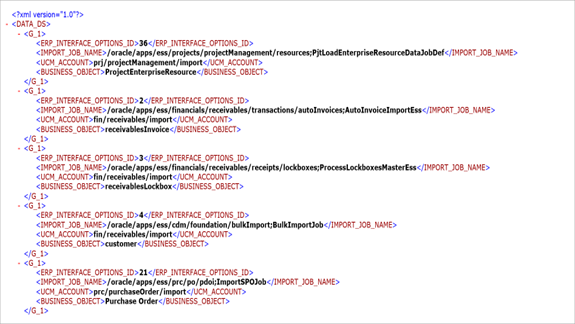
-
Add the file to the config directory located in the adapter's GUID directory to access updated values in the Process dropdown list.
File-based Data Import with a Single Job Definition
-
Enter the Job Application Name in the Oracle Cloud ERP tab of the Oracle Cloud ERP Job Definition dialog.
-
Choose Job as the type.
-
Check the Import checkbox and choose the import process from the Process dropdown list. The Job Name and the Path fields are auto-populated based on the selected import process.
Example: For HCM Import and Load process, click the Import and Load HCM Data File-HRC_DL_Main process in the Process field.
Note: Users can override the default values in the Process dropdown list using the “ImportProcess.xml” file.
-
Enter in File Name the path of the input file (.zip file) that should be uploaded to Oracle UCM.
Note: Make sure that the input file is placed in the same location where the TA Master is installed.
The read-only Load Data To Interface Table option, which is selected by default, informs the users that the data is imported from UCM to the interface tables first.
The Load Data To Application Table option is selected by default. With this option enabled, both steps of the file-based import process are performed.
-
Click Add in the Parameters tab to add the parameters from job definition metadata.
If available, add variables from the Variables context menu. See Variables for more information.
Other actions that can be performed from the Parameters tab:
-
To modify an existing parameter, click the parameter, and click Edit.
-
To remove an existing parameter, click the parameter, and click Delete. The selected parameters are removed only from the grid. The job must be saved in order for the parameters to be removed from the database.
-
To change the parameter sequence, click the parameter, and click Up or Down.
-
To remove all parameters from the Parameters grid, click Clear. The parameters are removed only from the grid. The job must be saved for the parameters to be removed from the database.
Note: If available, add variables from the Variables context menu for the Job Application Name, Job Name, and Path. See Variables for more information.
Note: For the HCM Import and Load process, do not enter the Filename and ContentID as parameters in the Oracle Cloud ERP Parameter dialog. By entering the file name in the Oracle Cloud ERP tab, the ContentID is automatically generated based on the file name. If you enter the FileName and the ContentID as parameters, the job is completed abnormally.
-
File-based Data Import with Multiple Job Definitions
In the file-based import process with single job definition, which has two steps A and B, TA knows only about the process id (referred to as "External ID" in TA) from step A. As the process id for step B cannot be determined, TA is unaware about this process id. Hence, Tidal recommends to perform a file-based data import with multiple job definitions.
To perform a file-based data import with multiple job definitions:
-
Define an Oracle Cloud ERP job using file-based data Import functionality. In this step, the input file is loaded into UCM and then the data from UCM is loaded into the interface tables.
Note: Make sure to clear the Load Data To Application Table option while defining an Oracle Cloud ERP job using the file-based data import.
-
Define an Oracle Cloud ERP job without using file-based data Import functionality. In this step, the data is imported from the interface tables to the actual transaction tables. For more information, see Defining an Oracle Cloud ERP Job.