Defining an Oracle Database Job
The Oracle database job is defined from the Oracle DB tab of the Oracle DB Job Definition dialog. You choose the type of job to be defined from the Job Type list on this tab.
The job type is either a PL/SQL type or a database type. If the Oracle Database Adapter selected on the Run tab of the job definition has a connection to an Oracle 11i database then only the PL/SQL option is available. If the selected adapter is connected to an Oracle 10g instance, both types of jobs can be defined.
You can add an Oracle database job using the right-click menu within the Jobs pane and selecting the Add Oracle Database Job option. You can also Edit, Copy, and Delete an existing Oracle database job. If you add Oracle database jobs to a TA job group, items common between the job group and the Oracle database job are inheritable. However, unless the parent group has an adapter assigned to it, you must clear the Inherited option and choose the correct Oracle database connection.
Defining a PL/SQL Job
PL/SQL jobs can either run in TA or run in the Oracle database. The output from jobs that run inline can be retrieved as XML or as simple text that can be formatted for display or printing. Job output cannot be retrieved from those jobs that run within the Oracle database.
To define a PL/SQL job:
-
Click Definitions in the Navigation pane > Jobs to display the Jobs pane.
-
Right-click in either the Navigation or Jobs pane and choose Add Oracle Database Job from the context menu to display the Oracle DB Job Definition dialog.
-
Enter a name for your job in the Job Name field. You can choose a name of up to 50 characters maximum.
The Job Name is an identifier for TA only. All of the other job definition information, such as Job Class, Owner, and Parent Group, is the same as any other TA job.
If you are putting your Oracle database job into a job group, note that unless the parent group selected has an adapter assigned, you must clear the Inherited option.
-
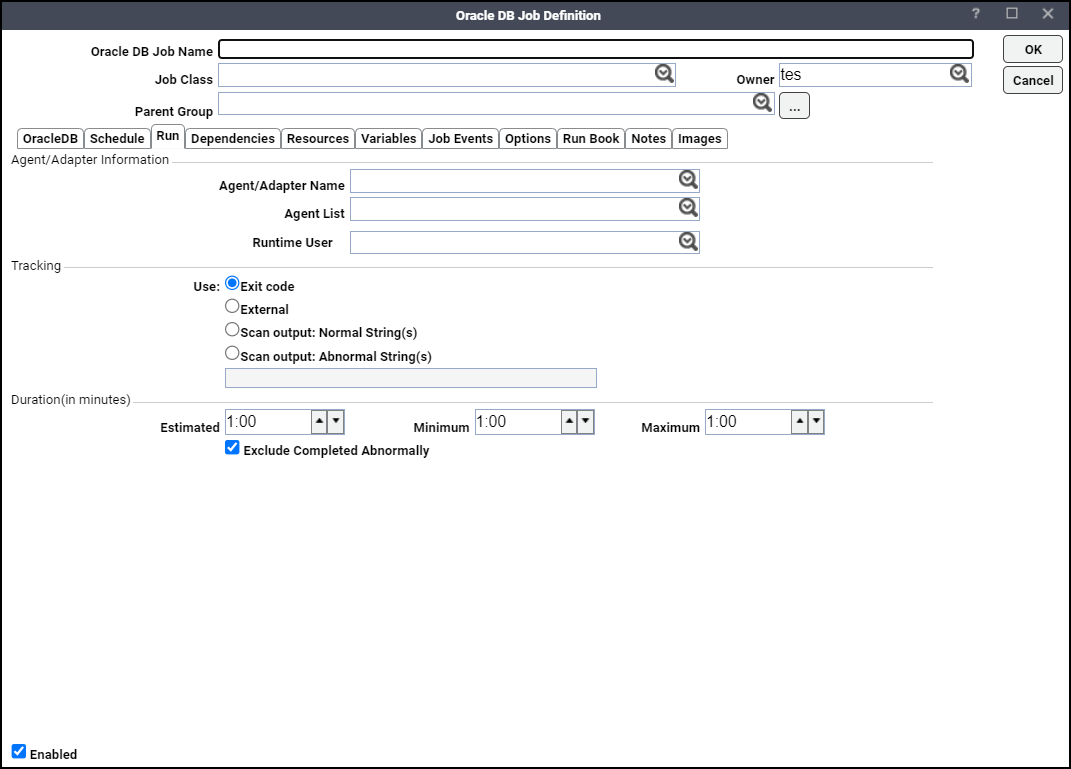
Click an Oracle database instance on the Run tab in the Agent/Adapter Name list. If no Oracle database instances are available from the menu, verify that an Oracle database connection has been defined.
Note: The name in this list represents all the information in the Oracle database connection definition, including the version number, runtime user, database instance, database user ID, etc. To use different parameters, modify the connection definition, or define a new Oracle database connection with a new adapter name and then use that adapter.
-
Click an Oracle database user in the Runtime User list.
-
Specify the appropriate Tracking and Duration information for the job. Refer to Tidal Automation User Guide for more information about these topics.
Note: If you wish to change the default job output settings for individual job instances, click the Options tab and modify the Job Output Option setting. Subsequent job instances will revert to the default job output setting specified in the System Configuration dialog.
-
Click the Oracle DB tab.
-
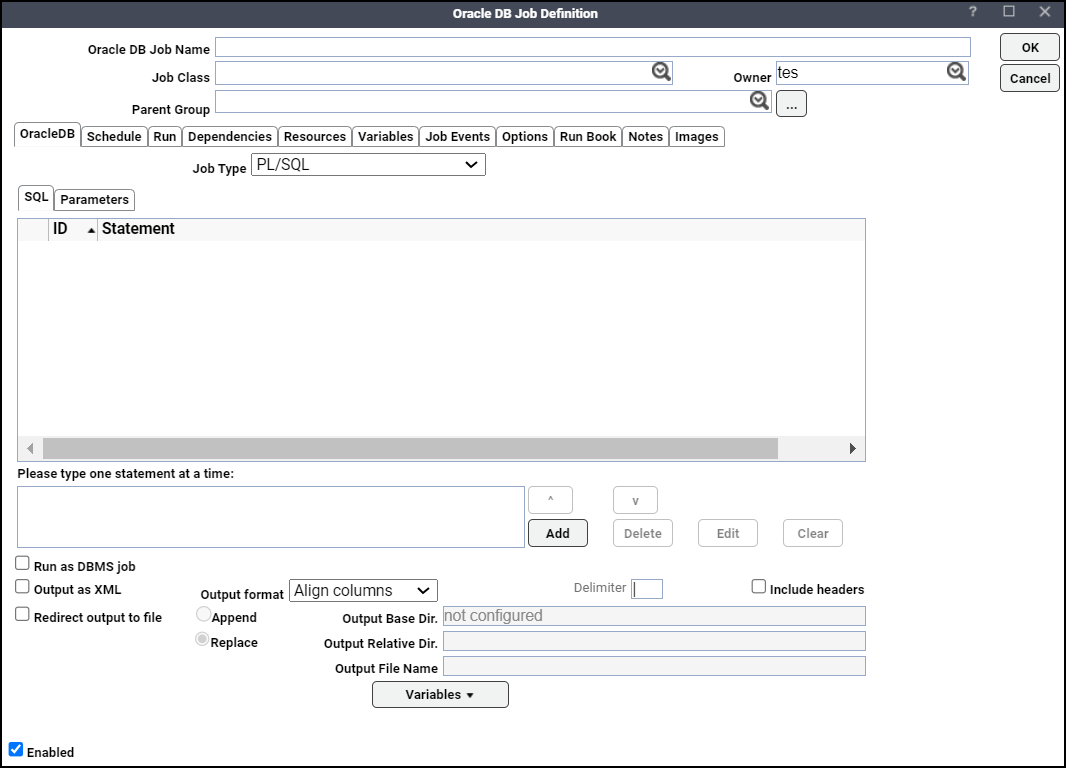
Choose a job type from the Job Type list.Choose whether the Oracle database job being defined is a PL/SQL statement or a predefined database job.
-
Enter the SQL statement that the PL/SQL job will run on the SQL tab.
Multiple SQL statements and SQL code blocks can be entered here. The output from the multiple SQL statements (if the job is configured to save output) is displayed in the order that the statements run.
-
Check the Run as DBMS job checkbox to run the job as a DBMS job.
-
Check the Output as XML checkbox to save the job output in the XML format.
-
Choose how the query results should be formatted from the Output format dropdown list.
-
Align Columns – Displays the values in the most readable format.
-
CSV Format – Separates values with commas.
-
Raw – Separates values with a user-defined character.
-
-
Specify in the Delimiter field the custom character to use for delimiting the column data from the query results if Raw or CSV Format is selected for Output Format.
-
Check the Include Headers checkbox to write out the column headers of the results as well.
-
Check the Redirect output to file checkbox if you want the job output to be stored in a file. This redirection option is independent of the Save Output Option located on the Options tab.
Example: If the Save Output Option is set to Discard and the Redirect output to file checkbox is selected, then the job output will be saved to the specified file while the Output tab on the Job Details will be empty.
Example: If the Save Output Option is set to Append or Replace and the Redirect output to file checkbox is selected, the Output tab on the Job Details dialog shows the redirection message.
-
Click Append to append current output to the existing output in the output file. Click Replace to replace the existing output with current output in the output file.
The Output Base Directory field specifies the output base directory, if configured. This is a read-only field.
-
If the output base directory is not configured, the field value is shown as “not configured” in the Output Base Directory field. In this case, the job will not execute and will have the “Error Occurred” status. The corresponding error message will be shown in audit log files.
-
If the output base directory is configured, the base directory path is shown in the Output Base Directory field. Example base directory path: /opt/Tidal/{adapter_guid}/, where adapter_guid is the GUID of the adapter.
Note: The base directory path is activated by specifying a value in the sysval_longstr column of the sysval “195”. This can be accomplished by executing an update statement to the database as mentioned in the example.
MS SQL Query:
insert into sysval (sysval_id, sysval_longstr, sysval_lstchgtm) values (195, 'c:\temp\adapter\output', GETDATE())
Oracle SQL Query:
insert into sysval (sysval_id, sysval_longstr, sysval_lstchgtm) values (195, '/tmp/adapter/output', SYSDATE)
Here, the sysval_longstr field contains the output base directory path. An optional sysval_integer field indicates whether the task GUID subdirectory will be appended to output base directory or not. If the value of sysval_integer is 1, the task GUID will be appended. In all other cases, the task GUID will not be appended.
-
-
Enter the directory path relative to the output base directory in the Output Relative Directory field. Example output relative directory path: relativedir/path.
-
Enter the name of the file in which the job output is stored in the Output File Name field. This file is placed in the path resulting from step 17 and 18.
Example: If the Output File Name is specified as “sqljob.xml”, then the job output is stored in /opt/Tidal/{adapter_guid}/relativedir/path/sqljob.xml.
Each parameter used in the SQL statement will be listed on the Parameters tab where its value can be specified. A parameter will be recognized only if written in the proper format. Each parameter name must begin with a colon (:) and end with a space; for example, :URL. If a parameter used in the SQL statement is not listed on the Parameters tab, verify that it is correctly formatted in this field.
-
Click OK.
Defining a Database Job
To define a Database job:
-
Click Definitions > Jobs in the Navigation paneto display the Jobs pane.
-
Right-click in either the Navigation or Jobs pane and choose Add Oracle Database Job from the context menu to display the Oracle DB Job Definition dialog.
-
Enter a name for your job (50 characters maximum) in the Job Name field.
The Job Name is an identifier for TA only. All other job definition information, such as Job Class, Owner, and Parent Group, is the same as any other TA job.
If you are putting your Oracle database job into a job group, note that unless the parent group selected has an adapter connection assigned, you must clear the Inherited option.
-
Click the appropriate instance on the Run tab in the Agent/Adapter Name list. If no Oracle database instances are available from the menu, verify that an Oracle database connection has been defined.
Note: The name in this list represents all the information in the Oracle database connection definition, including the version number, runtime user, database instance, database user ID, etc. To use different parameters, modify the connection definition, or define a new Oracle database connection with a new adapter name and then use that adapter.
-
Click an Oracle database user in the Runtime User list.
-
Specify the appropriate Tracking and Duration information for the job.
Note: If you wish to change the default job output settings for individual job instances, click the Options tab and modify the Job Output Option setting. Subsequent job instances will revert to the default job output setting specified in the System Configuration dialog.
-
Click the Oracle DB Job Definition tab.
-
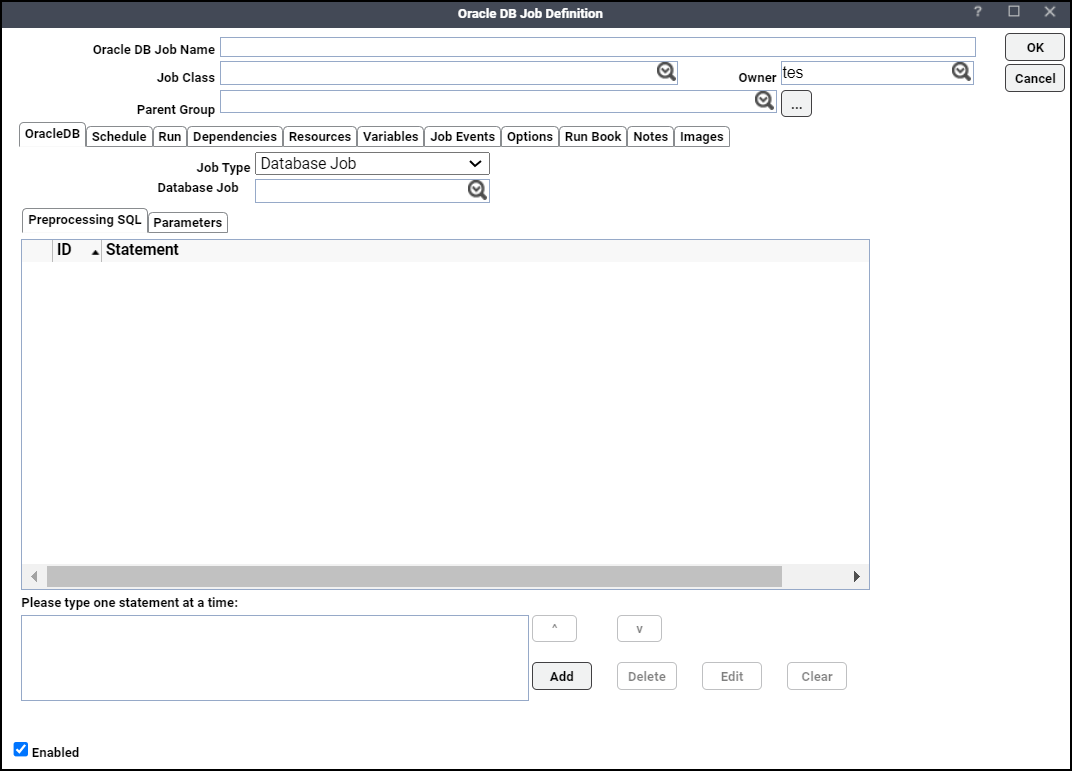
Choose Database Job from the Job Type list.
-
Choose the name of the predefined Oracle DBMS job from the Database Job list.
This field is only available if the Database Job option was selected in the Job Type field. The list shows all the jobs available for the schema owner. Wildcard characters cannot be used in this field.
-
Enter the SQL code block that should run before the job runs on the Preprocessing SQL tab.
These SQL statements will run inline before the database job runs. The SQL code specified here can be used to configure the job environment and any of the parameters needed by the database job that was selected in the Database Job field. If the SQL syntax is incorrect, an error message is displayed when the user attempts to save the job. This is an optional field as no preprocessing SQL is necessary for a database job to run successfully.
Multiple SQL statements and SQL code blocks can be entered here. The output from the multiple SQL statements (if the job is configured to save output) is displayed in the order that the statements run.
-
Click the Parameters tab to specify a value for each parameter used in the SQL statement.
Parameters displayed here are contained within the SQL block that was entered on the SQL tab. A parameter must be written in the designated format to be recognized. A parameter that is not formatted correctly will not be displayed here.
Each parameter name must begin with a colon (:) and end with a space.
Example: :URL.
The parameter name cannot be modified from this tab. This tab will display the parameter as it appears in the SQL block. Click the parameter and enter a value in the Value column for the parameter. You can either enter a specific value or use Variables to choose a predefined variable.
-
Click OK.