Defining a Web Services Connection
Create a connection to the Web Services host before TA can run your Web Services jobs. These connections also must be licensed before TA can use them.
A Web Services connection represents a connection to a single REST or SOAP Web server and one service defined in its WSDL. A single installation allows for multiple connections to be established to various REST and SOAP Web Services providers.
A connection is created through the Connection Definition dialog.
Adding a SOAP Web Services Connection
To add a SOAP Web Services connection:
-
Click Administration > Connections on the Navigation pane to display the Connections pane.
-
Click Add or right-click and choose Add Connection > WebService Adapter from the context menu to display the WebService Connection Definition dialog.

-
Enter a name for the new connection in the Name field.
-
Click the General tab.
-
Click the maximum number of concurrent active processes that TA should submit to the Web Services host on this server at one time in the Job Limit field.
-
Click the name of a default user for Web Services jobs in the Default Runtime User list.
The runtime user is used for HTTP authentication. Only users that have been defined with Web Services passwords display in this list. The user selected is automatically supplied as the runtime user in TA Web Services job definitions.
Note: If you intend to connect Web Services adapter to another TA 6.x platform, click a user account from the "Interactive User" group. Only an interactive user is allowed to connect to a TA platform.
-
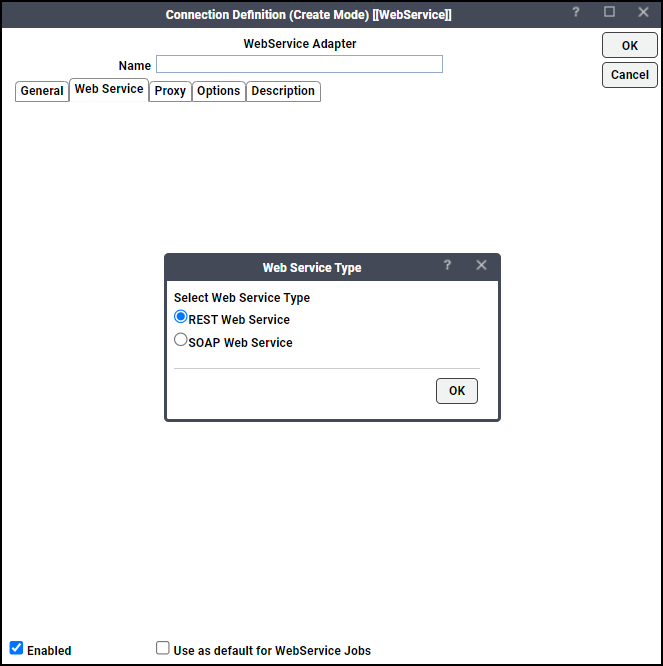
Click the Web Service tab. The Web Service Type dialog appears.
-
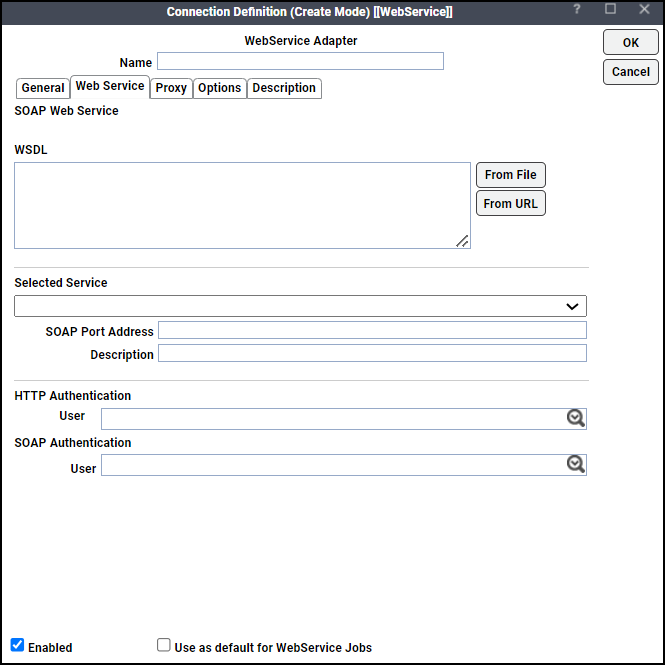
Click the SOAP Web Service option, and then click OK to display fields related to SOAP Web Service.
-
Click either From File or From URL to load the WSDL file.
Note: When attempting to process a WSDL file containing DTD and external links, this error message may appear on the user interface: Failed to read the external document 'burp', because 'http' access is not allowed due to restriction set by the accessExternalDTD property. To resolve this, disable the parameter by adding XmlFeatureSecureProcessing=N to the clientmgr.props file.
-
From File – Load the WSDL file from an existing file via the WSDL From File dialog.
Due to internet browser security constraint, WSDL upload from file will be successful only if the WSDL is self-contained and does not import a schema or other WSDL's. To supply WSDL that imports other files, you must download it through the From URL option.
-
From URL – Load the WSDL file from a WSDL URL
Note: You can also import a schema from within a WSDL. To import a schema, load the WSDL. If the WSDL imports any schemas, the adapter will follow the reference paths to load them. If the schema imports additional schemas, the adapter will load every one.
If HTTP Authentication is required to access the WSDL URL on the Web server, specify the HTTP Authentication user for the connection first, then load the WSDL from the URL.
-
-
Click a service from the Selected Service list.
The Web Services connection is defined by selecting a service defined in a WSDL file.
-
Click OK after selecting a file or entering a WSDL URL.
Optionally, in the HTTP Authentication section and the SOAP Authentication section, choose an authorized runtime user from the list for use with Web service jobs.
-
Click OK.
Note: See Tidal Automation User Guide for instructions on using the Options, Outages, and Description tabs. These tabs are not specific to this adapter.
Adding a REST Web Services Connection
A REST Web Services is a stateless client-server architecture in which clients access and manipulate Web resources through HTTP protocol. It does not introduce additional specification (as oppose to SOAP/WSDL) on top of the existing HTTP methods, definitions, and entities. This means an HTTP client can interact with a REST Web Service provider without having to incorporate any supporting stack. You can create a REST connection without authentication, with HTTP authentication, or with OAuth authentication.
Without Authentication
To add a REST connection without authentication:
-
Click Administration > Connections on the Navigation pane to display the Connections pane.
-
Click Add or right-click and choose Add Connection > Web Services Adapter from the context menu to display the Web Services Connection Definition dialog.
-
Enter a name for the new connection in the Name field.
-
Click the General tab.
-
Click the maximum number of concurrent active processes that TA should submit to the REST Web Service host on this server at one time in the Job Limit field.
-
Click the Web Service tab. The Web Service Type dialog appears.
-
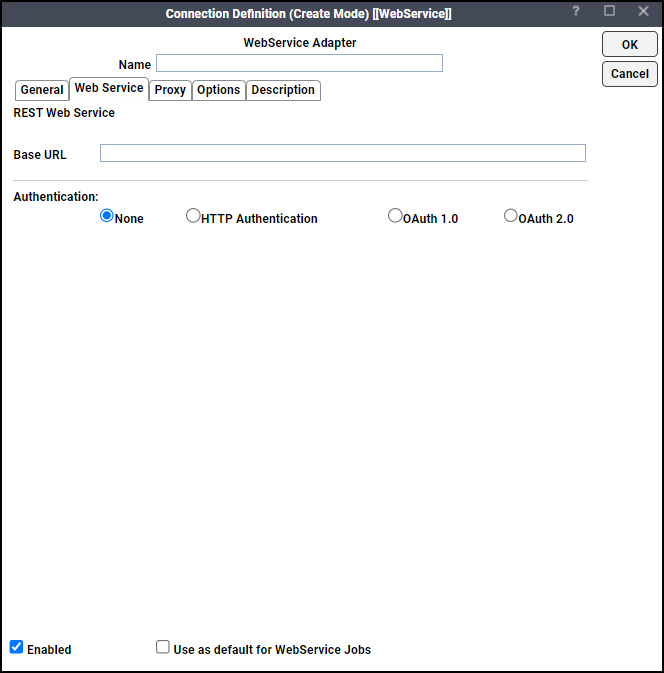
Click REST Web Service, and then click OK. The Web Service tab appears.
-
Enter the URL for the REST service in the Base URL field.
-
Click None from the Authentication section.
-
Click OK.
With HTTP Authentication
To add a REST connection with HTTP authentication:
-
Click Administration > Connections on the Navigation pane to display the Connections pane.
-
Click Add or right-click and choose Add Connection > Web Services Adapter from the context menu to display the Web Services Connection Definition dialog.
-
Enter a name for the new connection in the Name field.
-
Click the General tab.
-
Click the maximum number of concurrent active processes that TA should submit to the REST Web Service host on this server at one time in the Job Limit field.
-
Click the Web Service tab. The Web Service Type dialog appears.
-
Click REST Web Service, and then click OK. The Web Service tab appears.
-
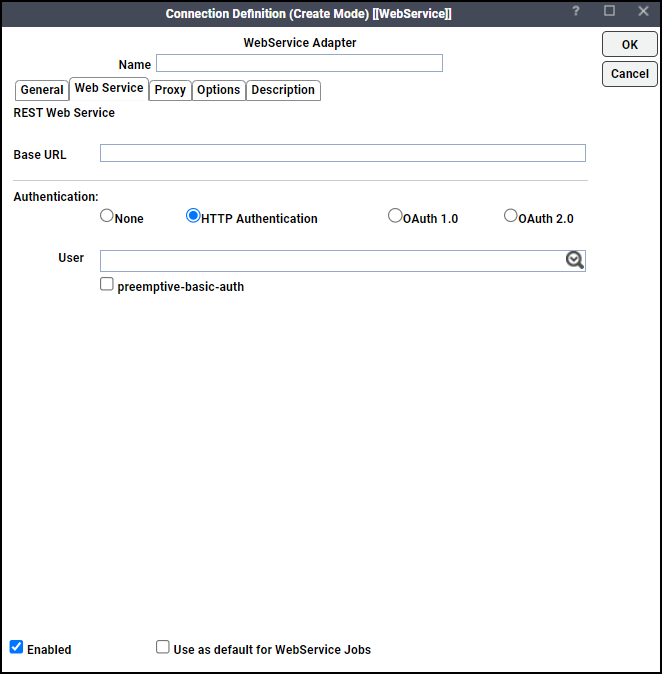
Enter the URL for the REST service in the Base URL field.
-
Click HTTP Authentication on the Authentication section.
-
Click the runtime user for Web Service that represents those users and passwords required for HTTP Authentication from the User list.
-
Click OK to save the connection.
With OAuth 1.0 Authentication
To add a REST connection with OAuth 1.0 authentication:
-
Click Administration > Connections on the Navigation pane to display the Connections pane.
-
Click Add or right-click and choose Add Connection > WebService Adapter from the context menu to display the WebService Connection Definition dialog.
-
Enter a name for the new connection in the Name field.
-
Click the General tab.
-
Click the maximum number of concurrent active processes that TA should submit to the REST Web Services host on this server at one time in the Job Limit field.
-
Click the Web Service tab. The Web Service Type dialog appears.
-
Click REST Web Service, and then click OK.
-
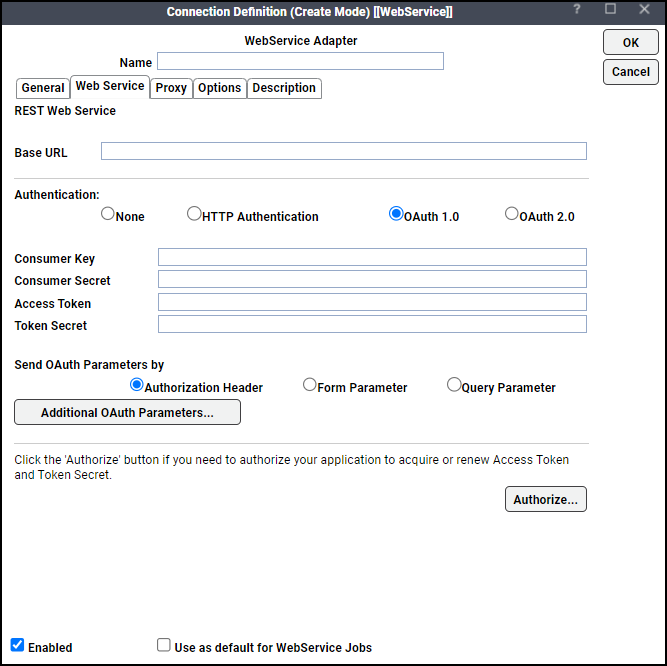
Enter the URL for the REST service in the Base URL field.
-
Click OAuth 1.0 on the Authentication section.
-
Enter these values that are required to authenticate with the service provider. You should have obtained the Consumer Key and Secret after registering your Web Service application with the provider.
-
Consumer Key
-
Consumer Secret
-
Access Token
Note: If you need to acquire or renew the Access Token, see Running the OAuth 1.0 Authentication Wizard.
-
Token Secret
-
-
Click one of these options in the Send OAuth Parameters by section:
-
Authorization Header
-
Form Parameter
-
Query Parameter
Optionally, click Additional OAuth Parameters to add or edit additional OAuth parameters. The Additional OAuth Parameters dialog appears.
-
Click Add or Edit to display the OAuth Parameters dialog.
-
Enter the parameter name in the Name field.
-
Enter the parameter value in the Value field.
-
Click OK to return to the Additional OAuth Parameters dialog.
-
Click OK to return to the Web Service tab.
-
-
Click OK to save the connection.
Running the OAuth 1.0 Authentication Wizard
To use OAuth 1.0 authentication, you are required to authenticate with the service provider with four values, Consumer Key, Consume Secret, Access Token, and Token Secret.
Note: The OAuth 1.0 Authentication Wizard will only work with Web Service providers that support the Out of Band (OOB) callback mechanism.
To acquire or renew these values:
-
Click Authorize on the Web Service tab to launch the wizard.
-
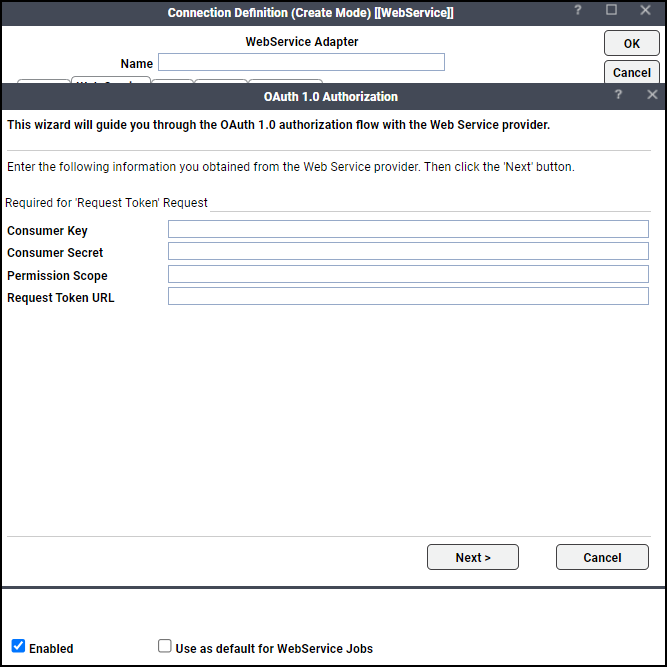
Enter these values that are required to authenticate with the service provider on the Authorization panel. You should have obtained the Consumer Key and Secret after registering your Web Service application with the provider.
-
Consumer Key
-
Consumer Secret
-
Permission Scope
-
Request Token URL
-
-
Click Next to connect to the Web Service provider and view the response.
-
Click View Response to display the View Response panel.
-
Click OK to return to the Authorization panel.
-
Navigate to the Authorization URL field and enter the authorization URL and Request Token value displayed in the Request Token field above in the format required by the Web Services provider.
Example: A typical format is as follows: https://www.provider.com/oauth/authorize?oauth_token=<request token>
-
Click Authorize to display the Web Services provider Website and follow the instructions provided to authorize your application and obtain the Verifier code.
-
Return to this wizard when complete, then click Next to continue with your OAuth authorization. The Verifier and Access Token URL panel appears.
-
Navigate to the Verifier field and enter the verifier you obtained in Step 7 above.
-
Enter the URL you obtained from the Web Service provider in the Access Token URL field.
-
Click Next. The Access and Token Granted panel appears.
-
(Optional) Click View Response to display the View Response panel.
-
Click Finish to save the values and return to the Web Service tab.
With OAuth 2.0 Authentication
To add a REST connection with OAuth 2.0 authentication:
Note: If you are setting up for Password Grant, create a TIDAL runtime user with the OAuth2 username and password that are required to log into your authorization server. Then continue the configuration steps as follows:
-
Click Administration > Connections on the Navigation pane to display the Connections pane.
-
Click Add or right-click and choose Add Connection > Web Services Adapter from the context menu to display the Web Services Connection Definition dialog.
-
Enter a name for the new connection in the Name field.
-
Click the General tab.
-
Navigate to the Job Limit field and click the maximum number of concurrent active processes that TA should submit to the REST Web Service host on this server at one time.
-
Click the Web Service tab. The Web Service Type dialog appears.
-
Click REST Web Service, and then click OK.
-
Enter the URL for the REST service in the Base URL field.
-
Click OAuth 2.0 in the Authentication section. If you are creating a connection using the new version of the adapter, continue to step 11.
-
Check Switch to new view checkbox to convert the connection configured in the old format to the new format.
Note: Switch to new view checkbox is displayed only when you are editing an existing connection created using an earlier adapter version. When you check this checkbox, it converts the connection configured in the old format to the new format. If you are creating a connection using the current version, then this checkbox is not displayed.
-
Click the desired grant type. Enter all the required information.
If you click Password option in the Grant Type field, then choose the runtime user you created earlier from the User dropdown list.
Note: You can leave the Scope field blank, if your authorization server does not require it.
-
Save the connection.
Enabling Web Service Proxy
You can set the proxy settings for the Web Services adapter.
To set the proxy settings:
-
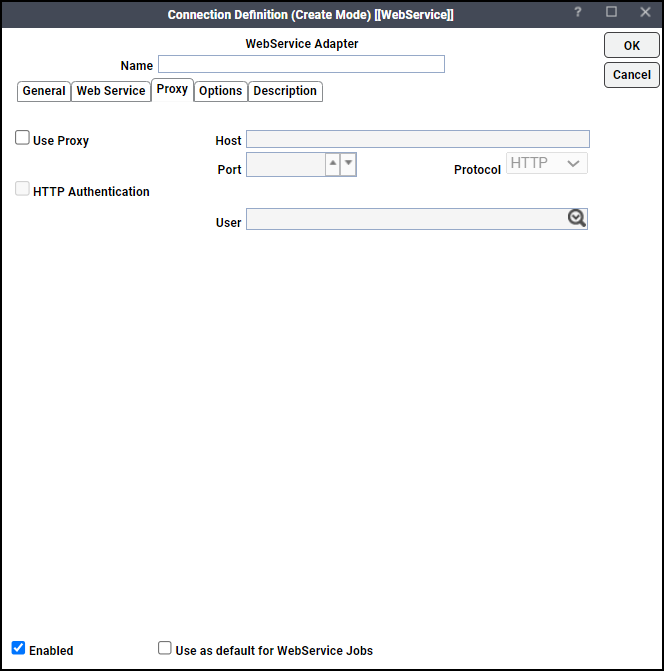
Click the Proxy tab on the Connection Definition dialog.
-
Check the Use Proxy checkbox.
-
Enter the proxy server address in the Host field.
-
Enter the port number in the Port field.
-
Enter the scheme (https or http) in the Scheme field.
-
(Optional) Check the HTTP Authentication checkbox.
-
Enter the user ID and password in the respective fields.
-
Click OK.
Web Services Connection – Options Tab
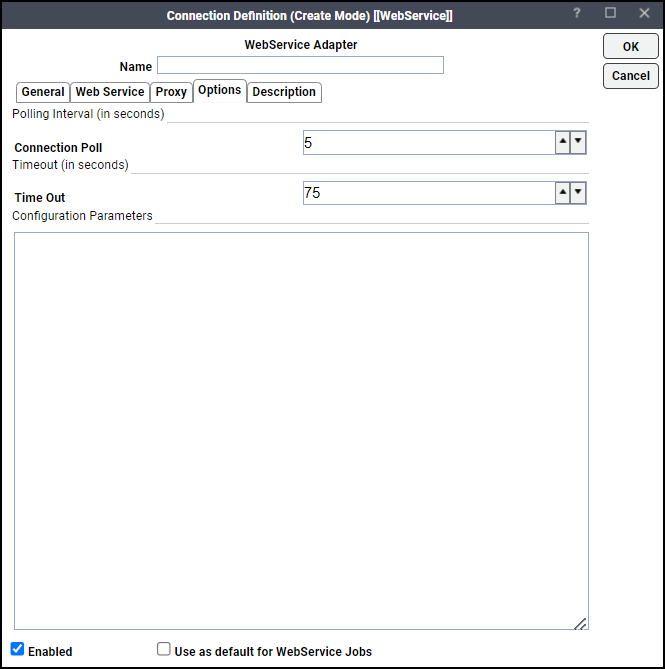
The Options tab allows you to specify polling for the connection and add any configuration parameters.
This tab contains these elements:
-
Connection Poll – The frequency (in seconds) in which the Web Services instance is checked for new connect messages. The default value is 5 seconds. Values can range from 1 - 999 seconds.
-
Time Out – The amount of time to wait for the connection to establish before timing out. The default value is 75 seconds.
-
Configuration Parameters – Specify any parameters that are used during polling.
OLDRECOVERYLOGIC – By default, when the connection is lost and then restored, the adapter sets the status of Orphaned jobs to Unrecoverable. In earlier adapter releases, the adapter sets the status of Orphaned jobs to Completed Abnormally. To restore the old behavior, specify OLDRECOVERYLOGIC=Y.