User Dashboard
Activating/Deactivating and Unlocking the User Dashboard
Administrators use this function to activate/disable and unlock user accounts.
Note: For new users and established user accounts, the default status is Active and Unlocked. Administrators cannot activate, deactivate or unlock their own accounts. However, an administrator can activate, deactivate, unlock another administrator user's account.
Activating and Disabling
When an account is Active, the user can login and use Tidal Repository based on the user’s established security policies.
A disabled account is not accessible by the user. Typically, an account is disabled when the user no longer requires access to the account (example: employment termination).
To activate or disable a user account:
-
Click Account menu > User Dashboard to open the Dashboard tab.
-
Check or clear the Active column’s checkbox for the user account to activate or disable
Unlocking Function
The Unlock function is used primarily to reset user accounts that have been locked as a result of the user unsuccessfully attempting to log on more than 10 times consecutively.
To unlock a user account:
-
Click Account menu > User Dashboard.
-
Deselect the Locked checkbox for the user.
Creating a User Account
To create a user account:
Note: Anyone who creates user accounts must have Add User permissions. The Assign User Privileges permission is applied only in the Create or Edit User screens. Users who have Add User permissions but do not have Assign User Privileges permissions can create a user profile, but cannot assign permissions to that profile.
-
Click Account menu > User Dashboard to open the Dashboard tab.
-
Click Plus on the Dashboard tab to add a new user.
-
Enter the Username on the Add User tab. This field is required. The Username must contain 2 – 100 characters including at least one uppercase letter, one lowercase letter, one digit, and no spaces.
Note: Only Admin users have access rights to edit their own first and last names and those of other users.
-
Define a role (Admin or User) using the Admin checkbox.
Note: Once you assign the user the Admin role, the User Privileges checkbox is disabled. All privileges are given to the user with the Admin role by default.
-
Choose an account.
To create a user, switch the toggle to DB and enter the password in the Password field. The Password field must contain at least one uppercase letter, one lowercase letter, one digit, and no spaces.
Note: Only the Tidal Repository administrator can create an AD/LDAP user. Before adding an AD/LDAP user, be aware that this user (with first and last name, username, and password) is already created on the server.
To create an AD/LDAP user, switch the toggle to AD/LDAP and enter the domain that is associated with this user. The administrator sees the newly created AD/LDAP user on the dashboard tab with the (disabled) label.
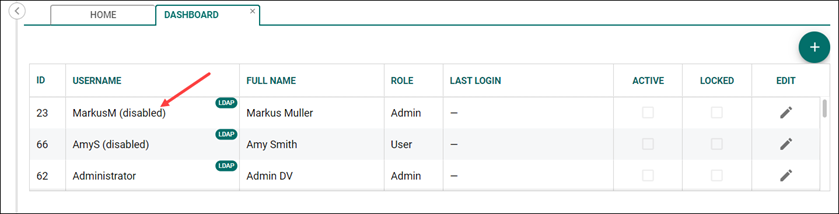
Once this new user logs in, the disabled label disappears.
Note: Logging in to the Tidal Repository, the user enters the username and the password created for this user on the server.
-
Choose User Privileges as follows:
Public and Private Objects
Workgroups
Users
Add Workspace
Add Connection
Add Repository
Add Mapping
Add Pipeline
Add Task
Add Policy
Add Workgroup
Read Workgroup
Edit Workgroup
Delete Workgroup
Add User
Read User
Edit User
Delete User
Assign Privileges
Security Policy
Authorization Policies
LDAP Groups
Add Security Policy
Read Security Policy
Edit Security Policy
Delete Security Policy
Add Authorization Policy
Read Authorization Policy
Edit Authorization Policy
Delete Authorization Policy
Add LDAP Group
Read LDAP Group
Edit LDAP Group
Delete LDAP Group
Assign Privileges
To choose all user privileges, check the User Privileges checkbox.
-
Click Save to create the user configured.
Editing a User Account
To make changes to an established user account:
-
On the Dashboard tab, click Edit for the user account you would like to change.
Note: The User Privileges fields are disabled for the Admin role as this role possesses the full set of privileges by default.
-
On the Edit User tab, make your changes and click Save to apply them.
Deleting a User Account
To delete the user account:
Note: The Administrators can delete other administrators as well as other users. However, the administrator cannot delete themselves. The users with the Delete User permission can delete only other users, they cannot delete themselves or the administrators from the system.
-
Click Delete on the Dashboard tab.
-
Click Accept to apply changes.
Changing a User Password
To change a password:
-
Click Change Password on the Edit User tab.
-
Enter a new password, confirm it, and click Accept to apply changes.