Upgrading Unix Backup Master
Follow the procedures in these sections to upgrade your Unix Backup Master.
Upgrading the Unix Backup Master from the Command Line
Note: Be sure to backup your database before proceeding with this upgrade.
To install from the command line:
-
Stop the Backup Master service.
-
Navigate to the UnixMaster directory and copy install.bin from the upgrade folder to the target machine.
-
Change the permissions on the install.bin file in the directory to make the file executable:
chmod u+x install.bin
-
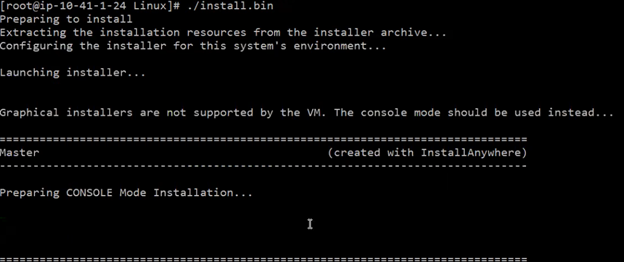
Open a command prompt window and enter:
sudo ./install.bin
-
Press Enter to move to the next step. The installer will extract resources and prepare the environment:
The installer will guide you step-by-step. Review the recommendations:
-
If you need to go back, type "back" to end the installation procedure and complete the listed prerequisites before beginning the upgrade procedure again.
-
If you want to cancel the installation process, type "quit."
-
-
Press Enter to move to the next step. Before you can upgrade to version 6.5 or higher, make sure to complete the necessary steps to prepare your database.
-
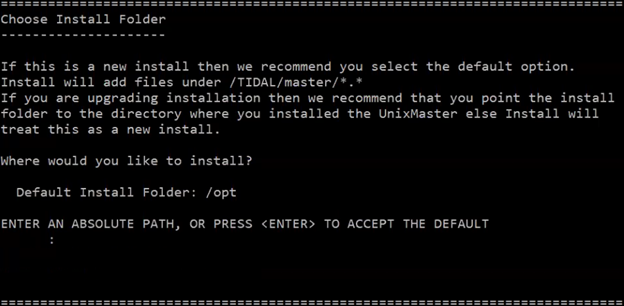
Press Enter and the Choose Install Folder screen displays. Enter the install folder and press Enter. Or press Enter to choose the default folder:
-
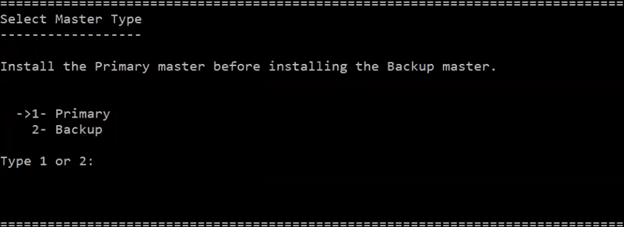
Choose the type of Master. Type 2 for Backup Master:
-
Specify if you want to use Disaster Recovery and press Enter:

-
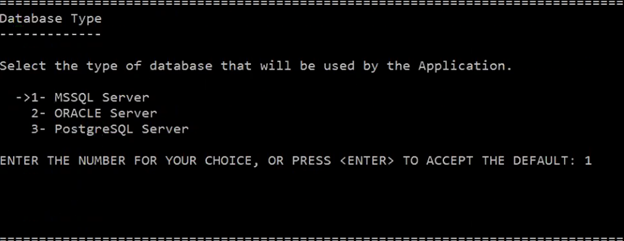
Select the database type on the Database Type screen:
-
1 for the MSSQL server and navigate to the Get Microsoft Azure SQL screen.
-
2 for the ORACLE server and navigate to the Get Autonomous Database screen.
-
3 for the PostgreSQL server and navigate to the Enter DBA User name and Password screen.
-
-
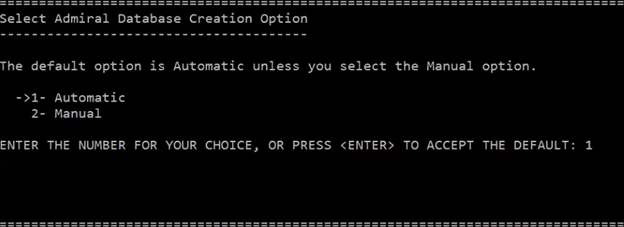
Select the Admiral Creation option and press Enter:
-
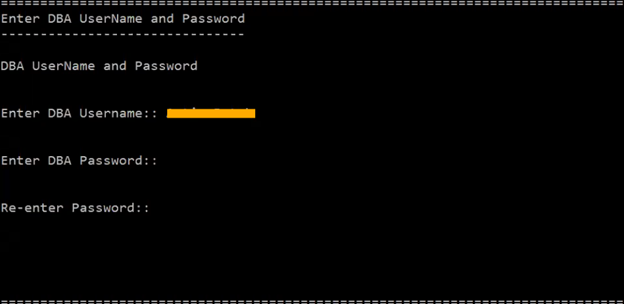
Enter the information on the Enter DBA Username and Password screen so that the Unix Backup Master can connect to and validate with the database:
-
Enter DBA Username – Enter a username for the Database Administrator.
-
Enter DBA Password – Enter the password for the Database Administrator.
-
Re-enter Password – Re-enter the password provided in the Enter DBA Password field.
-
-
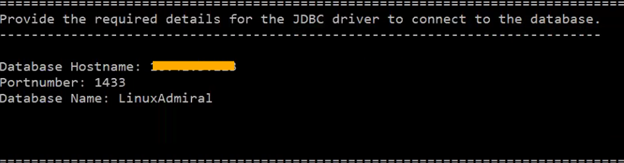
Provide this information so that the Unix Master can connect to the database:
-
Database HostName – Enter the hostname of the database server.
-
Portnumber – Enter the port number of the JDBC driver.
-
Service Name – Enter the Oracle System ID.
-
-
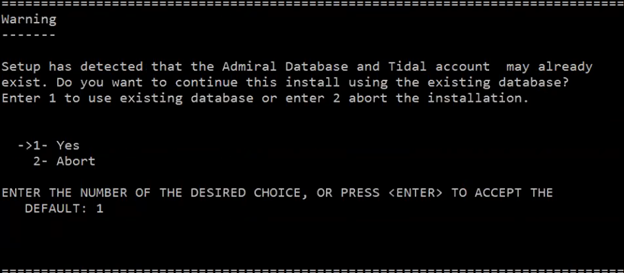
Press Enter to move to the next step. The installer will detect that the database already exists. To use the same database, select option 1:
-
Press Enter to choose the authentication methods.
-
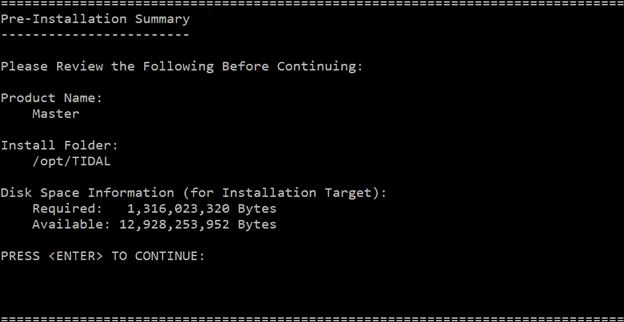
Review the Pre-Installation Summary information and press Enter to accept all the existing AD or LDAP configuration values.
Note: You can provide an AD or LDAP configuration value if required by typing the new value and pressing Enter.
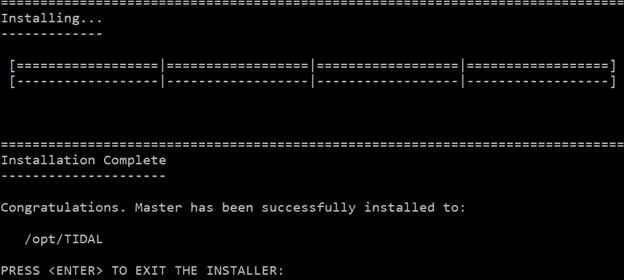
Press Enter to continue. When the upgrade has completed, the Installation Complete panel appears:
-
Press Enter to exit the installation process.
-
Start the Backup Master.
./tesm start
The Master applies database changes automatically during its first startup after the upgrade procedure.
Note: Use the dbcheck data integrity validation command and the tesm command if you encounter data inconsistencies post-installation.
-
Run this command to check the version:
./tesm status
-
Review the latest scheduler.out file in the log folder to confirm if the service has been initiated.
Upgrading the Unix Backup Master via the Upgrade Program
To upgrade to the latest version:
-
Complete all prerequisites in Upgrade Prerequisites.
If your installation uses an Oracle database, your database administrator must add these Oracle privileges to the TA user account in Oracle before beginning the upgrade procedure, or the upgrade will fail:
-
Create sequence
-
Create trigger
-
-
Ensure that the system queue has been set to 0 so that jobs will not launch. They will remain in the “Waiting on Resources” status until the system queue has been released.
-
Stop the Backup Master from the command line of the Backup Master machine:
./tesm stop
-
Copy install.bin to the target machine and change the permissions on the file:
chmod u+x install.bin
-
Run the upgrade program that you copied to your machine:
sudo ./install.bin
-
Click Next. The Readme panel displays.
-
Verify that you have already completed the prerequisites listed on the Readme screen.
-
Enter the directory path to the Backup Master folder where the Backup Master files were installed during the original installation of the Backup Master.
The Upgrade program cannot proceed without knowing where the Backup Master files it is modifying are located. You can manually enter the directory path or click Choose to browse through the file directory to the Backup Master folder.
A confirmation message verifies that the required Backup Master directories are in the specified location.
-
Click Next to move to the next step.
-
Choose Primary or Backup on the Master Type screen and click Next.
-
Choose Yes or No for the Disaster Recovery option.
-
Choose ORACLE, MSSQL, or PostgreSQL database on the Database Type screen and click Next.
-
Choose Yes or No on the Get Autonomous Database screen and click Next.
-
Specify the DBA username and password and click Next.
-
Provide information for the JDBC driver to connect to the database and click Next. The Master is being configured.
-
Click Continue on the Existing Admiral database installation found screen.
-
Click Create Read-Only User option to create a read-only user in the Master database.
Note: If read-only user is already existing, select Read-Only User already exists option.
-
Choose AD or LDAP authentication and click Next.
-
Click Next. The Pre-Installation Summary screen displays.
-
Verify that the information is correct.
-
Click Install. During the upgrade process, a progress bar displays. When the upgrade is complete, the Install Complete screen displays.
-
Click Done.
-
Start the Backup Master.
./tesm start