Configuring Agents
Once the agent is installed, instances can be added, deleted and modified as needed. Configuration parameters are provided for managing the agent. Before working with the Himalaya agent you must define a connection between the agent and the master.
Configuring Agents
You can configure Himalaya agents (add and delete agent instances) using the Agent Configuration Menu.
To display this menu:
-
Log on as agent owner on the agent machine.
-
Go to the bin directory by entering cd /opt/TIDAL/Agent/bin.
-
Type in ./tagent config to display the Agent Configuration Menu.
Adding Agent Instances
To add an instance:
-
Enter 1 in the Agent Configuration Menu and press Enter.
-
Enter the name of the agent, its port number and the directory path to the Java binaries and then press Enter.
-
Enter Y and press Enter. An agent instance is added.
-
Start the agent by entering ./tagent <agent name> start
Viewing the Status of Agent Instances
View the status of an agent by entering in the bin directory ./tagent <agent name> status. Once you have entered that command a status screen displays.
Deleting Agent Instances
To delete an instance:
-
Stop the agent.
-
Enter 3 in the Agent Configuration Menu and press Enter.
-
Type the number of the instance to delete.
-
Press Enter to delete the instance.
Configuring Agent Parameters
Certain parameters of the Himalaya agent can be configured for the convenience of users. You modify the parameters of the agent by changing the parameter values in the tagent.ini file. The tagent.ini file is located in the Himalaya agent directory. If the default location was used during the agent installation, the agent files are located at /opt/TIDAL/Agent/bin. Stop the agent before modifying any of the agent’s parameters. These agent parameters can be modified:
-
profile=y
The profile parameter is used to have the agent permanently override the For UNIX, source user’s profile option on the Options tab of the Job Definition dialog.
Specifying the y value means that all jobs that run on this agent will source the specified runtime user profile. In effect, a y overrides any job that has the For UNIX, source user’s profile option selected and uses its own user profile. Use this option when existing jobs need to use a specific runtime profile that can be associated with a particular agent.
Leaving the parameter value blank (the default value) or specifying a n value means that any job with the For UNIX, source user’s profile option selected will source the user’s profile.
-
homedir=y
The homedir parameter specifies the agent’s home directory.
A y value means that the starting path will be the runtime user’s home directory instead of the agent’s home directory.
Leaving the parameter value blank (the default value) or specifying a n value means that the home directory remains the directory where the agent is installed.
Note: This parameter will override the working directory setting in the master for all jobs to the user’s home directory.
-
minmem=x and maxmem=x
The minmem and maxmem parameters control how many MB of memory should be allocated to the agent processes. These memory parameters can be adjusted as individual needs warrent. Your system may need more or less than the default memory allotments.
The minmem parameter specifies that at least the amount of RAM specified should be available. The default value is 32 MB of RAM.
The maxmem parameter specifies that no more than the amount of RAM specified should be available for the agent processes. The default value is 64 MB of RAM.
-
fp=path of environment file
The fp parameter specifies a particular environment file to be used by an agent instance. Each agent instance can be assigned its own environment file and its associated environment variables with their various values.
To associate an environment file to an agent, enter the pathname of the environment file.
Leave this parameter blank (the default value) if you don’t want to associate an environment file to the agent.
-
Jobstopwait=n seconds
The Jobstopwait parameter specifies the time interval between sending a SIGTSTP warning that a job is about to be put on hold and actually sending the SIGSTOP signal to pause the job.
The default value is 1 second before pausing the job but the number of seconds between the warning and the actual pausing of the job can be modified from this parameter.
-
Jobkillwait=n seconds
The Jobkillwait parameter specifies the time interval between sending a SIGTERM warning that a job is about to be aborted/cancelled and actually sending the SIGKILL signal to abort/cancel the job. The default value is 5 seconds before cancelling the job but the number of seconds between the warning and the actual cancelling of the job can be modified from this parameter.
-
agentcpu=CPU number
The agentCPU parameter specifies the CPU on the machine where the agent process should run. There is no default CPU number.
-
jobcpu=CPU number
By default, jobs launched by the Himalaya agent run on the same CPU that the agent runs on. You can override this default setting with this parameter so that jobs run on a different CPU. There is no default CPU number.
Note: Individual jobs can override global CPU settings by adding a parameter to the job’s environment file. To specify a different CPU for a job to run on, add TIDALJOBCPU=<CPU number> to its environment file. The parameter must be in uppercase letters
-
tdm.agtpriority=agent process priority (value between 1 and 199)
Specifies the execution priority of the agent process. Execution priority of a process is the value in the range of 1 through 199 where 199 is the highest possible priority. By default the process priority is assigned by Guardian operating system to the agent process at the runtime.
Example: tdm.agtpriority=150
-
tdm.processname=agent process name (without $ sign)
Specifies the Guardian process name with which agent process is started. The agent process then can be monitored using the given name. The process name can NOT be more than 5 characters long. The process name value should exclude “$” sign. For example if you want process name to be $tidal, mention value of ʺtidalʺ in the tagent.ini file. By default process name is generated by agent using combination of letter T and port number of the agent process, for example $T5912.
Example: tdm.processname=tidal
Starting and Stopping Agents
The tidal Himalaya agent can be installed, started and stopped using login other than the root (SUPER.SUPER). During the agent install process, the installation script prompts the user to enter the oss userid and password under which tidal agent files to be installed and run.
You can start or stop an agent by entering on the command line:
./tagent <agent name> start
OR
./tagent <agent name> stop
Defining the Himalaya User
At least one user must be defined in the Scheduler to provide the necessary database access to submit Himalaya jobs from the Scheduler. Before you can create Himalaya jobs, an access ID to the Process Scheduler database tables (the database owner or equivalent) and one or more application users (operator IDs) must be defined in Scheduler. These user definitions authorize a connection to be established to the Himalaya database and permit requests to be made on behalf of application users.
Access to the Himalaya environment can be controlled by creating specific user definitions with Himalaya privileges. Those users with Himalaya access can then grant runtime user privileges to other users who need to run Himalaya jobs. Runtime users can also be limited to specific Himalaya instances or servers, if desired.
Note: The user of the Himalaya Adapter for TES is limited when interacting with Himalaya by the limitations imposed within Himalaya by the Himalaya administrator.
To add a Himalaya user:
-
Click Administration > Users to display the Users pane.
-
Click Add or right‐click and choose Add User to display the User Definition dialog.
-
Enter the user name in the User/Group Name list for the account provided by your Himalaya Administrator for use by Scheduler. The Full Name field is optional. Use the Domain field for additional documentation, such as to distinguish users with the same name that use different passwords in different instances.
-
Click the Runtime User Only option.
-
Click OK.
Authorizing a Himalaya Runtime User
If a Scheduler user is to work with Himalaya jobs, they must have one or more Himalaya users defined in their authorized runtime user list. If a Himalaya user is not added to a Scheduler user’s authorized runtime users list, the user has no access to Himalaya database and cannot run Himalaya jobs.
Similarly, you grant or deny access to specific Himalaya instances in the user’s authorized agents list.
Because the Scheduler user is a runtime user, any restrictions placed on the database user in the Himalaya environment apply to the Scheduler user as well.
To authorize a runtime user:
-
Click Administration > Users on the Navigator pane to display the Users pane, listing all Scheduler users. If the Scheduler users do not appear, you do not have the appropriate rights to view users.
-
Double‐click the name of the user account to display the User Definition dialog for that user.
-
Click the Runtime Users tab.
-
Navigate to the Runtime Users list.
-
Check the checkbox next to the name of the Himalaya user you want to include in this Scheduler userʹs authorized user list.
Note: If you wish to restrict this user’s access to specific instances, click the Agents tab and choose the appropriate instances.
Preventing Unauthorized Users from Using an Agent
The Himalaya agent can be configured to allow only specific users to run jobs on that agent. A list of users can be created to exclude or allow users access to the agent. If an unauthorized user tries to run a job on an agent that he is excluded from, the job will end with an Error Occurred status.
To exclude users from an agent:
-
Login as the owner of the agent.
Note: Stop all Himalaya agents before rebooting your system. It is recommended that you add the agent stop command to a system shutdown script to be used when restarting a system.
-
Create a file called Users.cfg in the agent’s root directory.
Example: /opt/ TIDAL/Agent/<name of agent>.
Note: The file name, Users.cfg, is case sensitive, so only the first letter should be capitalized and the rest of the name should be lower-case.
-
Change the Users.cfg file permissions to limit access to just the agent owner, by entering chmod 700 Users.cfg.
-
Enter EXCLUDE in the Users.cfg file.
-
List those users that will be prohibited from accessing the agent. Each user must be on a separate line.
An alternative method if the list of users to exclude is long, is to enter INCLUDE instead of EXCLUDE. Then you can list the users to give access to the agent if this is easier.
Note: To ensure that the changes take effect, stop, and restart the agent or disconnect and reconnect the client connection to the agent.
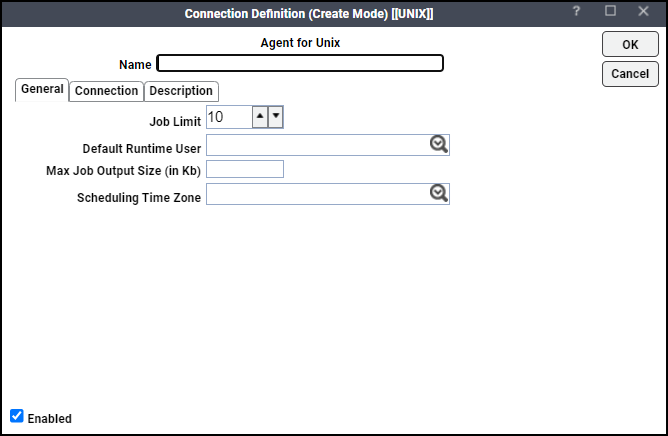
Defining an Agent Connection
Once you have installed the agent, define a connection between the agent and the master.
To define a connection between the agent and the master:
-
Click Administration > Connections on the Navigator pane of the Scheduler client to display the Connections pane.
-
Double‐click the agent name or right‐click in the Connections pane and click Add Connection > Agent for UNIX to display the Connection Definition dialog.
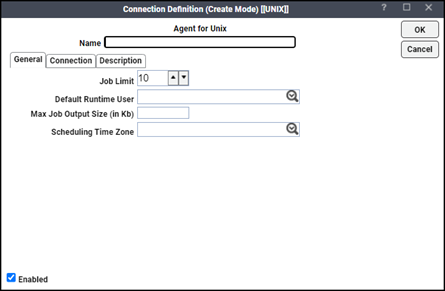
-
Enter a name for the Himalaya agent in the Name field. This name does not have to match the machine name or instance name.
-
Navigate the General tab.
-
Enter the number of jobs that the agent should be limited to in the Job Limit field.
-
Click Enabled to make the agent connection active once it is defined.
You activate and deactivate an agent by enabling or disabling the agent’s connection. Jobs cannot run on agents that are not enabled. If you disable the agent connection, jobs already running on the agent will complete but the completion status and other job information cannot be relayed to the master until the connection is enabled again.
From the Default Runtime User list, choose a runtime user from the pulldown list to be the default user if a runtime user is not selected in the job definition.
-
Click the Connections tab.
-
Navigate to the Machine Name field and enter the name or IP address of the machine where the newly installed Himalaya agent resides. This name must be a valid DNS name.
-
Navigate to the Master-to-Agent Port field and enter the port number that the master will use to communicate to the agent. This port communicates with the cqd process of an agent machine. The port number must be between 6700 and 9999. The default port for an agent is 5912 but if other agents are installed, this port may already be in use and the number will increment to the next available port.
Note: Be sure to not enter port numbers being used by other software programs. Check with your network administrator to ensure that the port numbers do not conflict with other programs.
Note: If desired, click the Description tab and enter a description or note about the connection being created. The Connections pane now shows the UNIX/Himalaya agent connection along with any other defined connections.