System Configuration
Before using TA on a regular basis, spend some time in the System Configuration dialog. By tailoring TA’s configuration to your needs, you will receive greater benefits from using the product.
You can configure these options:
-
Job and job group definition default field values. This lets you specify many of the default field values, such as the default agent, job priority, and concurrency that is automatically entered each time you create a new job or job group.
-
Timezones where target application environments are based. You can schedule a job or job group across a different timezone.
-
Mail parameters for email messaging services. This lets you define your email service so that TA can use it.
-
The audits, errors and diagnostic logging messages to include or exclude. As you become more familiar with TA, you might want to filter the messages that appear in the Logs pane, but initially we recommend keeping all default settings.
-
How job occurrences are sorted when the status sort is selected. This feature helps you to sort job occurrences based on the status order you choose, helping you more clearly organize jobs in the Job Activity pane.
System Configuration Dialog
Click Activities > System Configuration on the menu bar of the TA Client to display the System Configuration dialog.
System Configuration – Master Tab
The Master tab configures actions managed by the Master.
 This tab contains these elements:
-
Future Days to Include in Schedule – The number of future days to include in the production schedule when the Master does its daily compilation. Larger values let you schedule jobs farther into the future. Lower values reduce compilation time.
When you change the Future Days to Include in Schedule value, the new value will not take effect until the production schedule is compiled. Compilation will take place at midnight, by default.
-
Operator Alert Retention (in days) – The number of days to keep operator alert information in the Job Activity pane.
By default, alerts are kept for seven days. Alerts that are older than the Operator Alert Retention value are purged daily.
-
Trigger History Retention (in days) – The default number of days to maintain event trigger history on the Trigger History tab of the Event Details dialogs. The maximum length of time to keep trigger history information is 9,999 days but this length of time requires very large amounts of hardware, resources, and hampers performance. The default setting is for 30 days.
-
SLARun History Retention (in days) – The number of days the SLA History is retained in the TA database following which expired data will be purged. The default setting is for 30 days.
-
Use Passwords to Run Windows Jobs – If selected, enables Windows agents to use Windows passwords. Windows agents can be configured to use a per-job password. Each scheduled job can be configured to run under a specific username and password (runtime users). The job inherits the permissions and resources of the assigned user account. This means that all runtime users require valid passwords. Any jobs that log on as users with invalid or missing passwords will fail with a status of Error Occurred.
TA stores the passwords in encrypted form within its own database. At no time is an unencrypted password echoed to the screen or made otherwise accessible to any user. Passwords are also encrypted when passed from a Master to an agent.
Note: Checking the passwords of multiple users when running jobs restricts the Windows agent to only processing 30 jobs concurrently. If passwords are not used when running Windows jobs, the Windows agent can handle up to 80 concurrent jobs.
TA stores the passwords using 64-bit block cipher encryption within its own database. At no time is an unencrypted password echoed to the screen or made otherwise accessible to any user. Passwords are also encrypted when passed from a Master to an agent.
-
Automatic Daily History Cleanup – When this option is selected, TA automatically purges the database everyday. By default, the purge is executed at the beginning of the new production day.
The Master will log any errors when purge is performed automatically. When this option is not selected, TA will not automatically purge your database of old information history.
-
Delay History Cleanup while Compiler is Active – When this option is selected, TA TA checks if job compilation is in progress and delays the daily history purge until the job compilation is done.
-
FTP Local User Mandatory – Requires that a local (or runtime) user be selected on the Run tab of FTP job definitions. Using a runtime user adds additional security to FTP jobs. The default is to not use a runtime user (unselected). If this option is selected, any previous FTP jobs that were defined without assigning a local user, will error out until a local user is assigned to the job.
-
None (except Launched/Active Jobs) – Do not transfer any jobs from the current production schedule to the next production schedule unless the jobs have already launched or are in active status. On an individual basis, jobs can be prevented from carrying forward by selecting the Disable carryover option from the Options tab of the Job Definition dialog.
-
Successors only (unless disabled for job) – Transfers to the production schedule any successor jobs from active jobs in the current production schedule unless the Disable carryover option was selected in a job’s definition.
-
All Unfinished Jobs (unless disabled for job) – Transfers any jobs that did not run in the current production schedule to the production schedule unless the Disable carryover option was selected in a job’s definition.
-
Wait until previous schedule completes before starting new schedule – This option prevents any jobs from a new production schedule regardless of their priority from running until all of the jobs from the previous schedule are completed or cancelled. If the production day rollover is held up while waiting for the previous day’s jobs to complete, a warning is recorded in the Audit log. To rollover to a new production schedule after selecting this option, you must either cancel the previous day’s jobs that are still running or change the jobs’ status to completed.
-
Days to Carry Over – Use this option to specify the number of days to carry over unfinished jobs. When the number you specify is reached, TA will no longer include the unrun jobs in the next production schedule.
-
Production Day Offset [+/– hh:mm] – The Production Day Offset value adjusts the beginning of the production “day” to start the specified number of hours or minutes before or after midnight of the “real” day. For example, if you enter a +03:00, your calendar for the day will not start until 3:00 am.
If the production day offset is modified, you must recompile the current and future production schedule for the changes to take effect.
-
Compile Offset [+/– hh:mm] – This option adjusts your compile time to start the specified number of hours or minutes before or after the beginning of the production day. The default compile time is midnight, because midnight is the default time for the beginning of the production day. If you have set a Production Day Offset value (above) the Compile Offset value will be adjusted from the new beginning of the production day.
-
Week Begins – This option affects the starting date of all subset calendars that use weekly definitions. After changing the value in this field, select Recalculate from the Calendars pane context menu to have the changes take effect.
-
History Purge Offset – This option adjusts the purge or the Automatic Daily History Cleanup time to start the specified number of hours or minutes before or after the beginning of the production day.
-
Archive Offset – This option adjusts the daily Online Archiving cycle to start the specified number of hours or minutes after the beginning of the production day.
-
Application Format – This option affects the date and time format displayed in the entire application. The Connections and Job Activity screens will reflect the date format that is selected in this application format.
The date format conventions can be used:
Format
Example
dd/MM/yy
22/04/20
yy-MM-dd
20-04-19
yy-M-dd
20-6-19
M/dd/yy
4/19/20
dd.MM.yy
19.04.20
yy/MM/dd
20/04/19
yy.M.dd
20.4.19
yyyy/M/dd
2020/4/19
dd/MM/yyyy
19/04/2020
M/dd/yyyy
4/19/2020
HH.mm.ss z
19.22.32 CET
hh.mm.ss z
7.23.35 CET
HH,mm,ss z
19,24,49 CET
hh,mm,ss z
7,25,57 CET
HH-mm-ss z
19-26-48 CET
hh-mm-ss z
7-27-23 CET
HH mm ss z
19 28 13 CET
hh mm ss z
7 28 55 CET
HH.mm.ss
19.29.32
hh.mm.ss
7.46.01 PM
HH,mm,ss
19,46,38
hh,mm,ss
7,47,02 PM
HH-mm-ss
19-48-02
hh-mm-ss
7-48-31 PM
HH mm ss
19 49 20
hh mm ss
7 49 59 AM
If required, you can customize the time format. To add custom time format, select Time > Time Format, select either 12 hours or 24 hours from the Custom Time Format section in the Time Format Selection dialog. You can also change the Separator, which is “:” by default.
This Connections pane displays the time stamp for the selected Application format.
-
Banner Format – This option affects the date and time format displayed on the banner of TA. It is a sample screen of the banner format:

System Configuration – System Tab
The System tab provides various system settings for TA objects.
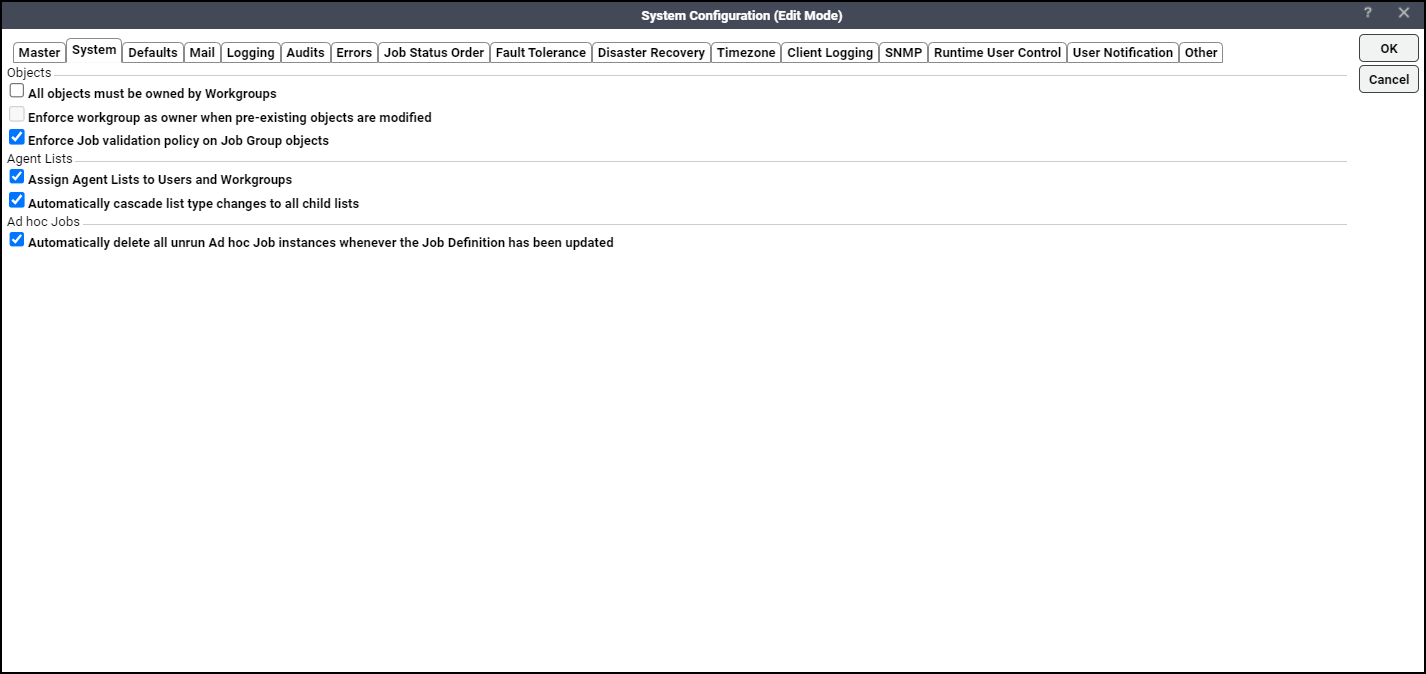
This tab contains these elements:
-
All objects must be owned by Workgroups – Click this option if all TA objects should be owned exclusively by workgroups. When this option is selected:
Only the workgroups are shown in the Owner drop-down list of a TA object, when the object is created or edited. Only the TA object that has a workgroup as the owner can be copied.
-
Enforce Workgroup as owner when pre-existing objects are modified – This option is enabled only if the All objects must be owned by Workgroups option is selected.
When this option is selected, changes to an object can be saved only if the existing owner of the object is a workgroup.
When this option is not selected, changes to an object can be saved even if the existing owner of the object is not a workgroup.
-
Enforce Job validation policy on Job Group objects – Click this option to apply validation policies defined for Job objects on Job Group objects.
-
Assign Agent Lists to Users and Workgroups – When you check this checkbox:
-
an additional tab, Agent Lists, is shown on the User Definition and Workgroup Definition dialogs for super users.
-
an additional checkbox, Assign Agent Lists, is added to both the Users and the Workgroups security functions.
When the Assign Agent Lists checkbox is checked from the Users/Workgroups security function, the Agent Lists tab is shown on the User Definition/Workgroup Definition dialog for non-super users. The users or workgroups assigned with the Assign Agent Lists security function can assign agent lists to the jobs or job groups when creating or editing those jobs or job groups.
Users and workgroups can access only the Agent Lists that are assigned to them. The Assign Agent Lists to Users and Workgroups checkbox can be cleared only:
If the Users and Workgroups security policies do not use the Assign Agent Lists security function.
If any of the users or workgroups are not assigned with agents lists.
-
-
Automatically cascade list type changes to all child lists – This checkbox, if checked, ensures that every time you modify the parent agent list type, the child agent list type(s) automatically changes to the parent agent list type. This checkbox is checked by default.
-
Automatically delete all unrun ad hoc Job instances whenever the Job Definition has been updated – This checkbox, which is checked by default, ensures the deletion of all unrun ad hoc job occurrences from the schedule when you modify or disable these jobs. Uncheck the option if you do not want ad hoc job occurrences automatically deleted when you modify or disable these jobs.
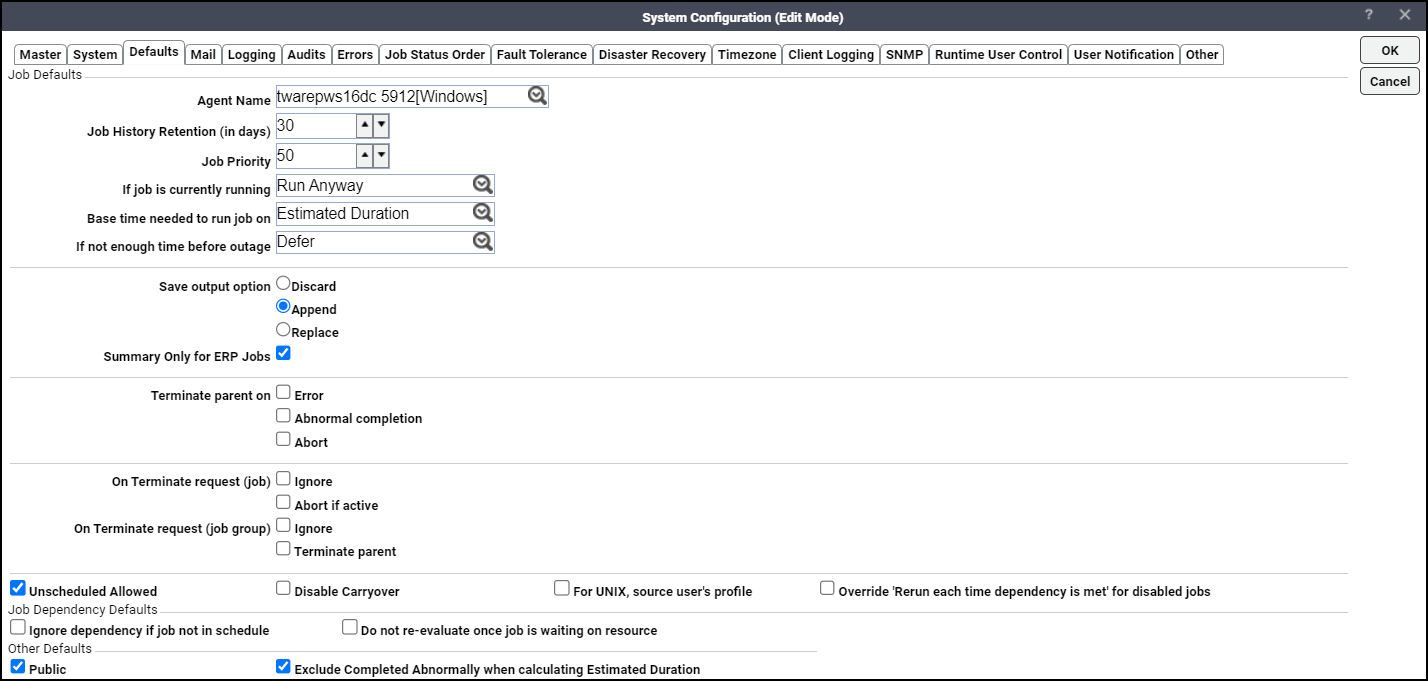
System Configuration – Defaults Tab
Displays default settings for job definitions. The Defaults tab also configures whether job events, system events, actions, variables and calendars will default to public availability.
This tab contains these elements:
-
Agent Name – Sets the default agent for the Agent Name setting in the Job/Group Definition dialogs.
-
Job History Retention (in days) – Sets the default number of days of job history to keep. The Job History Retention setting can be individually configured for jobs on the Options tab of the Job/Group Definition dialogs. The maximum length of time to keep job history information is 9,999 days but this length of time requires very large amounts of hardware, resources, and hampers performance.
-
Job Priority – Sets the default for the Job Priority setting in the Job/Group Definition dialogs.
-
If job is currently running – Sets the default for the If job is currently running setting (concurrency) in the Job Definition dialog. There are four options:
Run Anyway– Run another job instance even if the previous instance is still running.
Skip – Do not run another job instance if the previous instance is running.
Defer until Normal – Run another job instance only if the current job instance completes with a Normal status.
Defer until Complete – Run another job instance only after the current job instance completes.
-
Base time needed to run job on – Sets the default basis for evaluating whether jobs will complete before a scheduled outage. Whether jobs have adequate time to run can be based on either of the factors:
Estimated Duration – The estimated duration for the command or executable as specified in the job definition. If the job has run more than once with the same command or executable, the estimated duration is the historical average of the job's previous run times. You can also manually set the estimated duration time of a job in its definition.
Maximum Duration – The maximum duration for the command or executable as specified in the job definition.
-
If not enough time before outage – Sets the default for the If not enough time before outage setting in the Job Definition dialog. There are three options:
Run Anyway – Run the job anyway.
Skip – Do not run the job.
Defer – Wait and run the job after the connection outage has ended.
-
Save Output Option – Sets the default handling of job output. There are three options:
Discard – Does not save the job output. (Default)
Append – Saves the complete output from each job instance, adding the output to the previous job instance’s output.
Replace – Saves the complete output from each job instance, overwriting the previous job instance’s output.
-
Summary Only for ERP Jobs – This option only applies to some adapter jobs. Selecting this option saves the job output in a summary form. This option is useful when ERP jobs have long job output and you do not want the entire output file. Not available if the Discard option is selected.
-
Terminate parent on – For the job/job group, when you select the option:
Error – The job sends a terminate request to its immediate parent if an error occurred during the jobrun.
Abnormal Completion – The job sends a terminate request to its immediate parent if the job completed abnormally.
Abort – The job sends a terminate request to its immediate parent if the job was aborted.
-
On Terminate request (job) – When a job receives a terminate request. The job ignores the terminate request based on one of the conditions:
If the Ignore option is selected in the On Terminate request section on the Options tab of the job definition.
If the job is in a Done state.
If the job is in a Running state and the On Terminate request option, Abort if active is not selected.
If the job is in a Waiting state, the job is immediately set to a Terminated status.
The job is aborted if the selected On Terminate request option is Abort if active. An abort message is sent to the agent/adapter, which will then update the job with its final status.
-
On Terminate request (job group) – When a job group receives a terminate request from a child, a parent, or the user, then the group processes the terminate request in one of the ways:
Ignores the terminate request based on one of the conditions:
If the Ignore option is selected in the On Terminate request section on the Options tab of the job group definition.
If the group is in a Done state.
Sends a terminate request to all of its immediate children. The children process the terminate request immediately unless they are configured to ignore terminate requests. The child Terminator jobs that have not run are immediately set to a Terminated status.
If any child ignores the terminate request and the group's dependencies are not met, the group changes to Terminate Waiting status until its dependencies are met.
If any child ignores the terminate request and the group's resources are not available, the group changes to Terminate Ready status until its resources can be acquired.
If the group is active, it changes to Terminating status. The group remains in a Terminating status until all of its immediate children reach a Done state. If the group has a child Terminator job whose status is not Terminated, the group’s status is updated with that child's status. If there are multiple non-Terminated child Terminator jobs, the one with the highest priority determines the group's status. Finally, if there are multiple non-Terminated child Terminator jobs with the highest priority, the job that ran most recently is used to update the group status.
Sends a terminate request to its immediate parent if the Terminate parent option is selected in the On Terminate request section on the Options tab of the job group definition.
All jobs waiting on dependencies/resources are terminated on receiving a terminate request.
-
Unscheduled allowed – Sets the default for the Unscheduled Allowed setting in the Job Definition dialog.
-
Disable carryover – Prevents any jobs that did not run during the current production schedule from being carried over to the next production schedule. If you wish to carry over jobs to the next production schedule, refer to the Carryover Options for Unfinished Schedule section on the Master tab to configure which jobs should carry over to the next day’s production schedule.
-
For Unix, source user’s profile – Allows you to execute Unix user profiles. This global option provides for the execution of all variables in a Unix user’s profile. This option is available in individual job definitions on the Options tab so that job instances do not have to default to a source user’s profile. Without this option, any Unix user profile variables that are referenced by scripts will not be executed, causing a job to fail in TA.
-
Override 'Rerun each time dependency is met' for disabled jobs – If a job is disabled, the system will override the option to rerun the job each time a dependency is met.
-
Public – Sets the public option default where public option is used. Public items are available to all users of TA with an appropriate security policy.
-
Ignore Terminate Request – Click this option so that a job or a job group can ignore a terminate request that it receives.
-
Exclude Completed Abnormally when calculating Estimation Duration – Click this option to include only the previous execution time of jobs completed normally in the calculation of Estimated Duration for a jobrun.
-
Ignore dependency if job not in schedule – Click this option to ignore the job dependency when the predecessor job configured in the job dependency is not found in the schedule.
-
Do not re-evaluate once job is waiting on resource – Click this option so that a job’s dependencies do not require re-evaluation when the job is in the Waiting On Resource status. If you do not select this option, TA re-evaluates job dependencies when the job is in the Waiting On Resource status. When unmet job dependencies are detected during re-evaluation, the job status changes to Waiting On Dependencies.
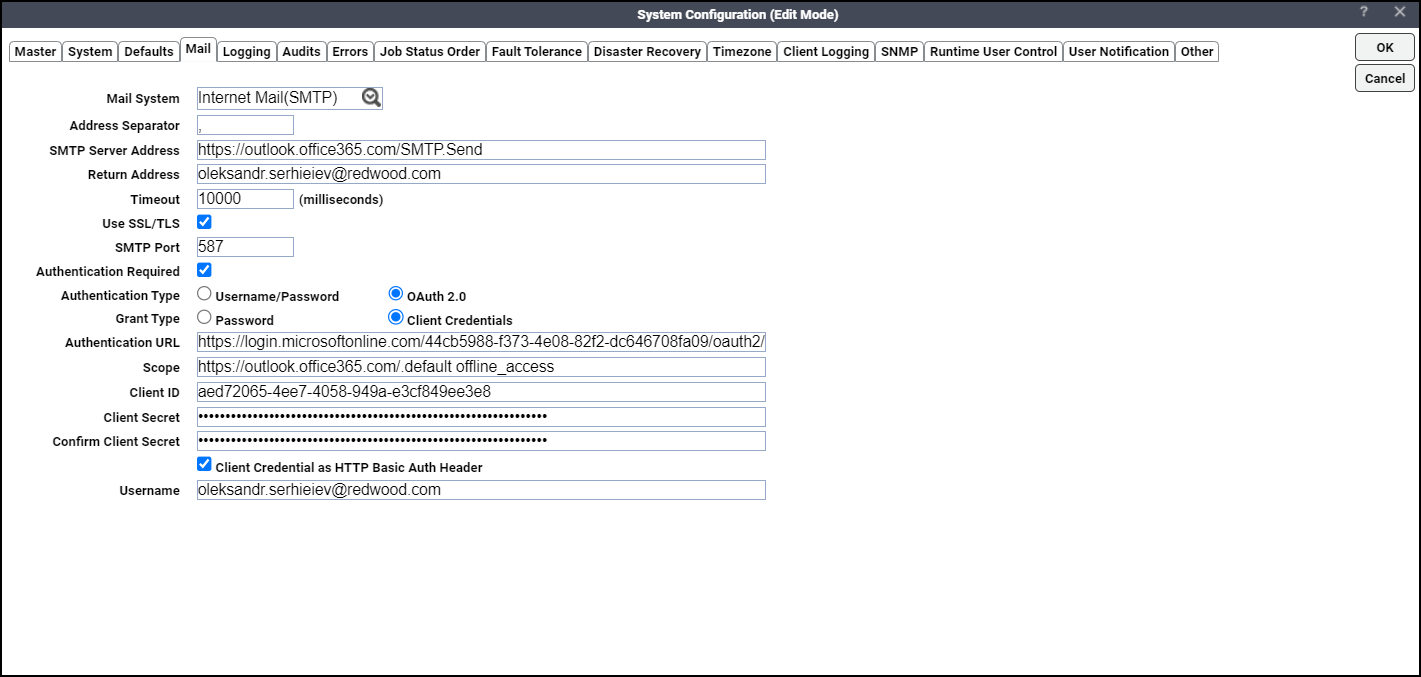
System Configuration – Mail Tab
This tab displays email settings. TA uses actions to send email about job scheduling information to users.
This tab contains these elements:
-
Mail System – The email system that your network uses. You can choose from the email system types:
-
None – No mail system is selected.
-
Internet Mail SMTP – Simple Mail Transfer Protocol.
-
-
SMTP server address –The complete path to your SMTP server. The Scheduler can process a maximum length of about 60 characters in this field.
-
Return address – If you do not select Authentication Required, the TA Master uses this address. If you select Authentication Required, TA Master uses this as reply address. The Scheduler can process a maximum length of about 60 characters in this field.
-
Timeout – The time (in milliseconds) the email times out if there is no response.
-
Use SSL/TLS – Click this option so that the communication between the SMTP server and the device, which receive the email is encrypted.
-
SMTP Port – The SMTP server uses this port for sending emails. The default value is 25.
-
If you select the Use SSL/TLS option, the port changes to 465.
-
If you use OAuth 2.0 for authentication with Microsoft 365, use the port 587.
-
-
Authentication Required – Check this checkbox to display the authentication options: Username/Password and OAuth 2.0.
Click the Username/Password option and enter the SMTP user credentials:
-
SMTP User – Indicates the username for SMTP server. The TA Master uses this as the sender’s email address.
If you do not select Username/Password for authentication, the TA Master uses the Return Address as the sender’s email address.
-
SMTP Password – Indicates the authentication password for the SMTP server.
-
Confirm Password – Indicates the password you re-type to ensure that the password provided in the SMTP Password field is correct.
Click the OAuth 2.0 option and select Password as Grant Type to display these options:
-
Authentication URL – Indicates the Token endpoint URL that a client uses to exchange an authorization grant or access token.
-
Scope – Indicates the limit of access each token is granted.
-
Client ID – Indicates the public identifier of applications for which access is requested.
-
Client Secret – Indicates the secret that OAuth Client uses for authentication.
-
Confirm Client Secret – Indicates the secret you re-type to ensure that the secret provided in the Client Secret field is correct.
-
Client Credential as HTTP Basic Auth Header – Click this option so that when receiving the access token, the Client ID and Client Secret are encrypted and passed in the HTTP Authorization request header. If you do not select this option, when receiving the access token, the Client ID and Client Secret are passed in the request body. This option is selected by default.
-
Username – Indicates the email ID.
-
Password – Indicates the password to access the email account
-
Confirm Password – Indicates the password you re-type to ensure that the password provided in the Password field is correct.
Click the OAuth 2.0 option and choose Client Credentials as Grant Type to display these options:
Note: Make sure that your email service provider supports this grant type. Otherwise, an exception is logged when you try to use it.
-
Authentication URL – Indicates the Token endpoint URL that a client uses to exchange an authorization grant or access token.
-
Scope – Indicates the limit of access each token is granted.
-
Client ID – Indicates the public identifier of applications for which access is requested.
-
Client Secret – Indicates the secret that OAuth Client uses for authentication.
-
Confirm Client Secret – Indicates the secret you re-type to ensure that the secret provided in the Client Secret field is correct.
-
Client Credential as HTTP Basic Auth Header – Click this option so that when receiving the access token, the Client ID and Client Secret are encrypted and passed in the HTTP Authorization request header. If you do not select this option, when receiving the access token, the Client ID and Client Secret are passed in the request body.
-
Username – Indicates the email ID.
-
Address Separator – You may want to notify more than one person when an action occurs. Use the address separator when listing several email addresses so that TA can distinguish between individual addresses. Use any single character that the designated mail system recognizes as the separator. A comma or a semicolon is the most commonly used separator.
-
System Configuration – Logging Tab
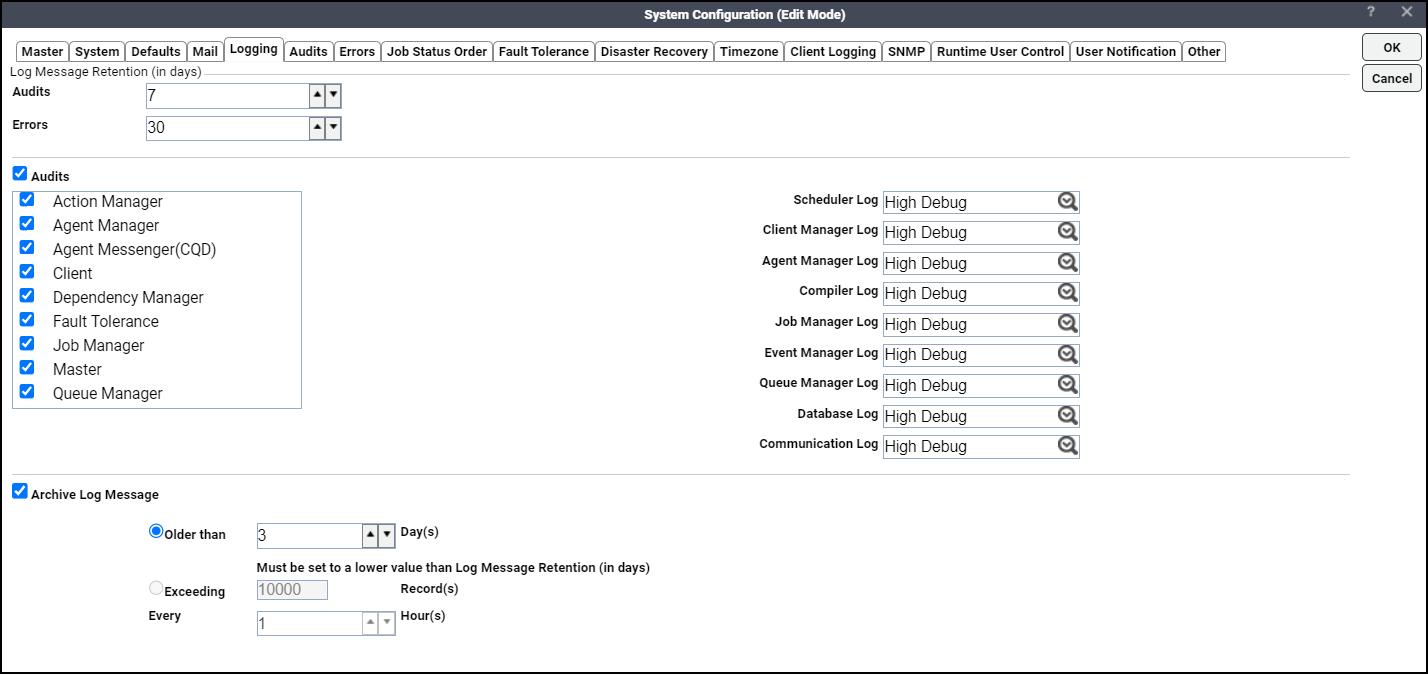
The Logging tab configures the length of time to keep audit and error messages. You can also choose to suppress messages from a specific source. More information on diagnostic logging is available in Troubleshooting. For more information about logging and log messages, see Monitoring Production.
Note: Be careful using diagnostic logging as excessive diagnostic logging consumes large amounts of disk space and affects the timeliness of processing requests and the launching of jobs
This tab contains these elements:
-
Audits – The length of time to keep audit information. The maximum length of time to keep audit information is 9,999 days but this length of time requires very large amounts of hardware and resources and hampers performance. The default is 7 days.
-
Errors – The length of time to keep error information. The maximum length of time to keep audit information is 9,999 days but this length of time requires very large amounts of hardware and resources and hampers performance. The default is 30 days.
-
Audits option – Click this option to activate audit logging. When checked, auditing information will be collected and can appear in the Logs pane.
This is a list of available auditing sources:
Master – Displays audit messages that originate from the Master.
Client – Displays audit messages that originate from all TA Clients connected to the Master.
Agent Manager – Displays audit messages that originate from licensed agents that run jobs. The Agent Manager: CQD category displays messages dealing with the underlying agent communications protocol.
Fault Tolerance – Displays audit messages from the Fault Monitor machine.
Dependency Manager – Displays messages about when dependencies for jobs and job groups are met.
Job Manager – Displays messages about the status of jobs.
Action Manager – Displays messages about all configured actions.
Queue Manager – Displays messages about queue activity.
Agent Messenger: CQD – Displays messages regarding the agent communications protocol, CQD. The Agent Manager category displays other messages originating from licensed agents.
Because of the volume of CQD diagnostic messages, you can clear the Agent Messenger: CQD source for messages while still gathering information regarding your agent(s) from the Agent Manager source.
-
Archive Log Message – Click this option to enable archiving of log messages. When selected, archiving of older log messages begins after the production day rollover, i.e., older records are moved to a shadow table. The archived log messages can be viewed in the Archive Logs pane instead of in the Logs pane.
Older than – This option can be used to archive log messages based on the aging of records. For example, if the value provided is 3 days and the date is 30 September, then the log messages created on 26 September or older or both will be archived.
Exceeding – This option can be used to archive log messages based on the maximum number of records you would like to view in the Logs pane. Using this option results in archiving of older messages if the count of messages exceed the specified maximum.
Every – This option works along with the Exceeding option. You can specify how frequently you want to trigger archiving of log messages such that the maximum number of messages that can be displayed in the Logs pane does not exceed the specified maximum.
Note: When the Archive Log Message feature is used for the first time, care must be taken so that the archiving activity does not impact the performance of the database server.
Example: If you have a large number of log messages or records, say 10,000,000 records in the message log table for the past 100 days, you may want to retain only the recent 500,000 records in the message log table (growing everyday with 100,000 messages), with the remaining historical 9,500,000 records to be moved to the archive table. You can try the recommended archive log message settings provided in the table for a smoother archiving of the historical 9,500,000 log messages.
Archive Log Message Settings
Impact
Settings 1
(NOT RECOMMENDED)
If Older than is set to 5 days, about 9,500,000 records are to be archived at once.
If Exceeding is set to 500,000, about 9,500,000 records are to be archived at once.
Adds substantial load on the database server. This should be avoided.
Settings 2 (RECOMMENDED)
If Older than is set to
-
90 days on Day 1
-
89 days on Day 2
-
88 days on Day 3
-
… and so on
If Exceeding is set to
-
8,500,000 on Day 1
-
8,000,000 on Day 2
-
7,500,000 on Day 3
-
… and so on
The historical 9,500,000 records would be archived gradually over a period of time without compromising on the database server performance.
-
Note: If you want to set the Older than to a lower number, say 30 days, then you may want to first plan a one-time maintenance to move log messages older than 30 days manually to the archive table and then set Older than to 30 days.
Often the error messages displayed in the TA Clients that are generated by a problem provide an indication of the source of the problem revealing which component should be monitored. If no source is indicated in the error message, check the messages in the system log for clues to the source of the problem. Once the source of the problem is identified, you can enable diagnostic logging for that system component. Be careful when using the diagnostic logging function as logging messages can consume a large amount of disk space very quickly. Carefully monitor the size of the log file being created as excessive logging consumes system resources as well as disk space. Try to repeat the scenario that produced the problem, so system activity can be recorded for Tidal Support Center (TSC) to interpret. Once the problem occurs again, contact TSC and send them the log file.
If you are enabling diagnostics before contacting TSC, start at the Info level and TSC will provide additional instructions after receiving the diagnostic files.
These components are monitored:
-
Scheduler Log – Records system level messages regarding the Master.
-
Client Manager Log – Records messages about Client Manager activity.
-
Agent Manager Log – Records messages from agents running jobs.
-
Compiler Log – Records messages about the status of production schedules being compiled.
-
Job Manager Log – Records messages about the status of jobs.
-
Event Manager Log – Records messages about events defined in TA .
-
Queue Manager Log – Records messages about queue activity.
-
Database Log – Records messages relating to the state of the database.
-
Communications Log – Records messages concerning all defined connections and sockets. Be aware that setting this component to a high level of logging results in a large amount of information that consumes large amounts of disk space.
Each component has a drop-down list with seven levels of progressively more detailed logging. Each level includes the messages of the previous levels of logging. The levels of logging are:
-
None – No logging for the component.
-
Severe – Logs only serious problems for that component. (default)
-
Warning – Logs potential problems for the component as well as messages from the Severe logging level.
-
Info – Logs status messages about the normal operation as well as messages from lower logging levels.
-
Low Debug – Logs important debugging messages as well as messages from lower logging levels.
-
Medium Debug – Logs an increasing amount of debugging information as well as messages from lower logging levels.
-
High Debug – Logs the largest amount of debugging information as well as messages from lower logging levels.
Note: Do not delete the current log file, which is always the log file with the latest timestamp. Even if the file does not exist, the Master will continue to relay diagnostic information to the log file until it has relayed 1 MB of information. At that point, the Master starts a new log file but any diagnostic information from the time between the deletion of the current log file and the creation of a new log file is lost.
System Configuration – Audits Tab
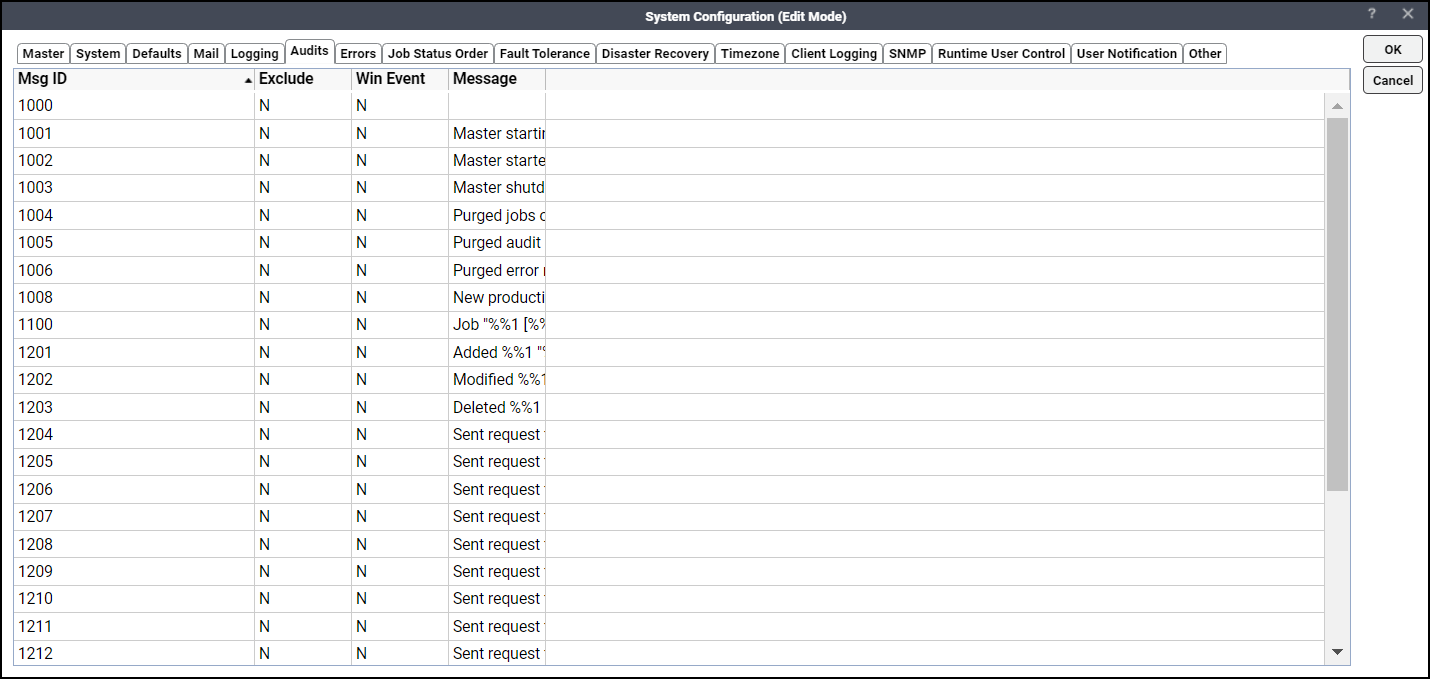
Lists all the audit messages TA can issue. All audit messages can be viewed from the Logs console view. From this tab, you can include or exclude audit messages for TA to record.
Job audit messages can be viewed by individual job from the Job Details dialog for that job (accessed from the Job Activity pane). The first audit message listed (with the 1000 ID number) is blank because it is available for creating a custom audit message.
This tab contains these elements:
-
Msg ID – The ID number associated with the specific audit message.
-
Exclude – Excludes the audit message from being issued by TA .
-
Message – The text of the audit message. Message strings consist of two string types: the message text and the substitution string placeholders. Substitution string placeholders are denoted by a double-percent sign and the string number. For example, the first substitution string place holder is %%1, and the second, %%2.
Double-click the message to display the Audit Message dialog.
Instead of individually selecting or excluding audit messages, you can right-click the Audits field to display a context menu providing all or nothing options as noted below:
For more information about audit messages, see Monitoring Production.
Exclude Selected Messages – The selected audit messages will not be issued.
Exclude All Messages – None of the audit messages listed on this tab will be issued.
Include Selected Messages – The selected audit messages listed on this tab will be issued.
Include All Messages – All of the audit messages listed on this tab will be issued.
Log Selected As Windows Event(s) – The selected audit messages listed on this tab will be logged as Windows Events.
Log All As Windows Events – All audit messages listed on this tab will be logged as Windows Events.
No Windows Event Logging For Selected – The selected audit messages listed on this tab will not have Windows Event logging.
No Windows Event Logging – All audit messages will not have Windows Event logging.
System Configuration – Errors Tab
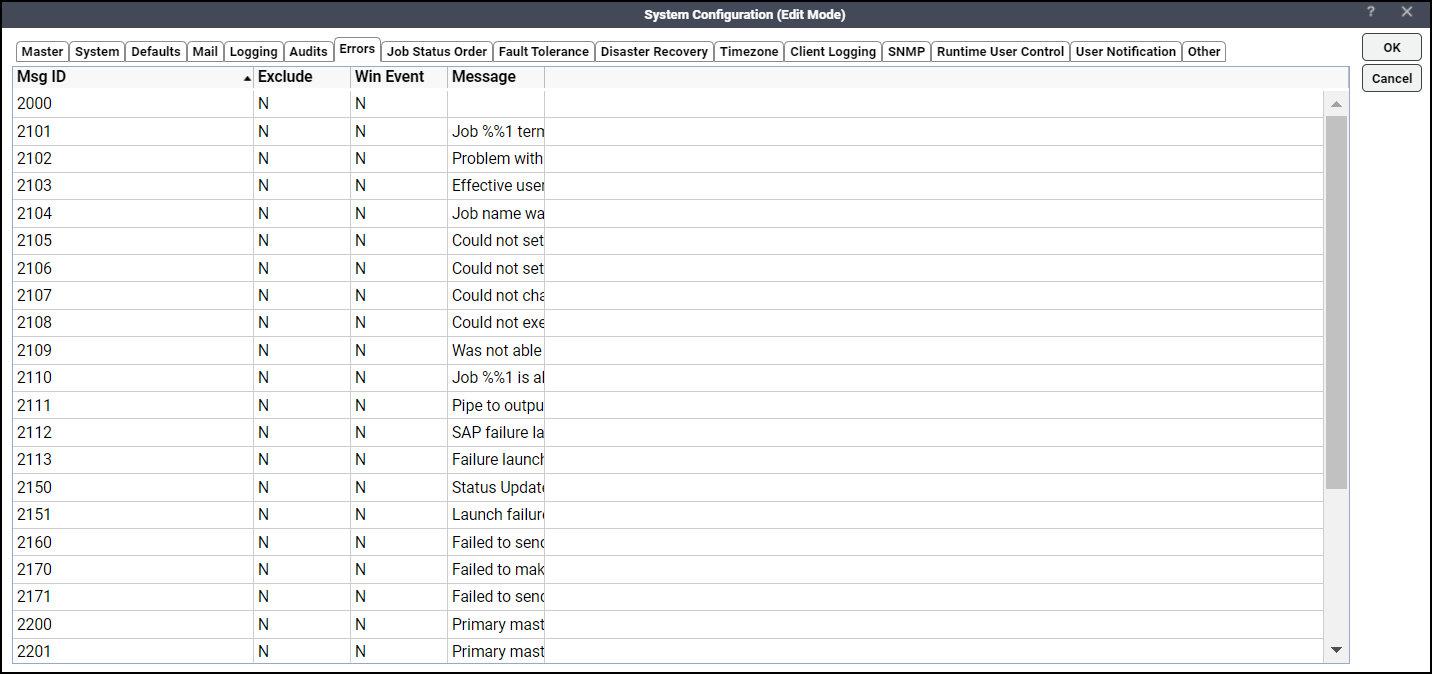
Lists all the error messages TA can issue. Error messages can be viewed from the Logs pane. The first error message listed (with the 2000 ID number) is blank because it is available for creating a custom error message. Here you can instruct TA to exclude specific error messages. For more information about error messages, see Monitoring Production.
This tab contains these elements:
-
Msg ID – The ID number associated with the specific audit message.
-
Exclude – Excludes the error message from being issued by TA .
-
Message – The text of the error message. Message strings consist of two string types – the message text and substitution string placeholders. Substitution string placeholders are denoted by a double-percent sign and the string number.
Example: The first substitution string place holder is %%1 and the second, %%2. Double-click the message to display the Error Message dialog.
-
Instead of individually selecting or excluding error messages, you can right-click the Errors field to display a context menu providing all or nothing options as noted below:
-
Exclude Selected Messages – The selected error messages will be issued.
-
Exclude All Messages – None of the audit error listed on this tab will be issued.
-
Include Selected Messages – The selected error messages listed on this tab will be issued.
-
Include All Messages – All of the error messages listed on this tab will be issued.
-
Log Selected As Windows Event(s) – The selected error messages listed on this tab will be logged as Windows Events.
-
Log All As Windows Events – All error messages listed on this tab will be logged as Windows Events.
-
No Windows Event Logging For Selected – The selected error messages listed on this tab will not have Windows Event logging.
-
No Windows Event Logging – All error messages will not have Windows Event logging.
-
System Configuration – Job Status Order Tab
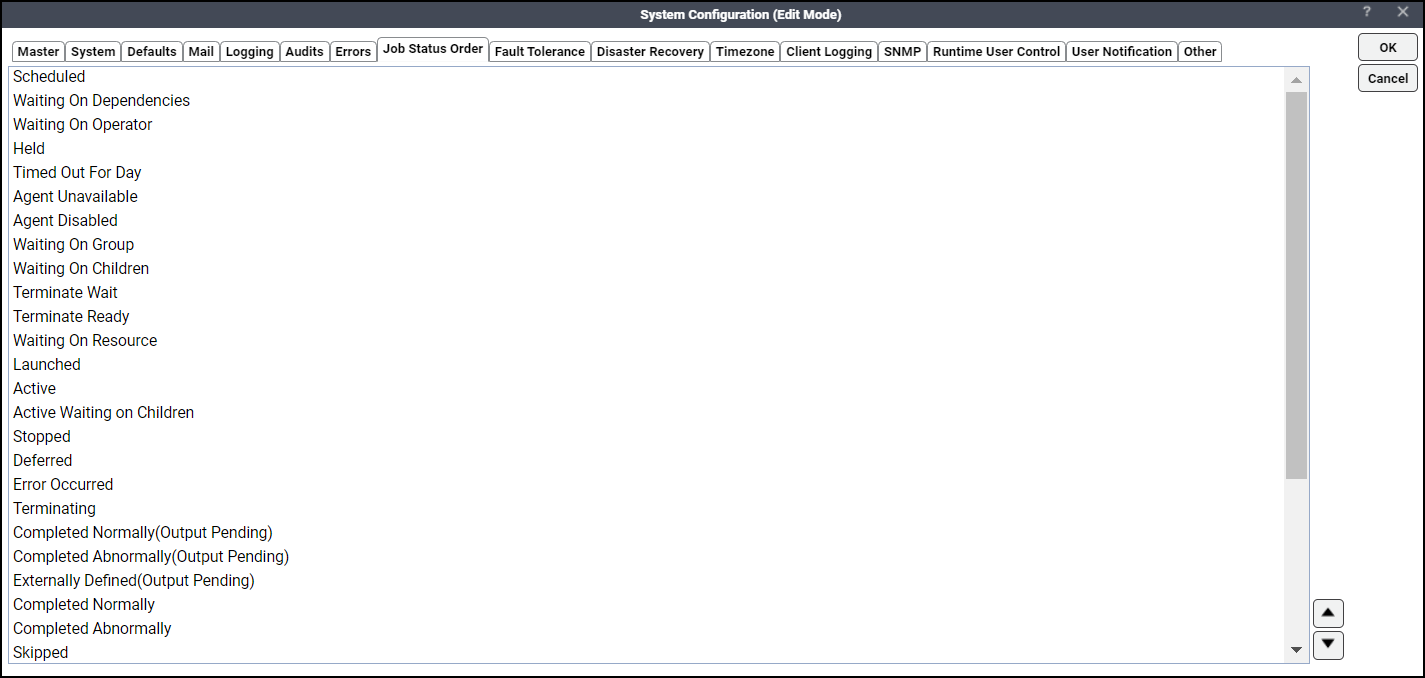
Lists the job statuses and allows you to change the job status order used for sorting jobs and job groups by status in the Job Activity pane.
This tab contains this element:
Job Status Sort Order – To change the job status sort order, select the status you want to move up or down, and click the up and down arrow.
By default, the job status order is sorted alphabetically, but you may want to change that if there is a sort order that makes more sense to you. For example, jobs always enter the Launched status before they enter the Active status. Thus, you may want to place Active after Launched in this list.
System Configuration – Fault Tolerance Tab
The Fault Tolerance tab of the System Configuration dialog allows you to turn on fault tolerance and configure the settings.
Note: The Fault Tolerance tab is not displayed if you are not licensed for fault tolerance.
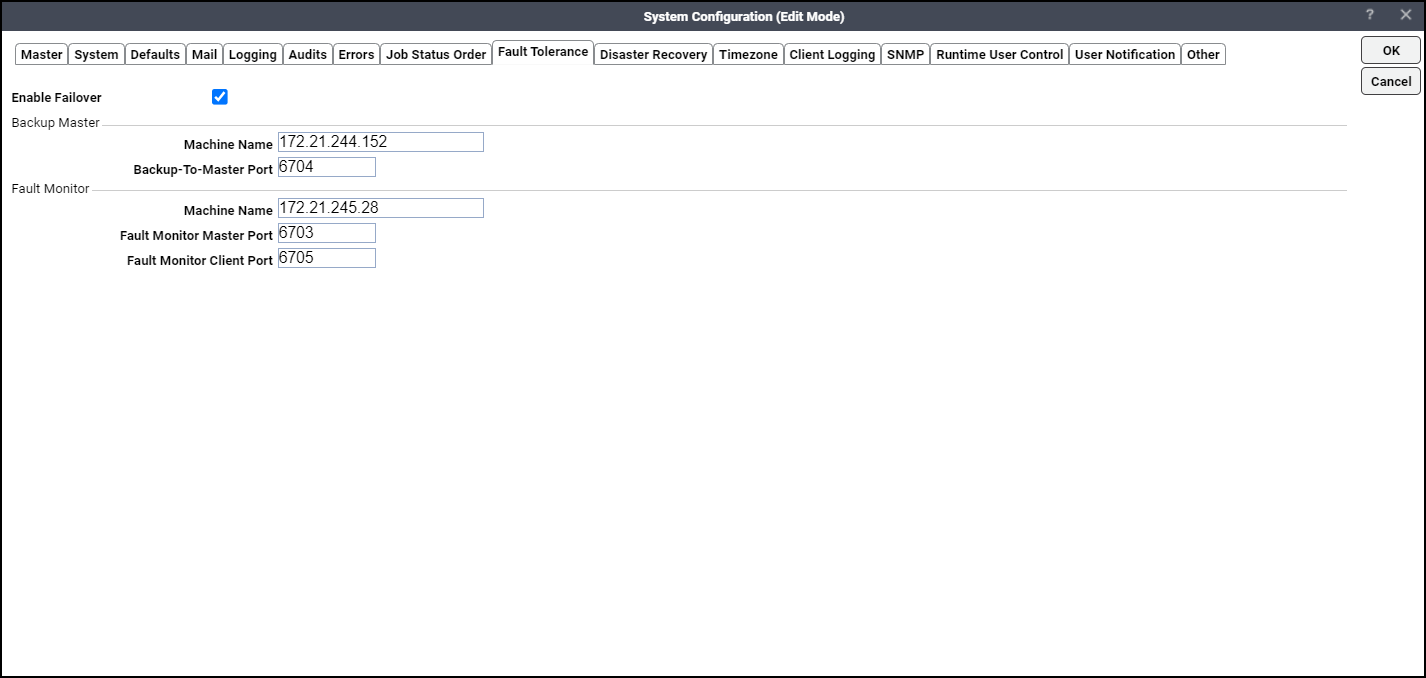
This tab contains these elements:
-
Enable Failover – Turns on fault tolerance. The default is disabled.
Note: These fields do not display unless the Enable Failover option is selected.
-
Machine Name (Backup Master) – The name of the machine the Backup Master is on.
-
Backup-To-Master Port – The port number for the Backup Master to Primary Master connection.
-
Machine Name (Fault Monitor) – The name of the machine the fault monitor is on.
-
Fault Monitor Master Port – The port number for the fault monitor to Master connection.
-
Fault Monitor Client Port – The port number for the fault monitor to Client Manager connection.
System Configuration – Disaster Recovery Tab
The Disaster Recovery tab of the System Configuration dialog allows you to configure TA disaster recovery settings.
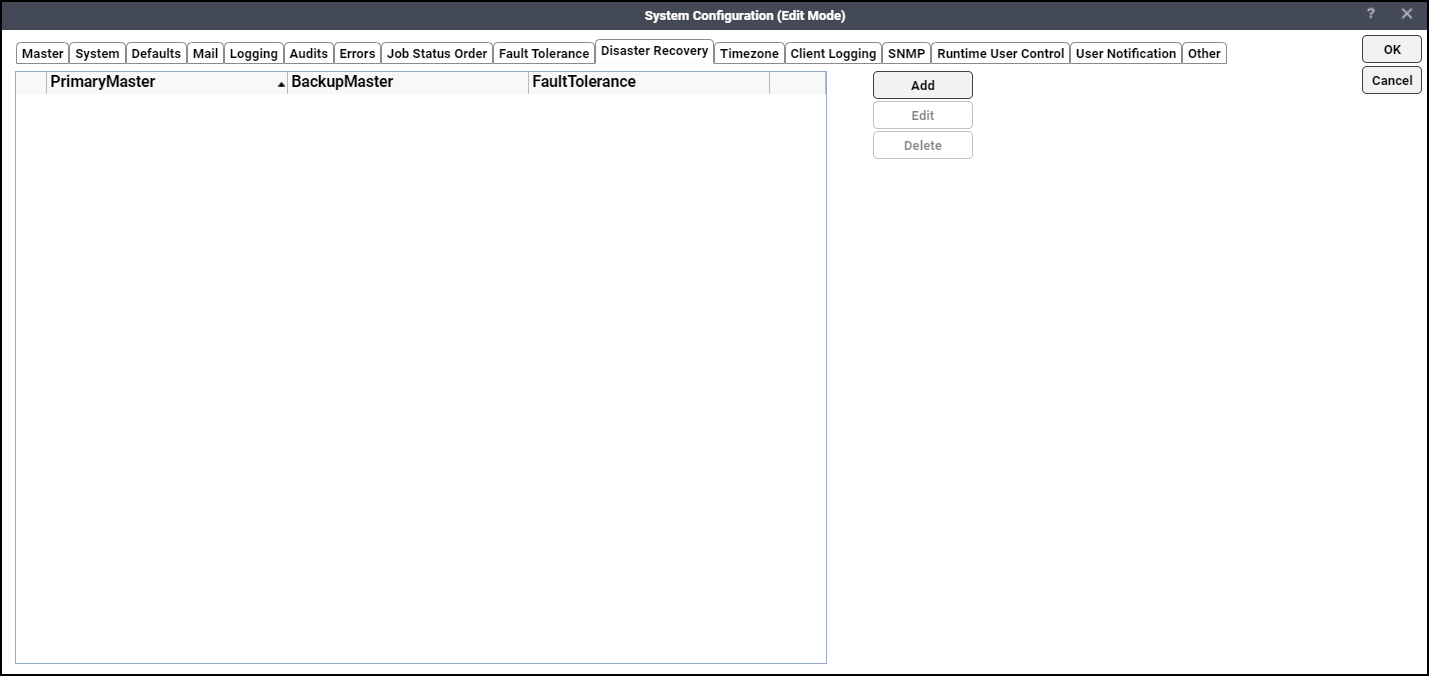
This tab contains these elements:
-
Primary Master – The name of the machine where the Primary Master is running.
-
Enable Failover – This checkbox is enabled and checked by default if the Enable Failover checkbox is checked on the System Configuration > Fault Tolerance tab. When this checkbox is checked, the Backup Master and the Fault Tolerance fields display.
-
Backup Master – The name of the machine where the Backup Master is running.
-
Fault Tolerance – The name of the machine where the fault monitor is running.
System Configuration – Timezone Tab
This tab allows you to define various time zones where target application environments are based. You can select one of these time zones displayed in the Schedule tab of the Job Definition and Job Group Definition dialogs when you schedule a job or job group.
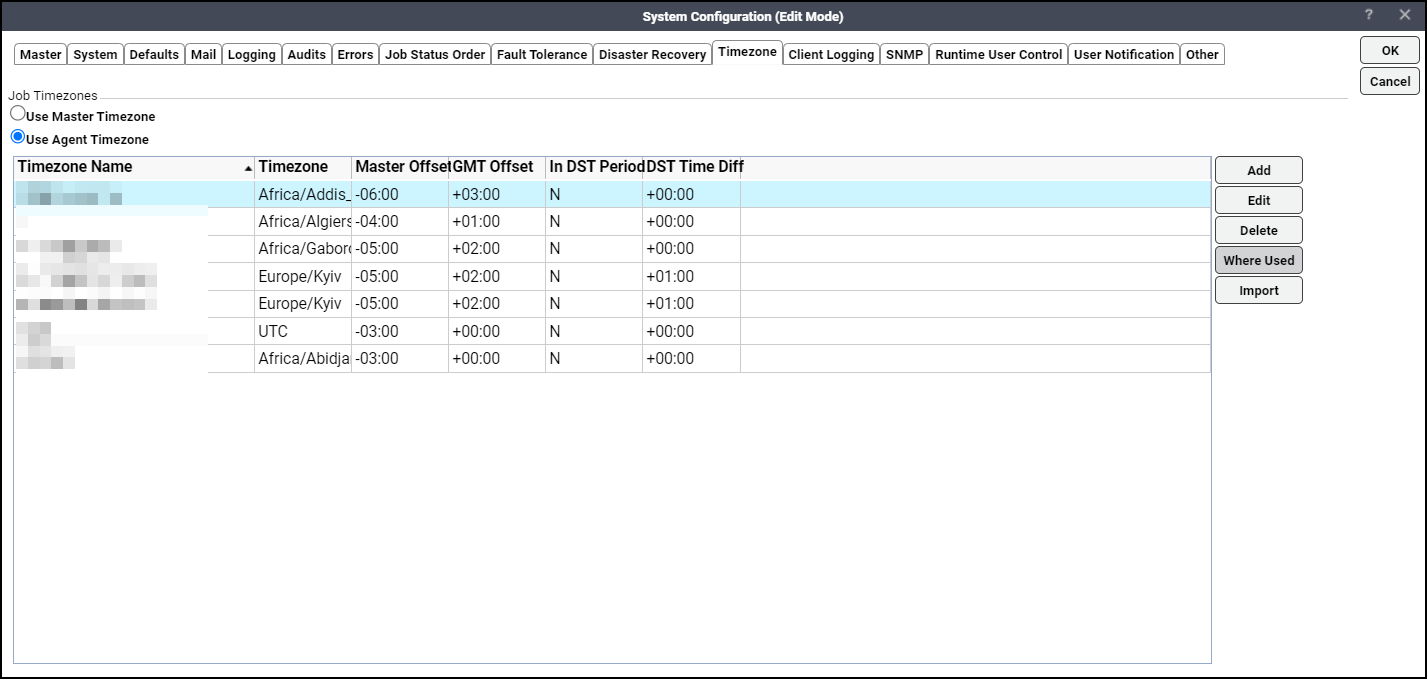
This tab contains these elements:
-
Use Master Timezone – Click this option so that TA assumes the time zone for the time specified during job scheduling to be in accordance with the Master machine’s time zone. Click this option if you want a job-based time zone.
-
Use Agent Timezone – Click this option so that TA assumes the time zone for the time specified during job scheduling to be in accordance with the agent machine’s timezone. For example, a job running simultaneously on agents based in different time zones is displayed on the Master with these time zones.
Note: Do not use the Use Agent Timezone option with the Production Day Offset option unless you thoroughly understand the scheduling complexities. When you use the Master time zone, the agents refer to the same time zone when launching jobs. However, when you use the agents’ time zone, each agent launches jobs based on its native time zone. Due to the differences in the Master and agent time zones, as per the agent, a 11 am job launches correctly, but as per the Master, the 11 am job may launch at noon, 1 pm, 2 pm, and so on.
Adding a production day offset to a system network spread across a vast geographic area with multiple time zones complicates scheduling. A production day offset may entail jobs to launch on different days from the Master. Contact the Tidal Support Center to troubleshoot complicated scheduling issues.
-
Job Timezones grid – This grid displays the new or modified time zone details.
Add – To add a new time zone, see Adding Time zones for Jobs.
Edit – To edit an existing time zone, select a time zone record from the Job Timezones grid, select Edit, and modify the details as required in the Timezone for Job Definition dialog.
Delete – Click a time zone record from the Job Timezones grid and select Delete to delete the selected record.
Where Used – Click the Job objects which use these time zones.
Import – Click this button to add multiple time zones simultaneously for jobs. For more information, see Importing Time zonesfor Jobs.
Adding Time zones for Jobs
You can add a new time zone or modify an existing time zone for jobs using the Timezone for Job Definition dialog.
To add a new time zone for jobs:
-
Choose Add from the System Configuration > Timezone tab to display the Timezone for Job Definition dialog.
-
Enter a unique name for the time zone in the Name field.
-
Click a time zone from the Timezone dropdown list.
These fields are populated based on the time zone you have selected from the Timezone field:
-
Timezone Full Name – Displays the long name for the Java built-in time zone.
-
Master Timezone Offset – Displays the time differences between the Master time zone and the selected Java time zone.
-
UTC/GMT Timezone Offset – Displays the time differences between the standard UTC/GMT time zone and the selected Java time zone.
-
Current in DST Timezone Period – This option is checked if current time falls in the Daylight Saving Time (DST) period for the selected time zone.
-
DST Time Differences – Displays the time duration to be added to the selected time zone if it falls in DST period.
-
Importing Time zones for Jobs
You can add only one time zone at a time using Add in the System Configuration > Timezone tab. You can also add multiple time zones simultaneously using the Import Timezone dialog.
To add multiple time zones for jobs:
-
Click Import from the System Configuration > Timezone tab to display the Import Timezone dialog.
-
Choose one of the actions:
-
Click all applicable time zones from the list of time zones.
-
Click the Select All option to choose all time zones displayed.
-
Use the Search Grid field to locate required time zones and choose from the time zones displayed.
-
-
Click on a selected timezone name and rename it, if required. Repeat this step until you have renamed the required time zones.
-
Click OK to display your selections in the Timezone tab > Job Timezones grid.
System Configuration – Client Logging Tab
The Client Logging tab allows to change the log levels of the various logs in the Client Manager from the user interface, without stopping or restarting the Client Manager.
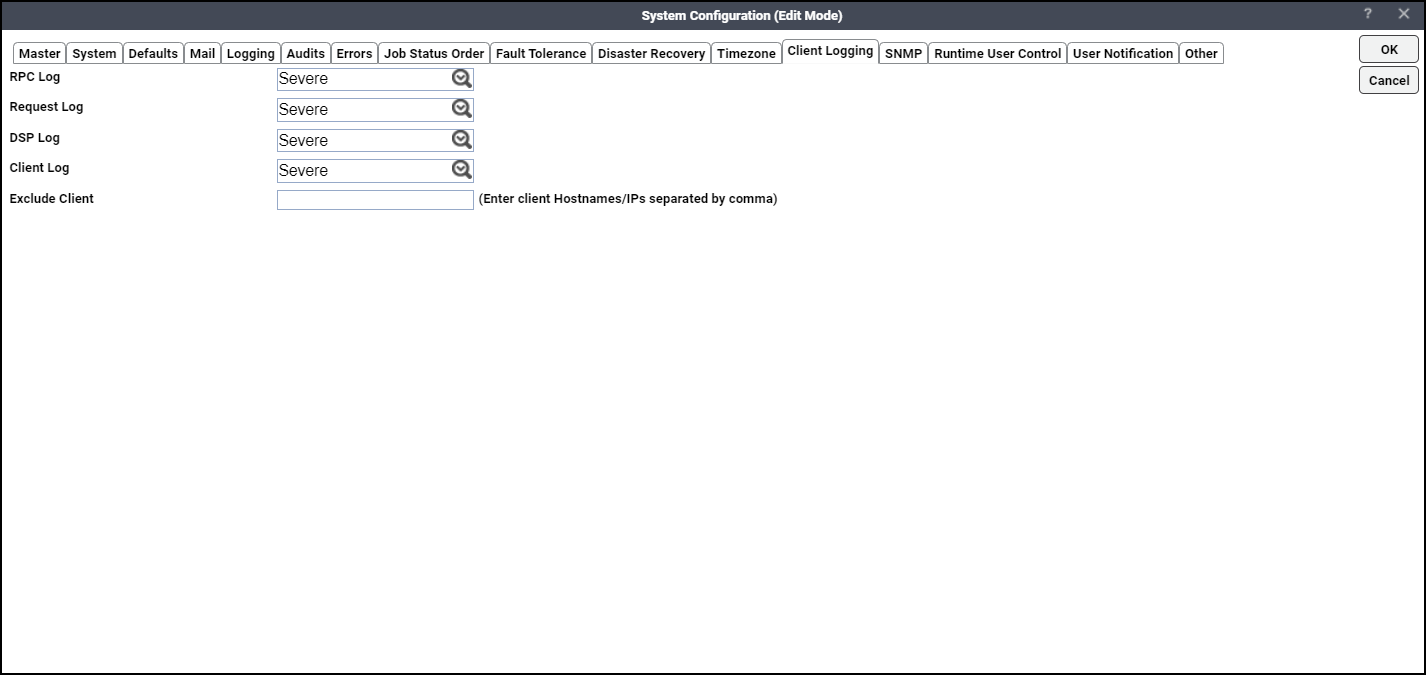
This tab contains these elements:
-
RPC Log – Communication between the Client Manager and Master.
-
Request Log – Relates to all requests of the DSP.
-
DSP Log – For the items related to the DSP module.
-
Client Log – Client related logging.
Each component has a drop-down list with seven levels of progressively more detailed logging. Each level includes the messages of the previous levels of logging. The levels of logging are:
-
None – No logging for the component.
-
Severe – Logs only serious problems for that component. (default level)
-
Warning – Logs potential problems for the component as well as messages from the Severe logging level.
-
Info – Logs status messages about the normal operation as well as messages from lower logging levels.
-
Low Debug – Logs important debugging messages as well as messages from lower logging levels.
-
Medium Debug – Logs an increasing amount of debugging information as well as messages from lower logging levels.
-
High Debug – Logs the largest amount of debugging information as well as messages from lower logging levels.
When multiple CMs are connected to a Master, you can specify the IP address or name of the CMs (with comma separated) whose logging levels need not be changed in the Exclude Client field.
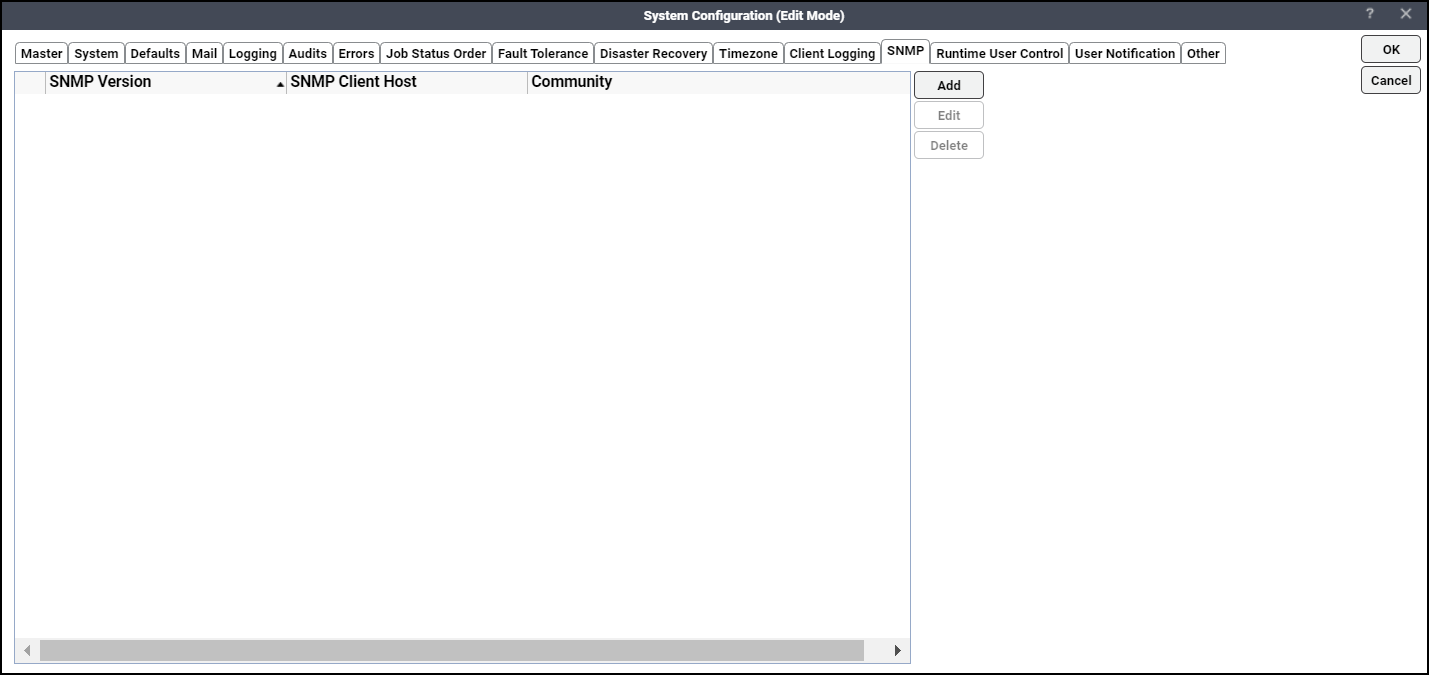
System Configuration – SNMP Tab
The SNMP tab allows you to configure multiple communities and hosts and use either SNMP V1 or SNMP V3. Click Add and enter the input fields to configure the SNMP trap receiver host.
-
SNMP Version – The version of SNMP, either V1 or V3.
-
SNMP Client Host – The host name or the IP address of the SNMP Manager or the host that receives the SNMP trap.
-
SNMP Trap Port – The port number on which the SNMP trap is received. SNMP defines the standard port 162 for receiving traps.
Community – The SNMP community that you want to send the SNMP trap to. This value is case-sensitive, so type the name exactly as it is defined.
-
Username – SNMP V3 user.
-
Security Level – Security Level for SNMP V3.
noauth, nopriv – no authentication and no privacy
auth, nopriv – only authentication and no privacy
auth, priv – both authentication and privacy
-
Authentication Protocol – Authentication protocol for SNMP V3.
-
Authentication Password – Authentication password for SNMP V3. It must be 8 or more characters long.
-
Privacy Protocol – Privacy protocol for SNMP V3.
-
Privacy Password – Privacy password for SNMP V3. It must be 8 or more characters long.
-
Engine ID – The unique ID that identifies the SNMP trap sender. It must be 5 to 32 characters long.
When a system event or a job event is triggered, based on the SNMP configuration, trap message will be sent to each one of the SNMP Client Hosts.
System Configuration – Vault Tab
TA supports integration of a third-party Password Vault with the TA Master to store runtime user credentials. When the Password Vault feature is enabled, the Vault tab is shown on the System Configuration dialog. By default, the Password Vault Configuration is in Read Only mode and does not allow any changes to runtime user credentials. In this case, the runtime user credentials can be imported from the Password Vault.
Set Runtime Users Mode to Write in the Password Vault Configuration to allow any changes to runtime user credentials in TA. The modified credentials are sent to the Password Vault, which in turn, are synchronized back to cached credentials in the TA Master.
The Vault tab shows the Password Vault configuration added to master.props file. The configuration details are read-only. For more information about the Password Vault configuration, see the Tidal Automation Installation Guide.
These configuration parameters are shown in the Vault tab:
-
Server – Indicates the server where the Password Vault is configured.
-
Runtime Users Mode – Indicates whether the runtime user credentials can be updated from the TA system or imported from the Password Vault.
If Runtime Users Mode is Read Only, you cannot add or edit runtime user credentials in the User Definition dialog for runtime users. Hence, you must import runtime user credentials from the Password Vault using the Import option. For more information about importing runtime user credentials from the Password Vault, see the “Import” option in Runtime UserDefinition – Passwords Tab.
If Runtime Users Mode is Write, you can add or edit runtime user credentials from the User Definition dialog for runtime users.
-
Store Tokens – Indicates whether the API tokens are stored in the Password Vault as well as in the TA database (if set to Y) or only in the TA database (if set to N).
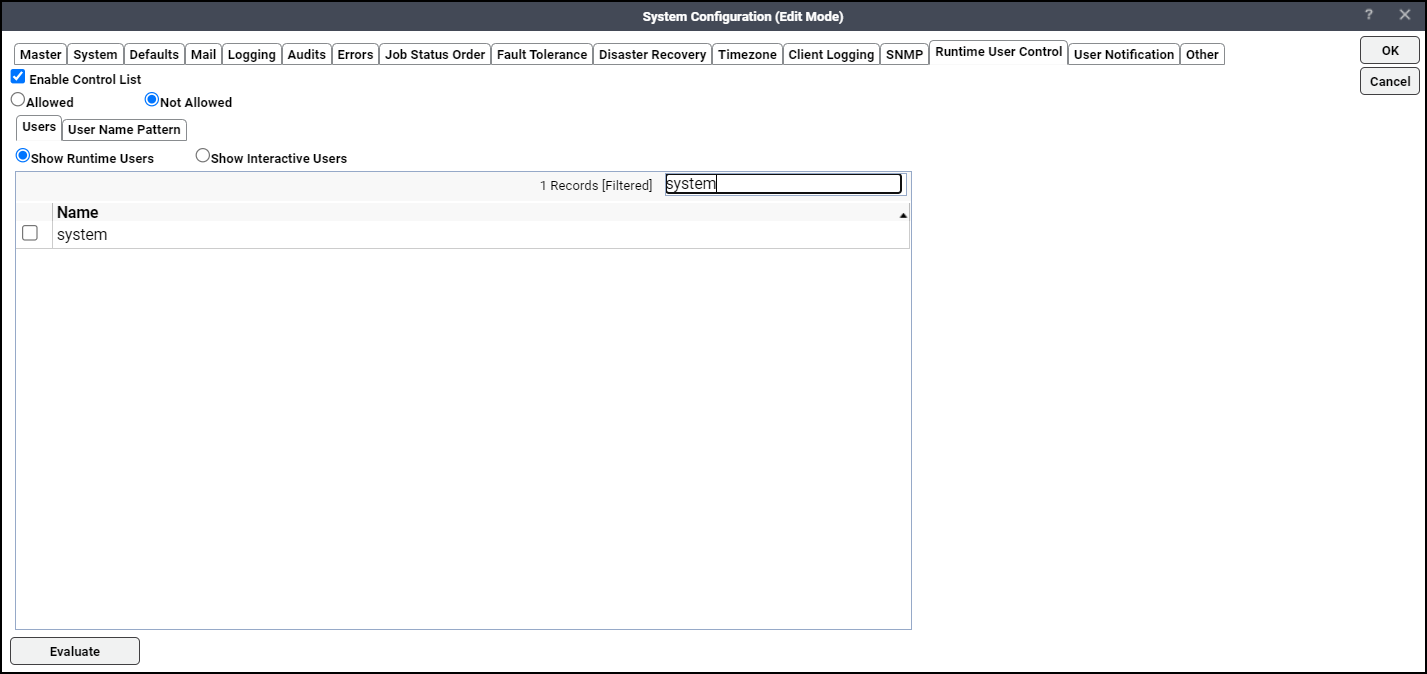
System Configuration – Runtime User Control Tab
The Runtime User Control tab provides the settings for allowing or disallowing runtime users to launch jobs. When the runtime user control list is enabled, a job is not allowed to change state from Waiting on Resource to Launched unless the runtime user used in the job is part of the allowed list of users.
This tab contains these elements:
-
Enable Control List – When this checkbox is checked, before a job is launched, the scheduler checks if the runtime user used in the job is configured as an allowed user in the Activities > System Configuration > Runtime User Control tab.
-
Allowed – This option is enabled only when the Enable Control List checkbox is checked. When this option is selected, only the list of users defined in this tab are allowed to launch jobs.
-
Not Allowed – This option is enabled only when the Enable Control List checkbox is checked. When this option is selected, only the list of users not defined in this tab are allowed to launch jobs.
Users Tab
The Users tab shows the list of runtime users or interactive users defined in the system.
This tab contains these elements:
-
Show Runtime Users – When selected, shows the list of runtime users defined in the system.
-
Show Interactive Users – When selected, shows the list of interactive users defined in the system.
Click the runtime users and interactive users to be added to the Allowed or Not allowed control list.
User Name Pattern Tab
The User Name Pattern tab allows to add, modify, delete, and clear user name patterns. A user name pattern can be defined using either a regular expression or a wildcard.
To add a user name pattern:
-
Click Add on the User Name Pattern tab.
-
Click the Type as Regular Expression or Wildcard.
-
Enter the User Name Pattern. One or more patterns separated by a comma can be defined for a username.
-
Click OK. The user name pattern is added to the grid on the User Name Pattern tab.
Evaluate button
Note: The Evaluate button is enabled only when the Enable Control List checkbox is checked.
-
Click Evaluate to open the Evaluate Runtime User Control dialog that displays all the users that are part of the runtime user control list.
Note: When the Include Users option is selected, only the users defined in the Runtime User Control list are displayed. When the Include User Name Pattern option is selected, only the users filtered based on user name patterns defined in the Runtime User Control list are displayed. These options are selected by default.
-
Click OK.
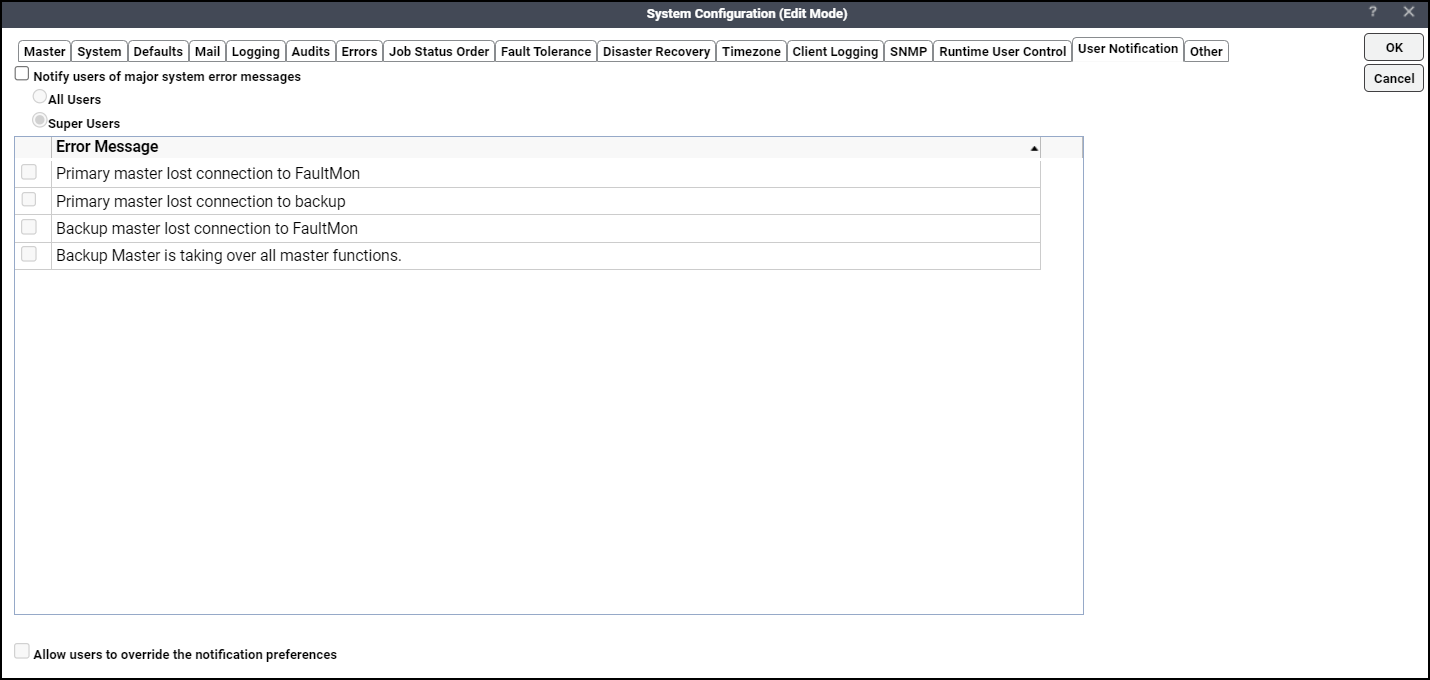
System Configuration – User Notification Tab
TA can notify users of major system error messages. When the errors occur, the major system error messages selected in this tab are displayed in the TA Web Client banner for a default duration of 30 seconds or until the TA Web Client is automatically refreshed. The error messages are also displayed in the Operations > Master Status > Messages tab. Users must have the security function View Master Status to view these error messages.
This tab contains these elements:
-
Notify users of major system error messages – Check this checkbox to enable the rest of the fields in the tab.
All Users – Indicates all TA users assigned with the Super User security policy or the View Master Status security function.
Super Users – Indicates users assigned with the Super User security policy.
-
A grid that displays error messages available for selection.
-
Allow users to override the notification preferences – Check this checkbox so that users can override the notification preferences in the Operations > Master Status > Preferences context menu > Notification Preferences dialog.
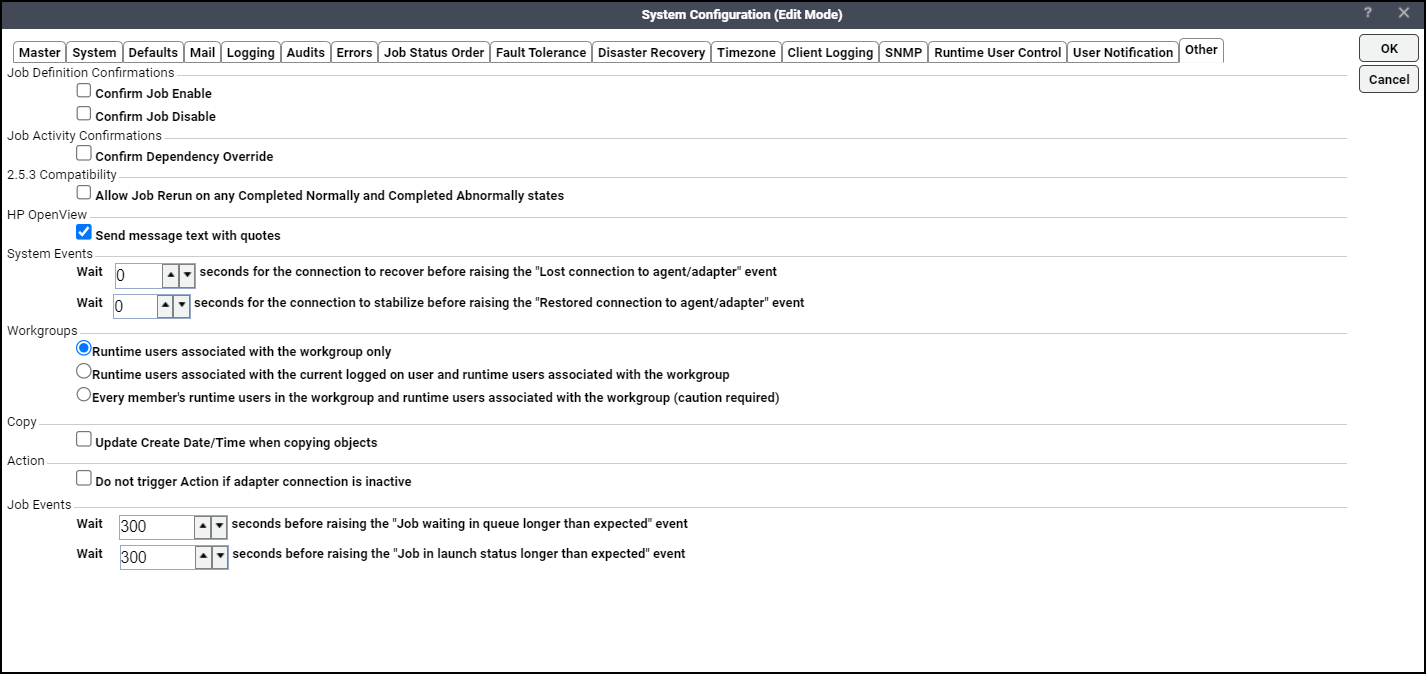
System Configuration – Other Tab
The Other tab provides the configuration related to any TA object and functionality.
This tab contains these elements:
-
Confirm Job Enable – Displays a confirmation alert whenever you try to enable a disabled job.
-
Confirm Job Disable – Displays a confirmation alert whenever you try to disable a selected job.
-
Confirm Dependency Override – Displays a confirmation alert when you try to override a job dependency using the Override on the Dependencies tab of the Job Details dialog. Alternatively, you can use Override on the Dependencies tab.Allow Job Rerun on any Completed Normally and Completed Abnormally states – Allow jobs to be rerun on when the job state is either Completed Normally or Completed Abnormally.
-
Send message text with quotes – When using HP OpenView, send all messages with quotes around the text.
-
Wait. seconds for the connection to recover before raising the “Lost connection to agent/adapter” event – Specified delay interval in seconds before the system event Lost connection to agent/adapter is triggered when the connection to an agent or adapter is lost. The default value is zero. The value ranges from 0 - 900 seconds.
-
Wait seconds for the connection to stabilize before raising the “Restored connection to agent/adapter” event – Specified delay interval in seconds before the system event Restored connection to agent or adapter is triggered when the connection to an agent or adapter is restored. The default value is a zero. The value ranges from 0 - 900 seconds.
-
Runtime users associated with the workgroup only – Allows only the runtime users associated with the workgroup to be available for jobs owned by the workgroup. This is the default option for a new workgroup.
-
Runtime users associated with the current logged on user and runtime users associated with the workgroup – Allows the runtime users associated with the current logged-on user along with the runtime users associated with the workgroup to be available for jobs owned by the workgroup.
-
Every member’s runtime users in the workgroup and runtime users associated with the workgroup (caution required) – Allows the runtime users associated with every member in the workgroup along with the runtime users associated with the workgroup to be available for jobs owned by the workgroup. Selecting this option allows a workgroup member to access the runtime users associated with other members in the same workgroup. So, please click this option cautiously.
-
Update Create Date/Time when copying objects – The table below denotes TA behavior whether or not you select this option, and which database fields and tables are affected.
User Action
TA Behavior
Affected Database Fields and Tables
If you select the Update Create Date/Time when copying objects option...
TA creates a copy of an object after updating the creation date/time to the current time in the copied object.
jobmst_crttime field in the jobmst table
tagmst_crttime field in the tagmst table
If you do not select the Update Create Date/Time when copying objects option...
TA creates a copy of an object without modifying the creation date/time in the copied object.
slamst_crttime field in the slamst table
slarule_crttime field in the slarule table
-
Do not trigger Action if adapter connection is inactive – Selecting this option triggers the TA Master, when an adapter connection is inactive, to dispose of any pending action that requires the adapter connection with the audit log message Unable to process event for inactive service. If you do not select this option and the adapter connection is inactive, the TA Master continuously checks to determine if the connection is active to complete pending actions.
-
Wait ... seconds before raising the "Job waiting in queue longer than expected" event – Specifies the maximum wait time before TA triggers the Job waiting in queue longer than expected event. The default value is 300 seconds. The value ranges from 1 – 99999 seconds.
To override this value, specify a custom time duration in the Options tab of the Job Event Definition dialog.
Note: If the Job waiting in queue longer than expected event is associated with jobs, make sure that you modify the maximum wait time in the Options tab only when the jobs are not waiting in the queue.
-
Wait ... seconds before raising the "Job in launch status longer than expected" event – Specifies the maximum wait time before TA triggers the Job in launch status longer than expected event. The default value is 300 seconds. The value ranges from 1– 99999 seconds.
To override this value, specify a custom time duration in the Options tab of the Job Event Definition dialog.
Note: If the Job in launch status longer than expected event is associated with jobs, make sure that you modify the maximum wait time in the Options tab only when the jobs are not in the Launched status.