Variables Interface
Click Definitions > Variables on the Navigation pane to display the Variables pane.
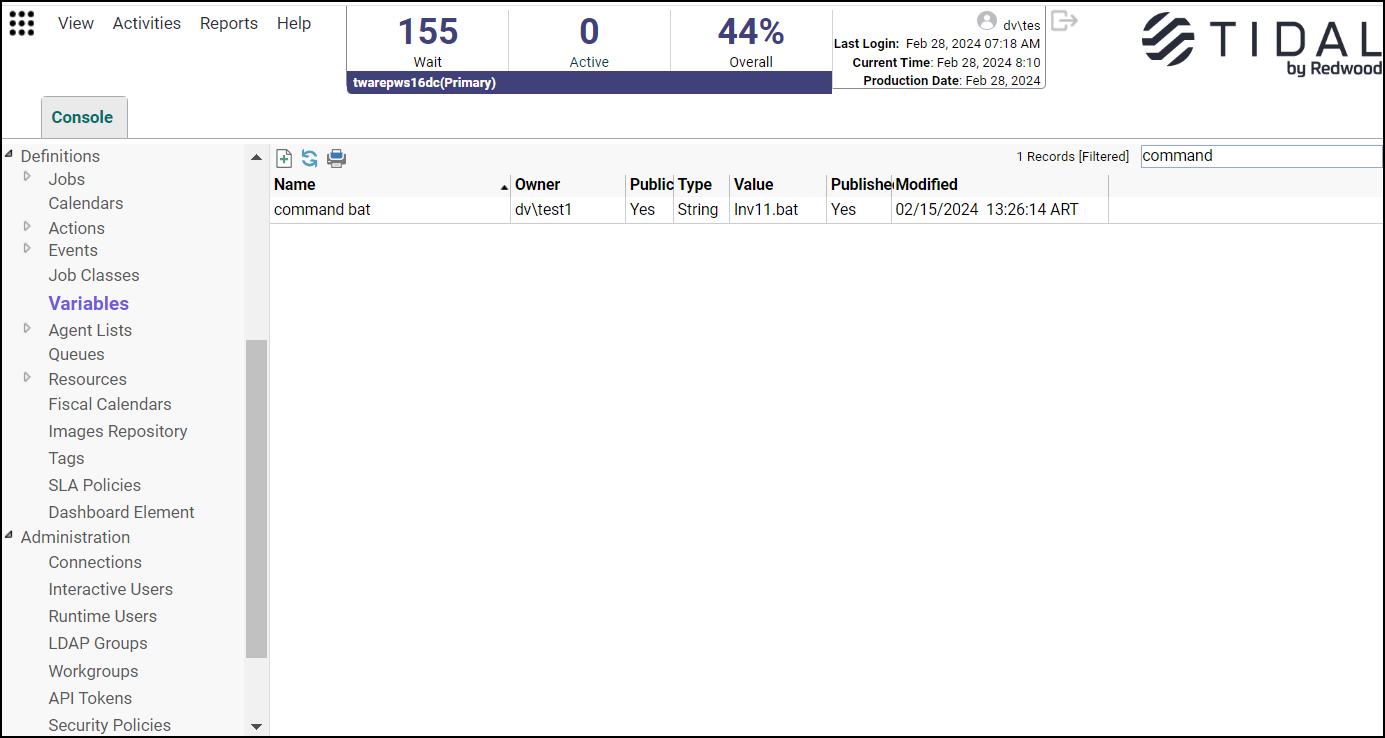
Buttons
The Variables interface contains these buttons:
-
Add Variable – Displays the Variable Definition dialog to add a variable.
-
Edit Variable – Displays the Variable Definition dialog to edit a variable.
-
Copy Variable – Creates a copy of the selected action with the same information as the selected variable, except for the name.
-
Delete Variable – Removes the variable definition from the TA database.
-
Refresh – Updates the data in the current pane.
-
Print – Displays the Reports pane to view and print your variable definitions. For more information, see Monitoring Production.
-
Where Used – Allows to view the objects to which the selected variable has been referred.
Search Field
Enter text that you want to search in this field.
The field at the top right of the grids will only search text columns that are not grayed out and are string-based.
Columns
The Variables interface contains these buttons:
-
Name – The name of the variable.
-
Owner – The owner of the variable.
-
Public – Specifies that the variable is public, that is, available to all TA users.
-
Type – The type of variable; whether String, Date, Number or Boolean.
-
Value – The value of the variable.
-
Published – Shows whether the variable is available for use with remote Masters.
-
Modified – The last time the variable definition was modified.
Variables Preferences Dialog
If you select Preferences from the View main menu while viewing the Variables pane, the Variables Preferences dialog appears.
From the Variables Preferences dialog, you can select which columns are displayed in the Variables pane and in what order they appear.
-
A checkmark to the left of a column title indicates that it displays in the pane. No checkmark indicates that it is not displayed.
-
To rearrange the order in which the columns are displayed, select the column and click the up or down arrow.
Navigation Context Menu
When you right-click in the Navigation pane while viewing the Variables pane, the Navigation context menu appears.
These describe the items in the Variables Navigation context menu:
-
Add Variable – Displays the Variable Definition dialog to add a new connection. Has the same function as the Add Variable button.
-
Preferences – Displays the Preferences dialog for the Variables pane.
-
Print – Displays the Reports pane to view and print your variables definitions. Has the same function as the Print button on the TA toolbar. For more information, see Monitoring Production.
-
Export – Saves the data in the current pane as an ASCII text file. You can then use the file data in other applications.
-
Refresh – Updates the data in the current pane.
Variables Pane Context Menu
When you right-click in the Variables pane, the Variables pane context menu appears.
The Variables pane context menu contains these options:
-
Add Variable – Displays the Variable Definition dialog to add a new variable.
-
Edit Variable – Displays the Variable Definition dialog to edit an existing variable.
-
Delete Variable – Deletes the selected variable.
-
Print – Displays the Reports pane to view and print your variables definitions. Has the same function as the Print button on the TA toolbar. For more information, see Monitoring Production.
-
Where Used – Allows to view the object to which the selected variable has been referred.
Variable Definition Dialog
The Variable Definition dialog displays when adding or editing a variable.
This dialog contains these elements:
Note: Name – The name of the variable that displays in the variable pane and in the variable selection context menus. The name of a variable cannot include these five characters: <, >, :, . or @.
-
Owner – The owner of the variable. By default, the creator of the variable is the owner.
-
ID – The variable’s identification number. The ID number is automatically appended to the variable name so that variables with the same name can be created between users and workgroups. You cannot edit the ID.
-
Type – The data type of the variable. You can choose from these types of data:
-
String – The value of the variable will be a text string consisting of no more than 4000 characters. Note that if you type a number when the STRING type is selected, the result will still be a string, not a numerical value.
-
Number – The value of the variable must be a number (base 10).
-
Date – The value of the variable will be a date string and must conform to the same format as set in the operating system that the Master is running.
-
Boolean – The variable uses Boolean logical operators to determine a true or false value.
-
-
Value – The value of the variable. Do not use quotation marks unless you want them to be a part of your text string (when the STRING type variable is selected). If Boolean was selected in the Type field, True or False are presented as the options in this field.
-
Calculated – This checkbox appears only if the Date option is selected in the Type field. Select this option to make the variable calculate a date based on a formula. Selecting this check box, makes the Value field unavailable since the value will be calculated and displays a Browse button at the end of the field. Clicking Browse displays the Date Calculation dialog.
-
Description – This is an empty text field for typing a description or notes about the variable.
-
Public – When selected, this option makes the variable available to all TA users on the Master. You can make this option default to either selected or cleared from the System Configuration dialog, Defaults tab.
-
Publish this variable to remote Masters – The variable is available for use by other Masters.
-
Read only – The defined variable is available to other Masters but the variable can not be modified. (This option is only available if the Publish this variable to remote Masters option was selected.)
Date Calculation Variable Dialog
If you wish to use a specific calendar date for the date value then simply enter the date in a specified format. The date format is defined on the Date tab of your computer’s Regional Options setting (Start>Settings>Control Panel>Regional Options).
If you wish to calculate a date, then you must configure the formula to be used in creating the date variable. You associate a date calculation with a variable from the Date Calculation dialog.
To display the Date Calculation dialog:
-
Click the Date option in the Type field of the Variable Definition dialog.
-
Click the Calculated option.
-
Click drill-down in the Value field to display the Date Calculation dialog.
The dialog contains these elements:
-
Calendar Start Section – The fields that are available in the Date Calculation dialog vary according to the option selected in the Starting with field in the Calendar Start section. Some fields are unavailable with certain options while other options display new fields.
-
Starting with – The starting point of the date calculation. All defined offsets are offset from this date. As soon as an option is selected from the drop-down list, the resulting date displays in parentheses to the right of the field.
The possible starting points of the date calculation and their definition are listed in the table:
Date Calculation Starting Points
Definition
System Date
The date displayed in the computer system. Usually this is the same as the current date.
Production Date
The date used when scheduling production schedules. This may differ from the current date if a production offset has been configured.
Job’s Actual Run Date
The date that the job actually runs. This may be different than the scheduled date due to production carryover.
Job’s Scheduled Date
The date assigned to a job to run.
Last Sunday
The Sunday that occurred before the current date.
Last Monday
The Monday that occurred before the current date.
Last Tuesday
The Tuesday that occurred before the current date.
Last Wednesday
The Wednesday that occurred before the current date.
Last Thursday
The Thursday that occurred before the current date.
Last Friday
The Friday that occurred before the current date.
Last Saturday
The Saturday that occurred before the current date.
Specific Date (m/d/yy)
A date is specified within a designated year.
Specific Date (m/d)
A date is specified within the current year.
Fiscal Month
The current month within a selected fiscal year.
Fiscal Week
The current week within a selected fiscal year.
Fiscal Quarter
The current quarter within a selected fiscal year.
Fiscal Year
The current year within a selected fiscal year.
Calendar Month
The current calendar month.
-
Using – This field displays only when the Specific Date options and the Fiscal period options are selected in the Starting with field. This field varies according to the option selected in the Starting with field.
Specific Date (m/d/yy) – Click the drop-down arrow to display the current monthly calendar tab. Click the desired date to select it. You can advance or roll back the calendar month by clicking the side arrows in the header bar. Alternately, you can click the month to display a list of the months to select from. You can also click the year and click the up or down arrow to advance or roll back the year.
Specific Date (m/d) – The Using field is split into two fields. The first field is a drop-down list of months. Once a month is selected, click the second field to select a day of the month. The current year is assumed.
Fiscal periods – Click the drop-down arrow in the Using field, to display a list of predefined fiscal calendars. This field displays only if one of these options is selected in the Starting with field: Fiscal Month, Fiscal Week, Fiscal Quarter and Fiscal Year.
-
Offset section – Date offsets are optional but you may require one or more offsets from the starting date to calculate the desired date. The offset units used when calculating dates in a variable vary from a specific number of days to fiscal periods and calendar periods. You select a unit of offset from the drop-down list of unit options and how many units to use.
-
Positive Offset – Select the positive offset (+).
-
Number of Offset Units – The number of the selected offset units to use. Type a number or use the arrow keys to increase or decrease the value. A zero offset value has special significance in date calculations.
-
+ 0 (Positive zero offset) – If the start date is the same as the selected offset unit then use that unit’s date or day. If the start date and the selected offset unit do not coincide than use the next occurrence of that unit.
Example: If the date offset is + 0 Sunday, and the start date falls on a Sunday then use that Sunday, but if the start date falls on a day other than Sunday use the next occurrence of Sunday. If the start date is March 10th, then because the start date falls on the same date as the date unit (Sunday), the calculated date is March 10th. If the start date was on a different day within the week, say on the 12th, then the calculated date would be March 17th.
-
-
Offset Units – Select from the drop-down list of unit options. These options range from specific days of the week to fiscal and calendar periods of time.
-
Calendar (Custom Calendar unit only) – This field only appears if the Custom Calendar option was selected in the Offset Units.
-
Fiscal (Fiscal periods only) – This field only appears if one of the fiscal units is selected (Fiscal Quarter, Fiscal Month, Fiscal Week and Fiscal Year). This field has a drop-down list of predefined fiscal calendars.
-
-
Calendar Offset – This column lists the defined calendar offset parameters.
-
Offset End – This column lists the calendar date derived from the defined calendar offset relative to the starting date if the variable were to be calculated now.
-
Add – Click this button to add the calendar offset parameters that are displayed to the list of calendar offsets.
-
Edit – Click a listed calendar offset to select it. Click Edit to display and, if desired, to modify the existing parameters.
-
Delete – Click this button to remove the selected calendar offset.
-
Test – Click this button to test the specified date offset. Clicking this button displays a calendar tab dialog. Click a date in the calendar month to apply the offset to that date and display the resulting calculated date. The Test button is unavailable if an offset date is not selected.
See Examples of Calendar Offsets to get an understanding of how calendar offsets work.
Examples of Calendar Offsets
A few examples may illustrate some important points about how calendar offsets work.
Fiscal calendar offsets key off the quarter breakdown and the starting date of the fiscal calendar used in the date calculation variable. A fiscal period is often independent of a calendar period. For example, assume that the fiscal calendar being used for a fiscal quarter offset is defined to start on a Monday, January 1st with a 4-4-5 quarter breakdown. If the starting date is February 2, 2001 and the calendar offset is “+ 1 Fiscal Quarter” then the calculated offset date is April 2, 2001. This is calculated from the starting point of January 1st and counting 13 weeks (4-4-5).
Using the same fiscal calendar parameters as the preceding example, for a fiscal month with a starting date of February 2, 2002 and a “+ 1 Fiscal Month” offset calculates an offset date of February 26, 2002. It seems odd that the next fiscal month begins in the same month but the fiscal calendar is counting months according to the designated quarter breakdown and not according to the calendar month. Counting from the start of the fiscal quarter (January 1, 2002), a 4-4-5 quarter breakdown means that the months of the first fiscal quarter start on 1/1, 1/29 and 2/26 respectively. The fourth fiscal month (and second fiscal quarter) begins on 4/2.
You can also use multiple offsets. Each listed calendar offset uses the date calculated from the preceding offset to build upon when calculating its result.
In the multiple calendar offsets in the example, there are three calendar offsets used to arrive at the date offset.
-
The first offset, + 1 “full month,” adds a calendar month to the current date (4/30/02) giving a date of 5/30/02.
-
The second offset, – 0 “Monday,” moves the calculated date to the previous Monday unless the calculated date already falls on a Monday, giving a date of 5/27/02.
-
The third offset, + 0 “Custom Calendar–Workdays,” advances the calculated date by one day by using a custom calendar that defines the workdays for a company. The calculated date from the previous offset, 5/27/02, does not fall on a workday according to the custom calendar because 5/27/02 is Memorial Day, a holiday. This offset ensures that the calculated date is a workday.
A table of more calendar offset examples is provided for the user to study how calendar offsets work.
|
Calendar Offset |
Definition |
|---|---|
|
Add 0 “Monday” |
The next Monday following the Starting with date. If today is a Monday, then today’s date is returned. |
|
Add 1 “Monday” |
Always the next Monday following the Starting with date. |
|
Subtract 1 “Monday” |
Go back to the Monday previous to the Starting with date. |
|
Add 2 “Monday” |
Move ahead two Mondays from the Starting with date. |
|
Add 2 “Days” |
Move ahead two days from the Starting with date. |
|
Add 1 “Week” |
Move ahead one week following the Starting with date. |
|
Add 1 “Month” |
One month following the Starting with date. |
|
Subtract 2 “Month” |
Go back two months previous to the Starting with date. |
|
Add 1 “Calendar Week” |
A calendar week begins on Sunday so this offset goes to the next Sunday from the Starting with date. |
|
Add 1 “Fiscal Quarter” Fiscal |
The beginning of the next fiscal quarter following the Starting with date. This varies according to the way the fiscal calendar being used is defined. The quarters are calculated according to when the fiscal year starts. |
|
Add 1 “Fiscal Week” |
The beginning of the next fiscal week following the Starting with date. This varies according to the way the fiscal calendar being used is defined. The weeks are calculated according to when the fiscal year started. |
|
Add 1 “Calendar Month” |
The beginning of the next calendar month following the Starting with date. |
Variables Button Context Menu
The Variables button context menu displays when you click Variables in the Job, Job Group or Action Definition dialogs.
When selecting a variable for a command parameter, the Variable Search dialog displays when there are too many variables to list in a context menu.
You can scroll down the list of variables and make a selection or you can start typing in the name of the variable to display the variables that match your entry.
Click OK.
System Variables on the Context Menu
These describe the System Variables available from the Variables button context menu.
This context menu contains these options:
-
System Date – The date on the TA Master. You can select from a list of predefined date formats, or construct your own format using the Date Format Selection dialog. For more information about using the Date Format Selection dialog, see Date Format Selection Dialog.
-
System Time – The time according to the TA Master when the variable is replaced with a value. You can select from a list of predefined system time formats. For more information about time formats, see Time Format Submenu.
-
System Name – The name of the TA Master.
-
User Name – The account under which the TA Master is running. If it is not running under a specific account, but as part of the system, the value of this variable will be SYSTEM.
-
Production Date – The current production date for the Master. This is the same as the System Date, unless you are running a schedule from a day other than the current day. You can select from a list of predefined date formats, or construct your own format using the Date Format Selection dialog. For more information about using the Date Format Selection dialog, see Date Format Selection Dialog.
-
Queue Name – The name of the queue that triggered the system event.
-
Queue Limit – The job limit of the queue that triggered the system event.
-
Connection Name – The name of the connection relevant to the variable. If you are defining a job, the connection name variable relates to the agent that will run the job. If you are defining an interMaster dependency, the connection name variable refers to the connection to the remote Master.
-
Agent Limit – The job limit on the agent that triggered the system event.
-
Remote Master Name – The name of the remote Master that triggered the system event.
SLA Variables on the Context Menu
The Variables button context menu contains these SLA variables:
-
Policy Name – The name of the system-wide SLA Policy.
-
Rule Name – The name of the SLA Rule defined under a system-wide SLA Policy.
-
Owner – The owner of the SLA Policy.
-
Timezone – The time zone where the application environments are based.
-
Breach From Time – The start time of an SLA breach time window. You can select from a list of predefined system time formats. For more information about time formats, see Time Format Submenu.
-
Breach Until Time – The end time of an SLA breach time window. You can select from a list of predefined system time formats. For more information about time formats, see Time Format Submenu.
-
Risk From Time – The start time of an SLA at-risk time window. You can select from a list of predefined system time formats. For more information about time formats, see Time Format Submenu.
-
Risk Until Time – The end time of an SLA at-risk time window. You can select from a list of predefined system time formats. For more information about time formats, see Time Format Submenu.
-
Start Time – The time that the SLA window started. You can select from a list of predefined system time formats. For more information about time formats, see Time Format Submenu.
-
End Time – The end time of an SLA window. You can select from a list of predefined system time formats. For more information about time formats, see Time Format Submenu.
Job Variables on the Context Menu
The Variables button context menu contains these Job variables:
-
Job Rule ID – The identification number for the job. The job rule ID may be shared by numerous job instances that were created from the same job. Compare to Job Instance ID.
-
Job Name – The name of the job as defined in the Job Definition dialog.
-
Job Parent – The parent job group that the job belongs to (if any).
-
Job Owner – The owner of the job. The owner can be a user name or a workgroup name.
-
Job Command – The command that the job executes.
-
Agent Name – The name of the agent that the job runs on. If the job has an agent list, it is the name of the agent in the agent list to which the job was assigned.
-
Estimated Runtime – The estimated time that it takes for the command executable to run. If the job has run more than once, this value is a historical average of its actual duration. The time is expressed in minutes in decimal format. This means that a job that runs for one minute and 15 seconds is shown as 1.25.
-
Earliest Start Time – The beginning of the job’s time window. You can select from a list of predefined system time formats. For more information about time formats, see Time Format Submenu.
-
Latest Finish Time – The end of the job’s time window added to its estimated duration. You can select from a list of predefined system time formats. For more information about time formats, see Time Format Submenu.
-
Owner’s Phone Number – The job owner’s phone number, as defined in the owner’s user definition.
-
Owner’s Pager Number – The job owner’s pager number, as defined in the owner’s user definition.
-
Job Alias – The alias of the job.
-
Job Class – The job class that the job belongs to.
-
Is Critical – Indicates whether the job is critical or not (YN).
-
SLA Risk From Time – The start time of an SLA at-risk time window. You can select from a list of predefined system time formats. For more information about time formats, see Time Format Submenu.
-
SLA Risk Until Time – The end time of an SLA at-risk time window. You can select from a list of predefined system time formats. For more information about time formats, see Time Format Submenu.
-
SLA Breach From Time – The start time of an SLA breach time window. You can select from a list of predefined system time formats. For more information about time formats, see Time Format Submenu.
-
SLA Breach Until Time – The end time of an SLA breach time window. You can select from a list of predefined system time formats. For more information about time formats, see Time Format Submenu.
Jobrun Variables on the Context Menu
The Variables button context menu contains these Jobrun variables:
-
Job Run ID – The number that identifies the individual job instance. A job may run numerous times and each time the job runs, it has a different job instance ID compared to the Job Rule ID.
-
Job Status – The status of the job.
-
Exit Code – The exit code of the job when it completed.
-
External ID – The job’s ID number on the agent platform. For example, the external ID for a jobrun on a Unix agent would be the Unix process ID. The external ID for an SAP job would be the job’s unique SAP instance number.
-
Runtime User – The user name under which the job is running.
-
Job Output – The output from the job that triggered the job event, up to 1024 characters. If this variable is used in a Windows log message, it is limited to 255 characters. This variable does not apply to system events.
-
Scheduled Date – The date on which the job is scheduled to run. You can select from a list of predefined date formats, or construct your own format using the Date Format Selection dialog. For more information about using the Date Format Selection dialog, see Date Format Selection Dialog.
-
Actual Runtime – The length of time that the job ran or has been (if still active) running. The time is expressed in minutes in decimal format. This means that a job that runs for one minute and 15 seconds is shown as 1.25.
-
Start Time – The time that the job entered Active status. You can select from a list of predefined system time formats. For more information about time formats, see Time Format Submenu.
-
Finish Time – The time that the job completed. You can select from a list of predefined system time formats. For more information about time formats, see Time Format Submenu.
-
Waiting on Resources Time – The length of time that the job waited on resources.
-
Duration – The actual duration (in minutes and seconds) of the jobrun.
-
Estimated Duration – The estimated duration of the jobrun.
-
Error Message – For jobs that complete abnormally, the error message currently associated with the job.
-
Queue Name – The queue in which the job ran.
-
FTP Statistics – Select from four options that offer details about the FTP operation.
-
# of Files – Details the number of files FTP’ed.
-
# of Bytes – Details the size of the file (in bytes) that was FTP’ed.
-
# Skipped – Details the number of files within a designated directory that were not FTP’ed.
-
Duration (Seconds) – Details how long (in seconds) that it took to perform the FTP operation.
-
Reruns – The rerun count for the current job, the parent job, and the dependent job namely <JobReruns>, <JobReruns..p>, and <JobReruns..<dependent job id>>, where the <dependent job id> indicates the ID of the dependent job.
Example: In <JobReruns..2>, ‘2’ is the dependent job ID.
-
Is Critical – Indicates whether a job is critical or not (Y/N).
-
On Critical Path – Indicates whether a job is on the critical path of any other downstream job (Y/N).
-
SLA Risk From Time – The start time of an SLA at-risk time window. You can select from a list of predefined system time formats. For more information about time formats, see Time Format Submenu.
-
SLA Risk Until Time – The end time of an SLA at-risk time window. You can select from a list of predefined system time formats. For more information about time formats, see Time Format Submenu.
-
SLA Breach From Time – The start time of an SLA breach time window. You can select from a list of predefined system time formats. For more information about time formats, see Time Format Submenu.
-
SLA Breach Until Time – The end time of an SLA breach time window. You can select from a list of predefined system time formats. For more information about time formats, see Time Format Submenu.
Event Variables on the Context Menu
Job event variables are only available when you are composing a message in the message field of an action.
The Variables button context menu contains these Event variables:
-
Event Name – The name of the job event that triggered the action.
-
Event Owner – The owner of the job event that triggered the action.
-
Action Name – The name of the action triggered by the job event.
-
Action Owner – The owner of the action triggered by the job event.
User Variables on the Context Menu
If you are the owner (by default, the creator) of any variables, this menu selection (replaced with your user name) appears. The submenu lists all your user variables.
Workgroup Variables on the Context Menu
If you or the workgroup to which you belong own any variables, this menu selection will appear. The submenu lists all the variables owned by that workgroup.
Public Variables on the Context Menu
The menu item appears if there are any public variables. Any variable can be made a public variable by selecting the Public option in its definition.
Date Format Selection Dialog
The Date Format Selection dialog displays when you choose to change the format of a date variable that was selected from a Variables button context menu. You could be in a Job, Job Group or Action Definition dialog.
The dialog contains these elements:
-
Date Format – The date format to be applied to a date variable. The drop-down menu shows a list of predefined date formats. You can choose from this list or create a custom format. The drop-down menu offers six common date formats:
ddd (Abbreviated day of the week) – Use this date format for abbreviated days only. The first letter (of three) is capitalized. For example: Mon, Tue, Wed, and so on.
dddd (Day of week) – Use this date format for days only. The first letter is capitalized. For example: Monday, Tuesday, and so on.
dddd, mmmm dd, yyyy – The long date format. Use this format to exclude any abbreviations. For example: Friday, October 6, 2006.
mmmm dd, yyyy – Letterhead date format. For example: October 6, 2006.
dddd, dd mmmm, yyyy – An alternative long date format. Use this format to exclude any abbreviations. For example: Friday, 6 October, 2006.
dd mmmm, yyyy – An alternative letterhead date format. For example: 06 October, 2006.
-
Sample – An example of the format you selected, using the current date.
-
Custom Format section – Use this section to define your own date format:
-
Order – Arranges the order of the day, month, and year in the date format as follows:
Month, Day, Year – For example: October 6, 2006 Day,
Month, Year – For example: 6 October 2006
Year, Month, Day – For example: 2006 October 6
Year, Day, Month – For example: 2006 6 October
-
Separator – The character to use to separate your format into year, month and day. You can have only one separator character. The default is a forward slash /.
-
Month/Qtr – Select this option to include the month or quarter in your custom date format. The default is selected.
-
Day – Select this option to include the day in your custom date format. The default is selected.
-
Year – Select this option to include the year in your custom date format. The default is selected.
-
Month, Day and Year drop-down menus – Selects the format for each of the date elements.
-
Fiscal Calendar (For Fiscal Month, Quarter or Year) – If a fiscal format was selected in either the Month/Qtr or Year fields then select a predefined fiscal calendar from this drop-down list.
-
Apply – Click this button to display the custom date format in the Date Format field, and show an example using the current date in the Sample field.
-
Time Format Submenu
The time formats available from the Time Format submenu use these conventions:
|
Format |
Description |
Example |
|---|---|---|
|
HH.mm.ss z |
Military time showing hours, minutes, and seconds along with the timezone. |
19.22.36 CET |
|
hh.mm.ss z |
Standard time showing hours, minutes, and seconds along with the timezone. |
7.23.35 CET |
|
HH,mm,ss z |
Military time showing hours, minutes, and seconds along with the timezone. |
19,24,49 CET |
|
hh,mm,ss z |
Standard time showing hours, minutes, and seconds along with the timezone. |
7,25,57 CET |
|
HH-mm-ss z |
Military time showing hours, minutes, and seconds along with the timezone. |
19-26-48 CET |
|
hh-mm-ss z |
Standard time showing hours, minutes, and seconds along with the timezone. |
7-27-23 CET |
|
HH mm ss z |
Military time showing hours, minutes, and seconds along with the timezone. |
19 28 13 CET |
|
hh mm ss z |
Standard time showing hours, minutes, and seconds along with the timezone. |
7 28 55 CET |
|
HH.mm.ss |
Military time showing hours, minutes, and seconds. |
19.29.32 |
|
hh.mm.ss |
Standard time showing hours, minutes, and seconds using ante meridiem (AM) or post meridiem (PM). |
7.46.01 PM |
|
HH,mm,ss |
Military time showing hours, minutes, and seconds. |
19,46,38 |
|
hh,mm,ss |
Standard time showing hours, minutes, and seconds using ante meridiem (AM) or post meridiem (PM). |
7,47,02 AM |
|
HH-mm-ss |
Military time showing hours, minutes, and seconds. |
19-48-02 |
|
hh-mm-ss |
Standard time showing hours, minutes, and seconds using ante meridiem (AM) or post meridiem (PM). |
7-48-31 PM |
|
HH mm ss |
Military time showing hours, minutes, and seconds. |
19 49 20 |
|
hh mm ss |
Standard time showing hours, minutes, and seconds using ante meridiem (AM) or post meridiem (PM). |
7 49 59 AM |
Date Format Conventions
Date formats use these conventions:
|
Format |
Description |
Example |
|---|---|---|
|
d |
Date |
1, 2, ..., 31 |
|
dd |
Date with leading ‘0’, if applicable |
01, 02, …, 31 |
|
ddd |
Abbreviated day |
Mon, Tue, …, Sun |
|
dddd |
Long day |
Monday, Tuesday, …, Sunday |
|
j |
Julian date |
9, 41, 121, ..., 365 |
|
jjj |
Julian date with leading ’0,’ if applicable |
009, 041, 121, ..., 365 |
|
m |
Numerical month |
1, 2, …, 12 |
|
mm |
Numerical month w\ leading ‘0’, if app. |
01, 02, …, 12 |
|
mmm |
Abbreviated month |
Jan, Feb, …, De |
|
mmmm |
Long month |
January, February, …, December |
|
yy |
Abbreviated year |
99, 00, …, 02 |
|
yyyy |
Full year |
1999, 2000, …, 2006 |
|
fm |
Fiscal Month |
1, 2, ..., 12 |
|
fmm |
Fiscal month w/leading ’0,’ if app. |
01, 02, ..., 12 |
|
q |
Calendar quarter |
1, 2, 3, 4 |
|
fq |
Fiscal Quarter |
1, 2, 3, 4 |
|
fyy |
Abbreviated fiscal year |
99, 00, ..., 02 |
|
fyyy |
Full fiscal year |
1999, 2000, ..., 2006 |