Connections
A connection is a link to a Tidal Automation Web client environment. A TA environment with multiple instances requires that multiple connections be defined to reach all instances within the environment.
There are two types of connections supported in Tidal Repository: cached and live.
A cached connection stores data in the TR database, while a live connection uses data directly from the TA Client Manager.
As your connection data is creating or refreshing, you can cancel this process. In this case, only those entity types (for example, Jobs, Calendars) that have already been modified before you click Abort are changed. Note that those entity types that have not been modified are not changed.
Example: If you click Abort during a Calendar refresh, Jobs are updated since they have already been refreshed; however, the Calendars are not updated. The connection has an Aborted status.
To cancel either creating or refreshing the connection process for the cached connection type, click Abort for the applicable connection on the Connection tab and confirm your action.
Note: Selecting the Abort button cancels the refresh of the connection so that the Refresh, Edit, and Delete buttons are functional. It is enabled only if the connection has either Refreshing or Creating status.
To refresh connection data for the cached connection type, click Refresh for the applicable connection on the Connections tab.
While a live connection shows cache data dynamically in real time, note that this can affect application performance if the Client Manager stores a large quantity of data. A cached connection, on the other hand, has no issue with application performance (as data is stored locally), although data must be refreshed regularly in order to work with recent data.
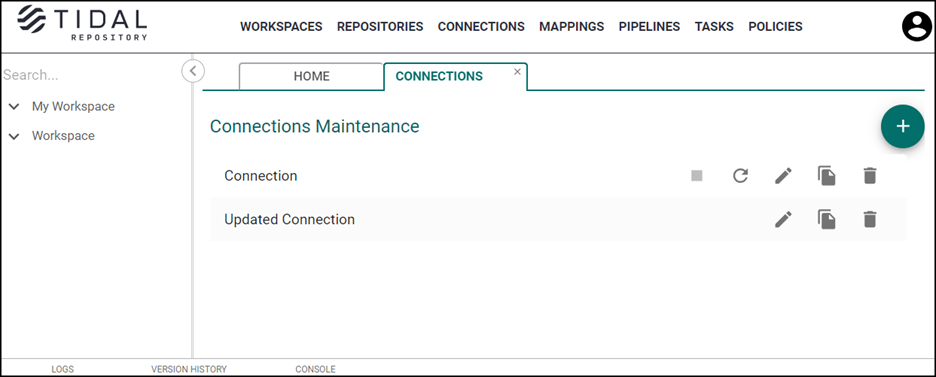
Connections Listing
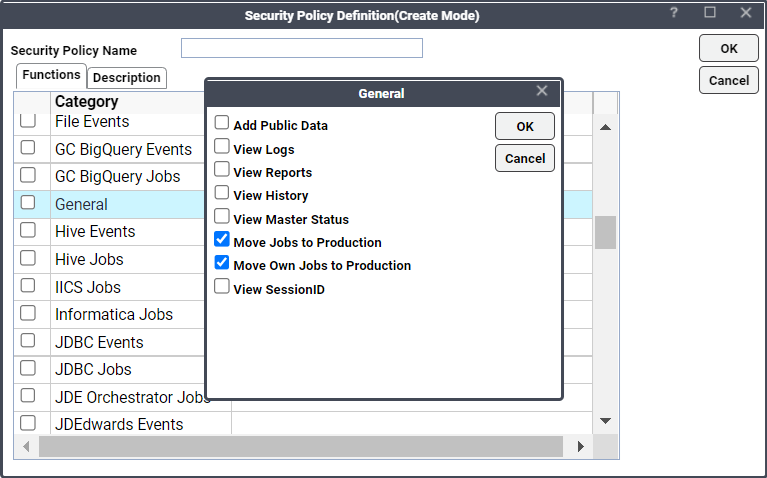
Note: To successfully create a connection, you must have a Tidal Automation security policy that contains the Move Jobs to Production and Move Own Jobs to Production permissions. To check the permissions via Administration > Security Policy > Functions > General. A check mark must appear in the Move Jobs to Production and Move Own Jobs to Production checkboxes.
To display connection listings on the Connections tab:
-
Click Connections on the Main menu.
-
Click a connection to display information on the connection’s creation date, most recent time of connection refresh, status (ready or refreshing), type (cached or live), and description information, if available.
Update Cache
To update cache:
-
Click Refresh Cache on the Connections tab for a connection’s cache data to be updated.
-
For a cached connection, data collected from the Client Manager is placed into the Tidal Repository database. The connection’s status changes to Refreshing.
For a live connection, data is taken directly from the TA Client Manager.
Note: Not all the objects are displayed on the View Pipeline and View Connection tabs while the connection cache is being updated. To view all objects, wait until the process completes.
Once the cache data is updated, the connection’s status changes to Ready.
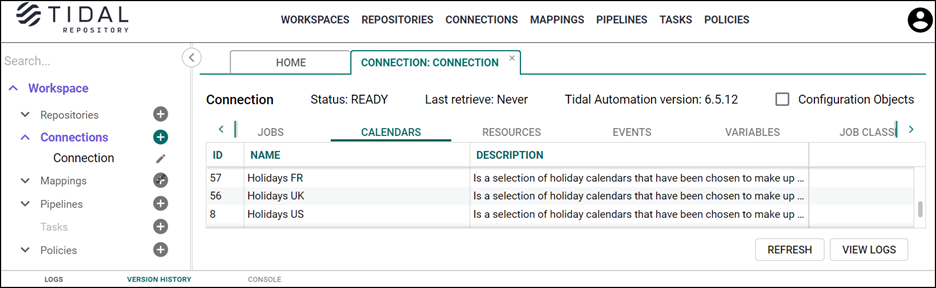
Viewing a Connection
To view the connection:
-
Expand a Workspsace in the Workspaces pane and its connections to display a connections list.
-
Click a connection to open its tab.
-
Check the Configuration Objects checkbox to view Tidal Automation Administration objects. Tidal Repository supports Authorization Policies, Security Policies, and Shared Owner Policies. See the Tidal Automation User Guide for more information.
Viewing Logs for a Specific Connection
Logs can provide insight into what changes have been made, when, and by whom.
On the Connection tab, click View Logs at the bottom of the screen to access the logs information.
Adding a Connection
To add the connection:
-
Click Connections in the Main menu.
-
Click Plus on the Connections tab.
-
Enter information into the these fields on the Add Connection tab:
Name (required) – A connection name (any alphanumeric characters to identify your connection).
Connection Type (required) – This toggle switch provides two options from which to select:
-
Live – The system refreshes a connection’s cache dynamically using data directly from the TA Client Manager.
-
Cached – The system refreshes a connection’s cache using data from the TR database.
Description (optional) – Information that identifies your connection.
Refresh interval in minutes (for cached connection type only) – The frequency of time (in minutes) that a cache is refreshed. Leave this field blank if you manually refresh the cache; otherwise, indicate the applicable value: minimum 20 – meaning that every 20 minutes, the Tidal Repository database is updated with connection data.
Client Manager URL (required) – A TA environment URL where the Client Manager is located (in the format ServerName = ‘host.port/attribute/attribute2’).
Login (required) – The username you enter to log in to a TA environment.
Password (required) – The corresponding password you enter to log in to the environment.
Policies – The policies you choose to be applied to the connection. You can specify either Must be met or May be met. See Policies to find out more.
Click Test Connection to validate a connection prior to saving it. The Test Connection ensures that the Client Manager URL, login, password, and TA user permissions are valid.
Token toggle selected. Verifies a request via the unique access token. Be aware that CM is configured to work with the tokens. You need to specify the valid bind details in cm.props:
For the AD users:
ActiveDirectory.AuthenticationMethod=simple
ActiveDirectory.BindUser=dv\\tes
ActiveDirectory.BindPassword=<VALID PASSWORD>
For the LDAP users:
LDAP.AuthenticationMethod=simple
LDAP.BindUser=<VALID USER>
LDAP.BindPassword=<VALID PASSWORD>
Note: The password should be in the encrypted format. You can encrypt it using the script located under CM->script directory/open cmd prompt from the script directory, run the below command to add bind password: cm.cmd setbindpwd "password". Avoid using quotation marks (") in the passwords, and remember to enclose the password itself in double quotes ("your password").
Plugin ID (required)– The TA API version you want to access to (in the format tes-6.5). You can find it via Tidal Automation > Help > API docs > URL.
Credentials toggle selected – Allows users to verify a request via the login and password.
Login (required) – The username you enter to sign in to the TA environment.
Password (required) – The password you enter to log in to the environment.
The Transactional/Block toggle allows exceeding the Client Manager limits on movement:
Transactional toggle selected – Movement is performed in a single iteration
Block toggle selected – Movement is performed in a number of successive iterations; you must indicate block size in KB (minimum value is 100).
Note: For the operation to be executed correctly, the block size value must be smaller than or equal to the Client Manager's movement limit for the operation to be executed correctly. Therefore, check the movement limit set in the Client Manager to prevent exceeding it. The movement limit is set by the org.eclipse.jetty.server. Request.maxFormContentSize property in TA 6.5.x is clientmgr.props file.
Choose a connection owner consisting of a designated user (non-LDAP or LDAP) or workgroup. Note that LDAP groups cannot own objects.
Indicate whether the connection is shared (access is limited to users you designate) or public (all users can view the connection and pull from it).
If you click Share, the connection can be shared with any users, workgroups, and LDAP groups that you designate.
If you click Public, the connection is shared with all Tidal Repository users in Read and Pull modes.
For the Shared connection, choose whom to share with from the Share With dropdown. -
-
Click Save to add the connection
Editing a Connection
Note: Connection editing is available only via the Main menu.
To edit the connection:
-
Click Connections on the Main menu to open its tab.
-
Click Edit on the Connections tab for the connection you’d like to change.
-
Make your changes on the Edit Connection tab and click Save to apply them.
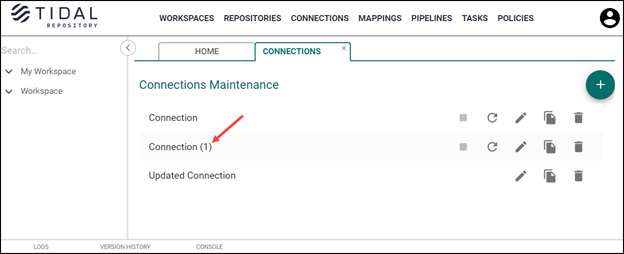
Copying a Connection
Note: Make sure to clear the cache before using the copy functionality.
To copy the connection:
Note: You must have the permission to edit a connection. If you have view-only permissions, the Copy button next to the connection will be disabled.
-
Click Connections on the Main menu.
-
Click Copy on the Connections tab for the connection that you want to copy.
-
Click Accept on the Copy dialog to confirm your action.
Once you copied the connection, it appears in the list on the Connection tab, so you can modify it.
Note: The user who initiates the Copy process is now the owner of the copied connection.
Deleting a Connection
Note: Deleting a connection is available only via Main menu.
To delete the connection:
-
Click Connections on Main menu.
-
Click Delete on the Connections tab for the connection you’d like to remove.
-
Click Accept in the Remove dialog to confirm your action.
Note: In case a connection with the Refreshing or Creating statuses belongs to no workspace, pipeline, or task, the user is able to remove it by selecting Delete and confirming the action.
If a connection with a status of Refreshing or Creating belongs to a workspace, pipeline or task, a message displays containing instructions for successful deletion.